
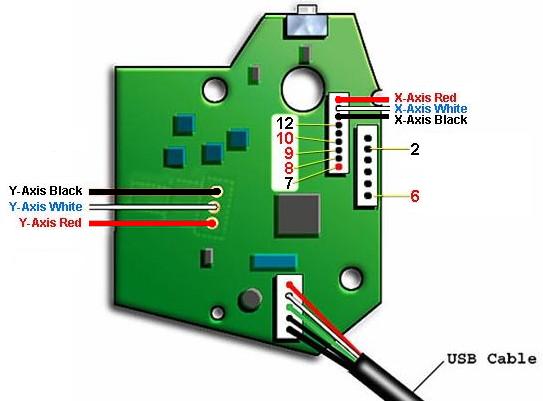
Once again I need to thank 1UP for his Dual Strike Hack. I created the same hack except I mapped additional buttons to run my 2 top fire joysticks. I mounted the main Dual Strike board to a small piece of Lexan and added a 12 terminal strip. The Dual Strike functions similarly to a keyboard matrix so it only takes 12 terminals to run my yoke and the 2 top fires. Connections 2,6,8,9,10 & 12 provide me with 12 buttons for the 2 top fires and the yoke triggers. The 5 remaining connections run the x & y axis of my yoke. The Atari yoke XY axis red wires are connected together because they are both grounds.
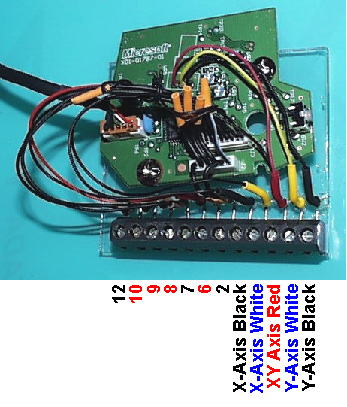
Here is a picture from 1UP’s Site that I modified to show the additional button mapping. Connections 6,8,9 and 10 require a 1N4148 diode at each microswitch to prevent masking.
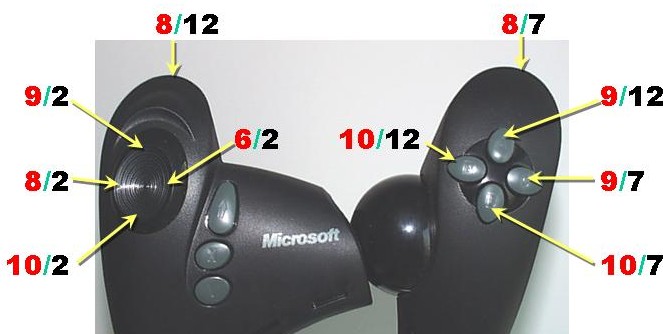
Here is a diagram of how the buttons map to the Dual Strike. I found these mapping through a web search, but unfortunately I lost the site and can’t give the guy credit. In case anyone needs 2 more buttons the button marked X is mapped to 6 & 7 and the button marked Y is mapped to 6 & 12. There is no matrix combo for the button with the up arrow. Instead it appears that the up arrow button is wired directly to a microprocessor chip pin and takes the pin to ground when pressed. The solder point TP20 on the board is a good way to hook up the up arrow button. If I ever replace my yoke grips with the thumb switch version I will probably use these 2 extra buttons. Currently, the yoke triggers and top fire buttons share the same connections because they are on different sides of my tri-panel and never would be used at the same time. The Dual Strike software is excellent. Once I changed the mode from FX to joystick and made a slight adjustment to the y-axis dead zone, everything worked like a charm.
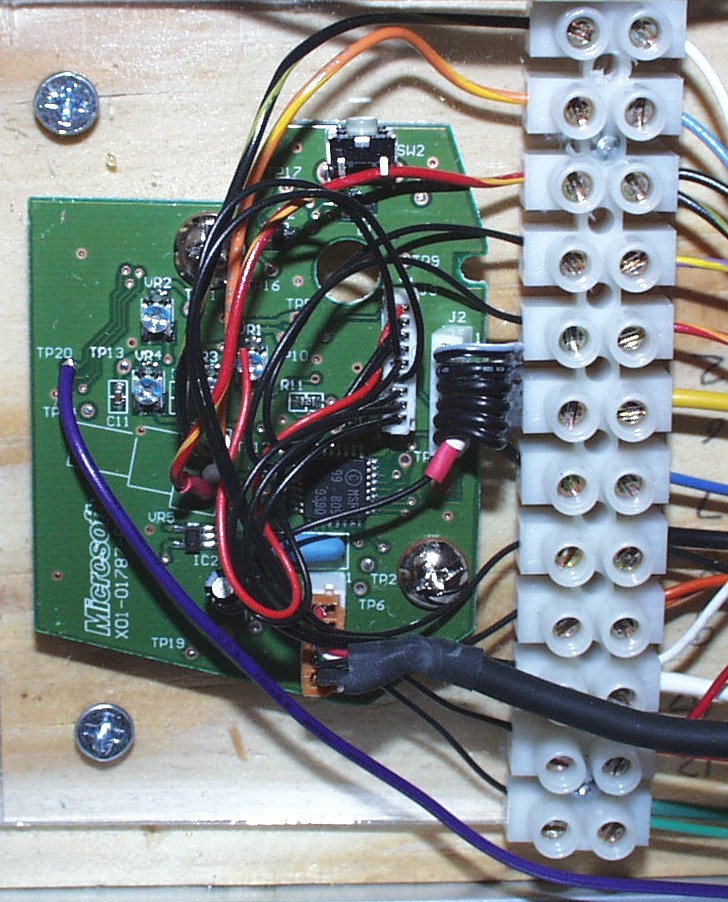
Here is a close up of another hack I built for my Aluminum Flight CP. For this project, I could only use 1 of the hat buttons, because they do not function like normal buttons. The hat buttons report a degrees to the computer in 45 degree increments. This works well for a regular joystick, because the stick operates the same as a hat. This will not work for buttons because you can press button combinations that do not translate to a degrees. For example, pressing the top hat and right hat at the same time is OK because it sends 45 degrees. However, pressing the top hat and the bottom hat at the same time violates the hat range. In other words, only adjacent hat buttons can be pressed at the same time. Therefore, I had to solder a wire to the board at TP20 to gain access to the up arrow button. This button then can be ground to the XY axis red wire which is also the ground for the board.
People have pointed out that my mapping combinations are different from the ones on 1UP’s site. This is true, but they still work very well.