
I’ve been having some issues with the AC in my server room. I figured this would be a good excuse to try out the Raspberry Pi. I’ve been working with AVR microcontrollers for a long time and they are very powerful and inexpensive. However, it has always been a pain to implement networking which is a breeze on the Pi. Using WebIOPi, I easily created a web-based temperature monitoring system with just a small amount of HTML and Python code.
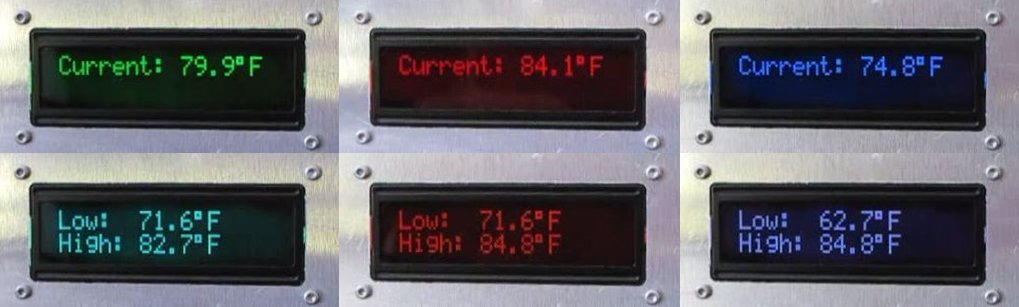
In addition to a web interface, the project has a 16×2 LCD display with a negative RGB backlight. Using pulse width modulation (PWM) the text color of the LCD display will change to highlight temperature fluctuations. Green is good, red is too hot and blue is too cold.
I couldn’t find the exact datasheet for this display. The closest one I found shows a minimum Vdd of 4.5 V. However, I’m running the LCD display at 3.3 V because I tested it and found no issues. The contrast is just right at this voltage, it is simpler to interface and there is no chance of accidentally putting 5 V into a GPIO pin which could damage the Pi. Still, other modules could have reliability issues at 3.3 V. At 5 V, make sure you use transistors to control the PWM and variable resistor to lower the contrast.
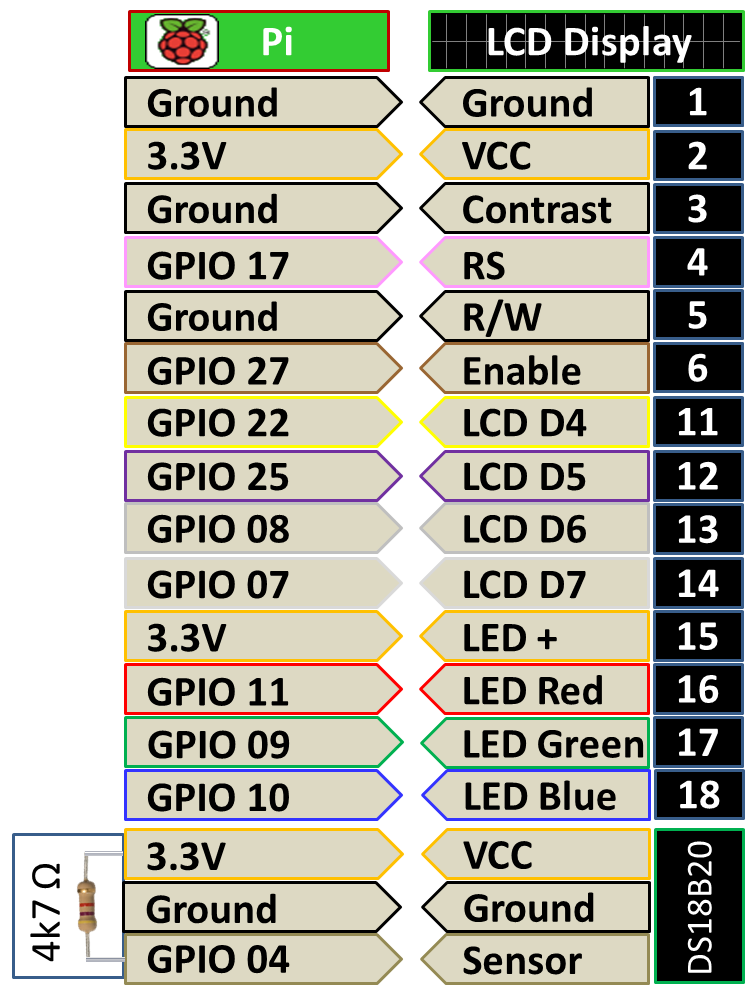
I’m using a DS18B20 one wire temperature sensor. WebIOPi has native support for this sensor so I only had to uncomment 1 line in the config file to get it up and running. The DS18B20 runs at 3 – 5.5 V so it is easily powered from the Pi. Only 1 external 4.7 kΩ resistor is required between the data line and Vdd.

 There’s a patch if you want to use WebIOPi with a Raspberry Pi B+, 2 or 3.
wget http://sourceforge.net/projects/webiopi/files/WebIOPi-0.7.1.tar.gz
tar xvzf WebIOPi-0.7.1.tar.gz
cd WebIOPi-0.7.1
wget https://raw.githubusercontent.com/doublebind/raspi/master/webiopi-pi2bplus.patch
patch -p1 -i webiopi-pi2bplus.patch
sudo ./setup.sh
Nano can be used to edit the WebIOPi config file. Under Scripts the myscript location must be specified. Under HTTP specify the doc-root and welcome-file. Under Devices uncomment DS18B20.
sudo nano /etc/webiopi/config
Use sudo to run the WebIOPi program and tack C to specify the config file location.
sudo webiopi -c /etc/webiopi/config
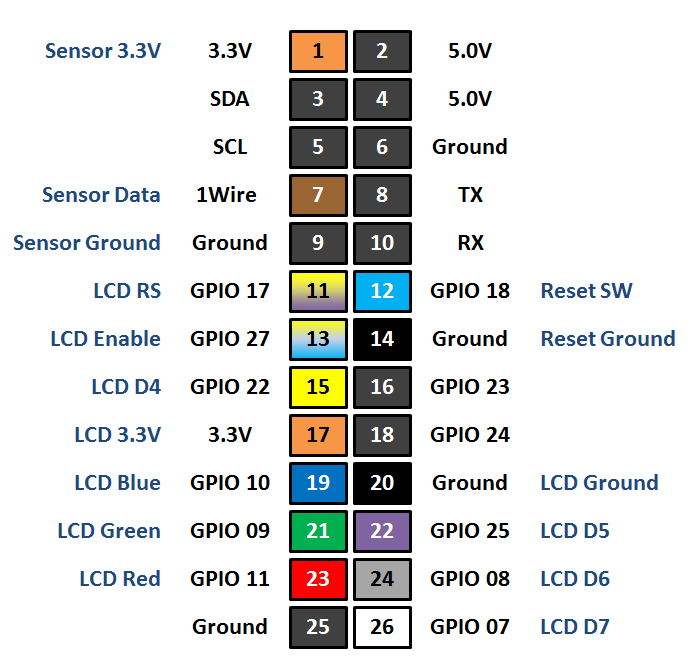
I’m using the following GPIO pins on the Pi. Since I’m running the LCD display and the sensor at 3.3 V there are no other components needed except for 1 resistor for the DS18B20.
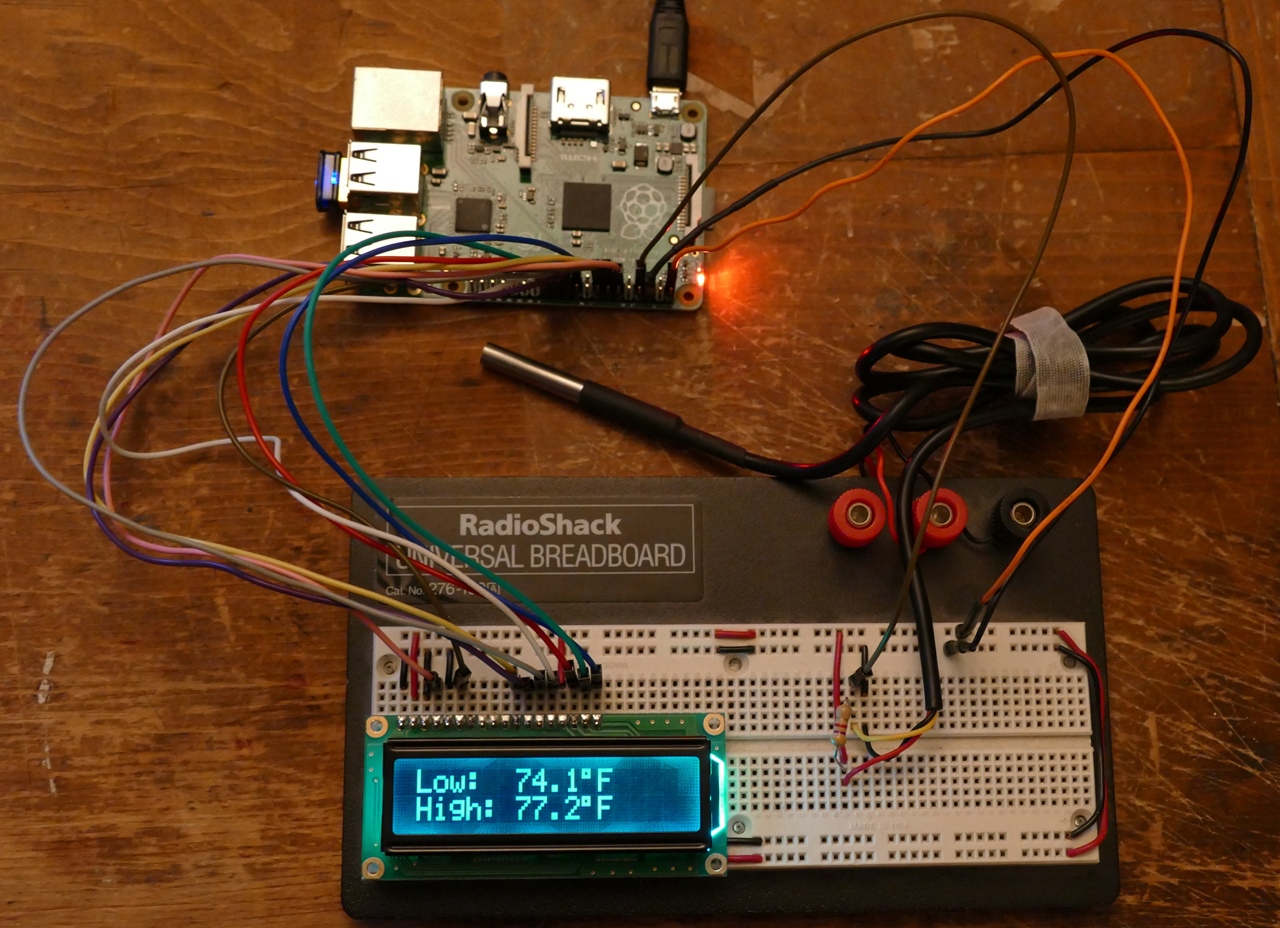
Here is my test breadboard with a Raspberry Pi connected to an RGB LCD Display and a DS18B20. The only software required to get this test up and running was WebIOPi by Trouch and lcd.py which came from Raspberry Pi Spy.
I mounted the Pi in an aluminum rack mount project case. The button on the front of the case resets the temperature high/low range. The front panel is removable which makes it much easier to cut and drill.
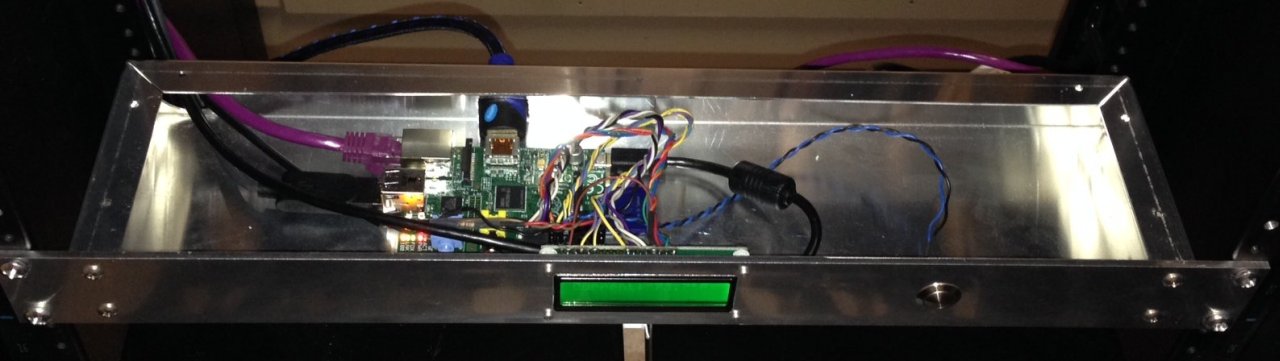
I used my Romaxx HS1 to cut out the front panel for the 16×2 LCD Display. The V-carve and g-code is available below.


WebIOPi serves a web page and provides custom controls to interact with the GPIO pins and control custom python scripts. I created a simple page that displays the current temperature in my server room. I also added button to get the temperature and high/low range, a button to reset the high/low range and a button that lights up when the reset switch on the front of the case is pressed.
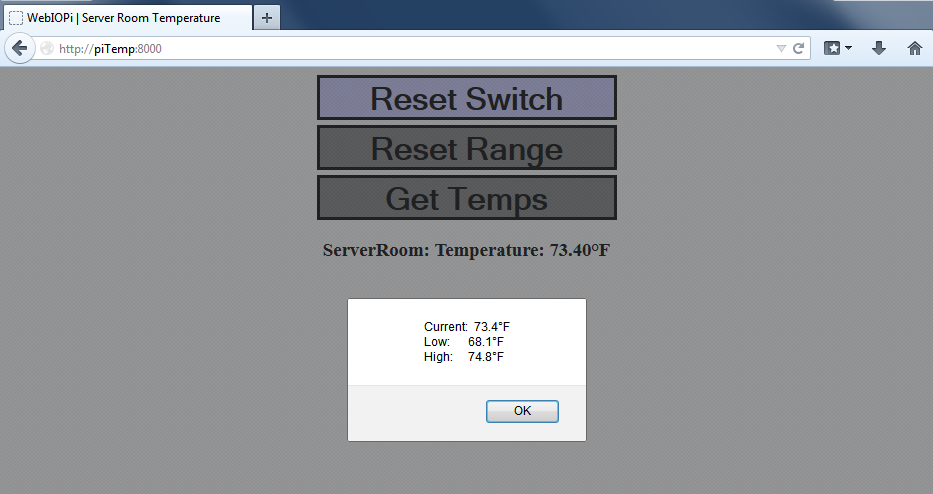
I looked at several Python solutions for email notification, but all the ones I found involved storing clear text passwords in code which I think is a very bad practice with respect to security. Implementing a secure solution from scratch using salting and a modern hash algorithm seemed like too much trouble. Therefore I decided to leverage existing infrastructure on my network. I had initially omitted my solution because I didn’t think it would be applicable to most users, but I received several requests for my code so I decided to make a quick video outlining my approach. The video shows 2 methods. The first uses a Syslog server and is relatively easy. The second is more advanced. I created a WCF web service on an IIS SMTP server in my office. I then use a Python module called Suds which is a lightweight SOAP client for consuming web services. This allows my Pi to send email notifications if there is possible AC failure in my server room and it does not require any stored passwords on the server or client. The web service only allows emails to my domain and there is no need for SMTP relay because the service is hosted on the same server. The web service also stores my temperature logs to a SQL Server Express database and provides data for a bar chart on my WebIOPi webpage.
Downloads:
HTML and Python code v.1.01 – 09/24/2013 (UTF Encoding Fixed)
HTML and Python code v.1.10 – 04/19/2014 (Added logging, notification & bar chart)
VCarve Pro aluminum enclosure cut out file and G-code – 09/24/2013
Please note that in order to subsidize my site, I’m an Amazon affiliate. If you click the Amazon links below and buy the item, I will get a commission. I have personally bought all the linked items below for this project from Amazon. I also recommend you check out Adafruit, because some of the items might be cheaper. I have no affiliation with Adafruit. Another way to support my site is to subscribe to my YouTube channel.
Parts List:
The newer w1thermsensor library can also be used for polling the DS18b20 temperature sensor. The library can easily be installed using pip.
sudo pip3 install w1thermsensor
Here’s sample code to display temperature readings in Celsius and Fahrenheit.
from time import sleep
from w1thermsensor import W1ThermSensor as W1

sensor = W1()

try:
    while True:
        temps = sensor.get_temperatures([W1.DEGREES_F, W1.DEGREES_C])
        print('{0:.1f}°F - {1:.1f}°C'.format(*temps))
        sleep(1)
except KeyboardInterrupt:
    print ("\nCtrl-C pressed.  Exiting...")