
In this project, I use MicroPython and an ESP32 to create a very inexpensive wireless device with a color touch screen to test passwords against a REST API designed to let people know if their online accounts have been hacked.
This project was inspired by a video entitled “Have you been Pwned?” by a great YouTube channel called Computerphile. In the video, Dr. Mike Pound creates a Python program to securely check if passwords have been leaked by hackers.
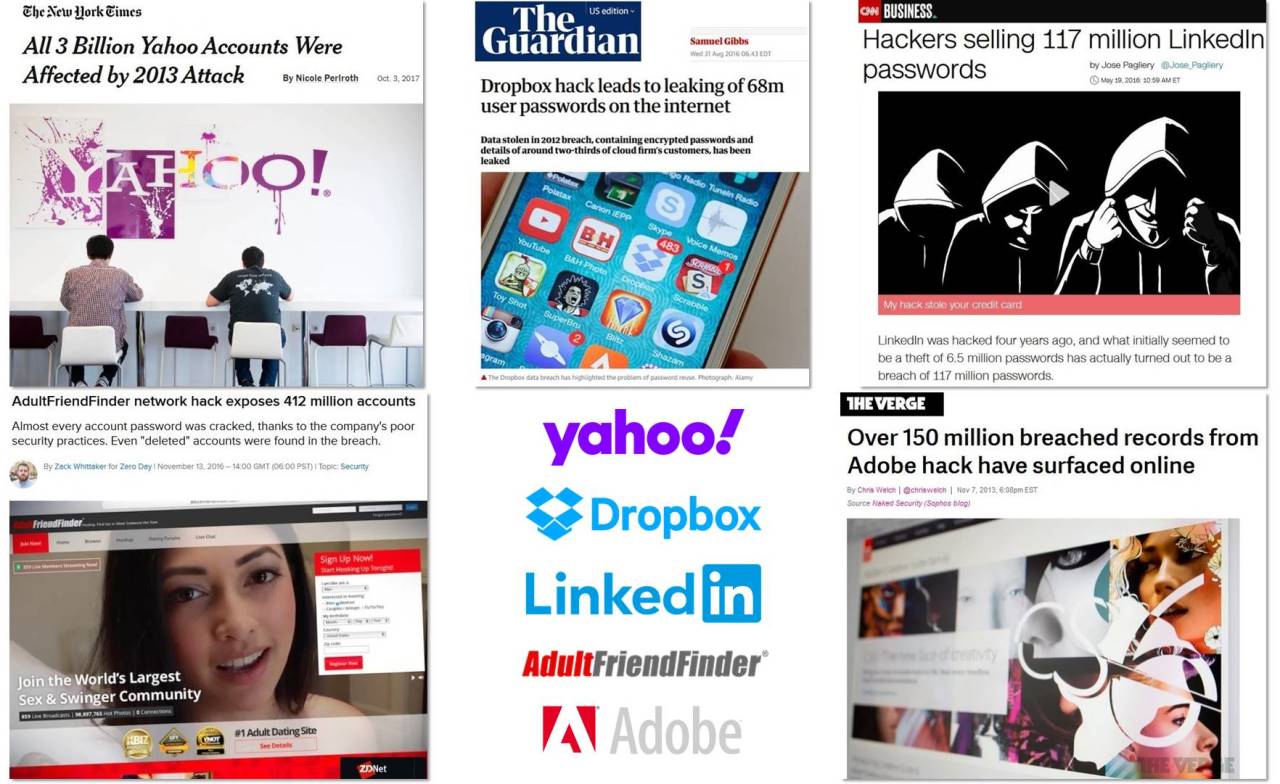
Many big companies have been compromised. Yahoo, DropBox, LinkedIn, Adult Friend Finder, Adobe are just a drop in the bucket of rampant security breaches.
Besides credit cards and personal data, user passwords are a valuable plunder because many people irresponsibly reuse passwords which puts all their other accounts at risk. This type of attack is known as credential stuffing and is a very lucrative criminal endeavor. Additionally, many people aren’t very original when picking a password. Hackers leak the stolen passwords and they end up in password dictionaries. For more information on password best practices and pitfalls, I recommend you check out the Computerphile YouTube channel.
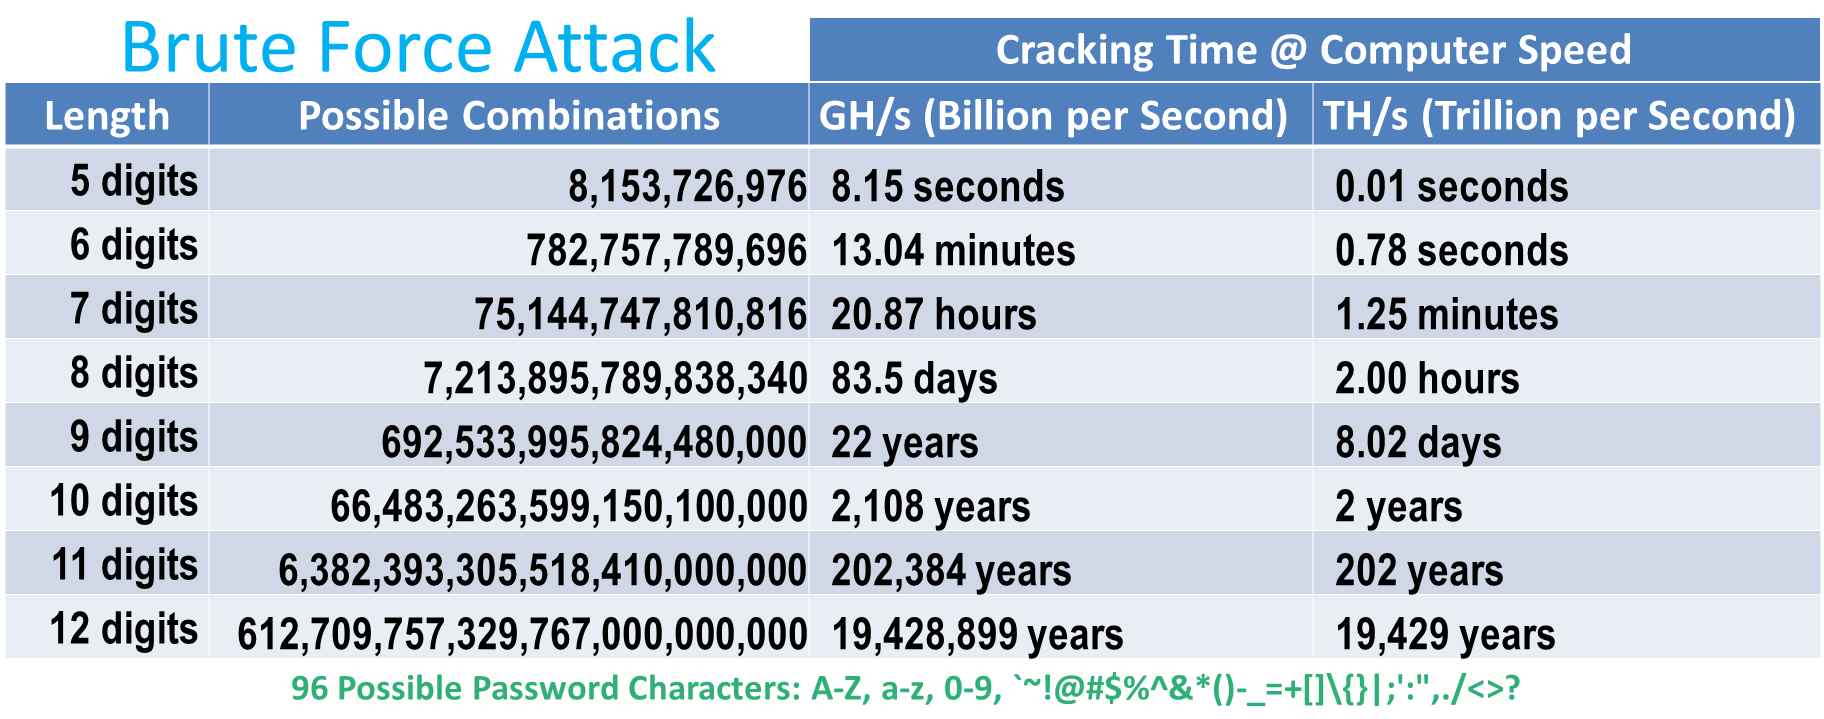
It can be very time consuming to brute force complex passwords. I’m hesitant to quote current password cracking speeds because it can be a bit misleading, and as the technology for gaming, cryptocurrency and deep learning get better, the hardware for password cracking also gets better. Amazon AWS now rents high end GPU cores at a very reasonable hourly rate. These can get a password cracking program such as Hashcat into the GH/s range depending on the hash. Assuming a strong password with 96 possible characters it could take years to guess depending on the password length, entropy and processor speed because there are so many possible combinations.
On the hand, looping through a dictionary of 500 million passwords can take seconds. And as more user accounts are exposed these dictionaries get better. A security blogger named Troy Hunt has created a popular website called haveibeenpwned.com. It allows you to enter your email or your password to check if they’ve been leaked. I believe his website is legitimate, however generally speaking, I think it’s poor security to check a password or an unsalted hash on a website. The web server could be compromised, the traffic could be monitored or it could just be a malicious site. This could let hackers know your password and IP address. Even if they don’t get your password they might be able to ascertain that you have a weak password.
Fortunately, Troy’s website provides a free REST API that implements a k-anonymity based protocol. It allows you to securely check a password without transmitting your password or disclosing to the web server if your password is weak or secure. K-anomity is a property related to anonymized data. The password to check is hashed to a 40 digit hexadecimal string, but only the first 5 digits are transferred over the web. The REST API will send back the ending 35 digits of all matching entries and their corresponding frequency. Therefore, the REST API doesn’t see your password or know if it’s compromised.
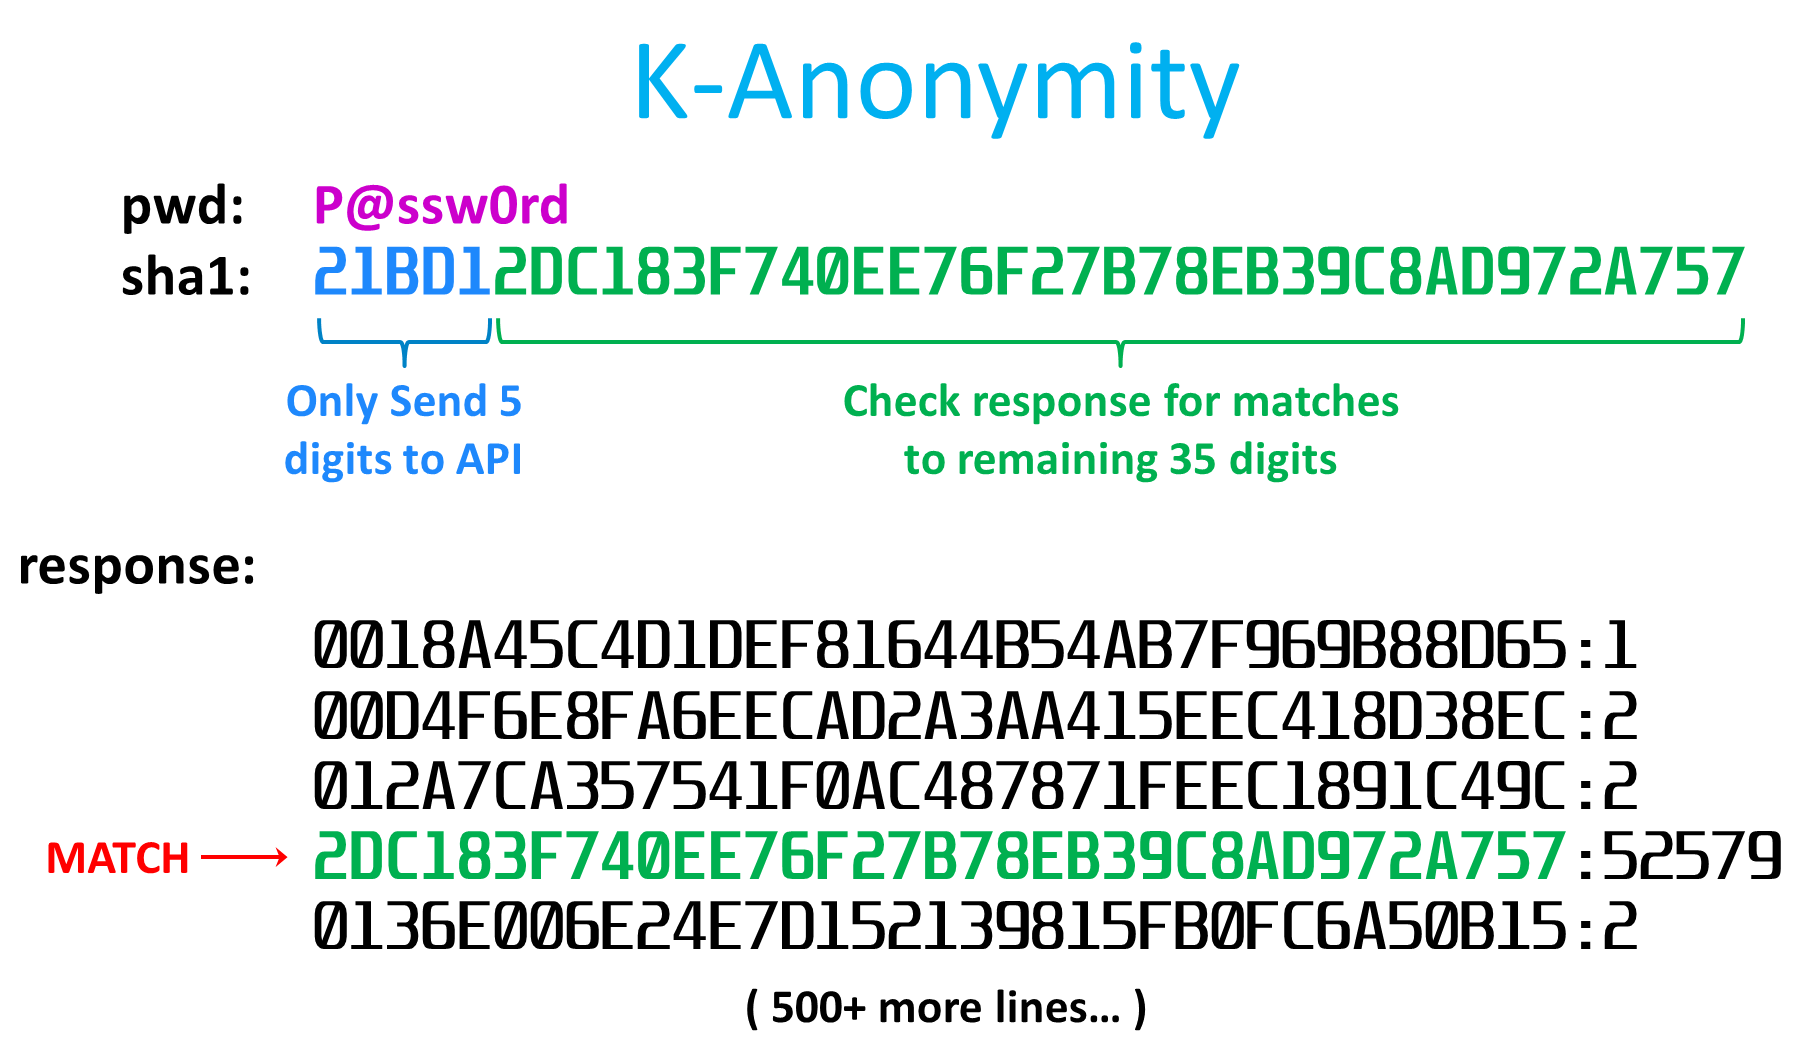
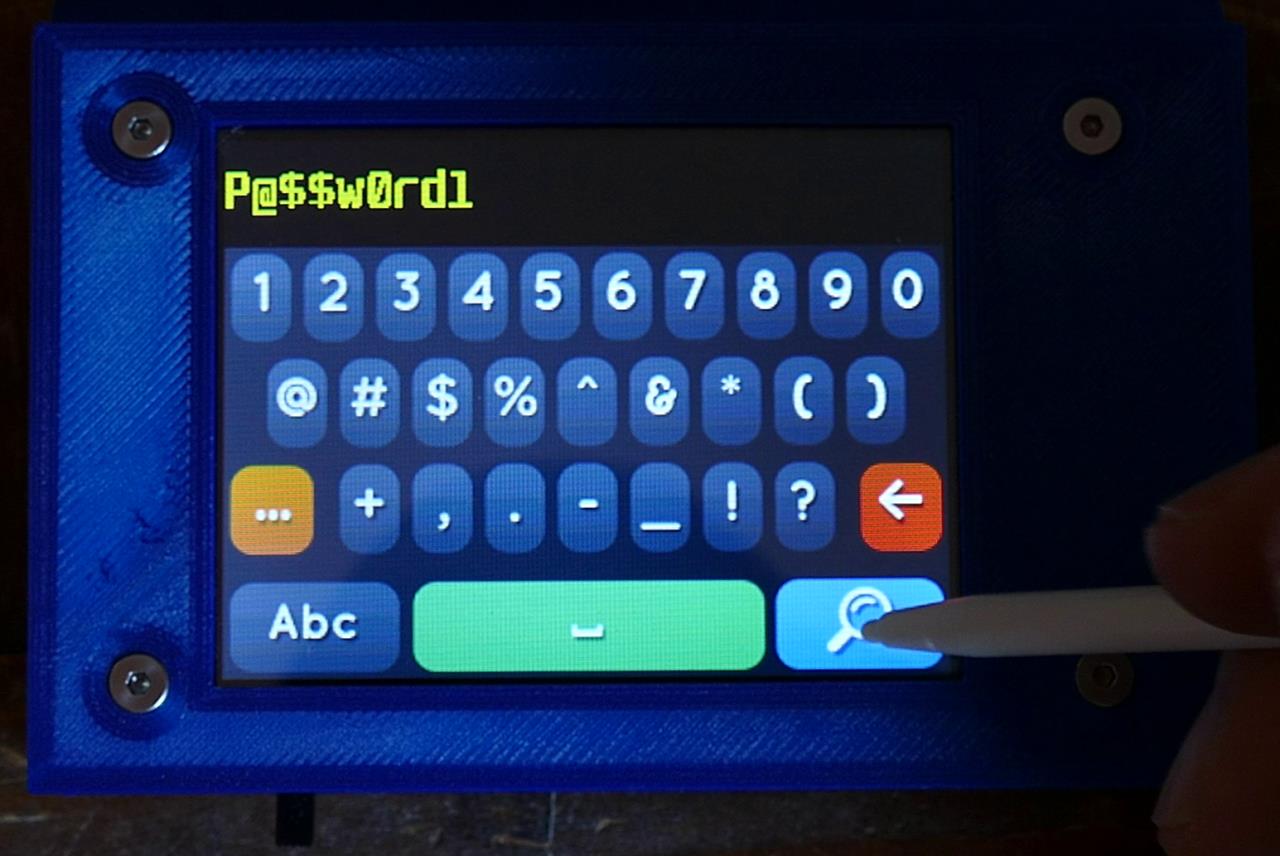
In the example above, P@ssw0rd has a sha1 hash that starts with 21BD1. This is sent to the REST API which responds with 500+ entries. A match is indicated because one of the returned lines equals the last 35 digits of the original hash. The communication protocol used in this REST API was developed by a British computer scientist named Junade Ali in 2018 and is currently being consumed by password managers and browser extensions such as 1Password and PassProtect.
In the Computerphile video above, Dr. Pound creates a Python script to poll the haveibeenpowned REST API. His Github repo also currently contains versions in Go, Haskell, PHP, Julia, Perl, PowerShell, Bash, C# and HTML. I ported his Python code to MicroPython for use on an ESP32. I chose an older Wemos Lolin32 because it is inexpensive and I had several in my junk drawer.
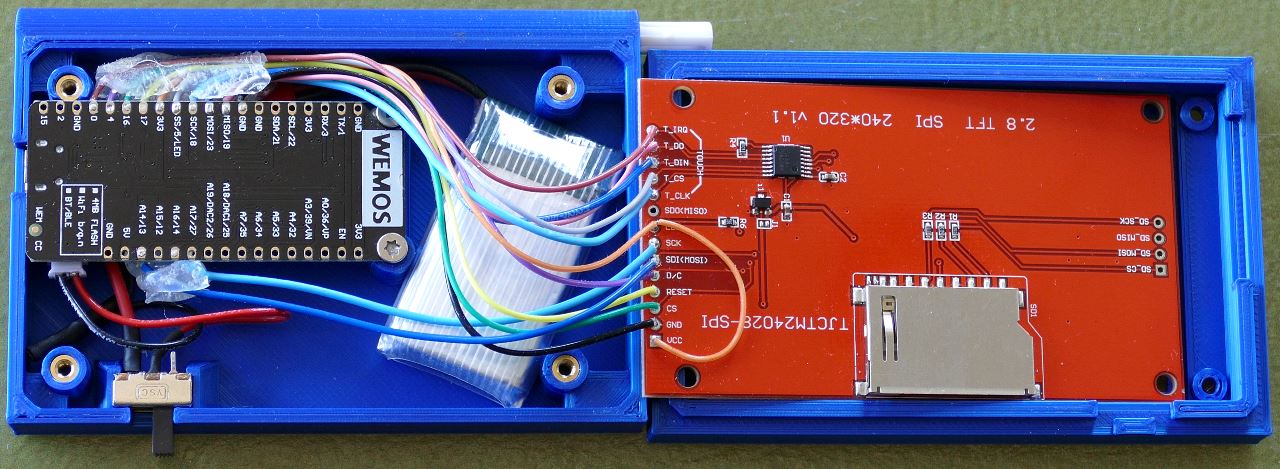
These boards also come with a built-in Lipo battery jack and charging circuit so the only other requirements are a battery and a touch screen. For the display, I chose an ILI9341 2.8” 320×240 pixel color LCD with a built-in XPT2046 touch screen overlay. It runs at 3.3 V so it can easily be powered from the ESP32. Amazon sells the display for around $13-19 US.
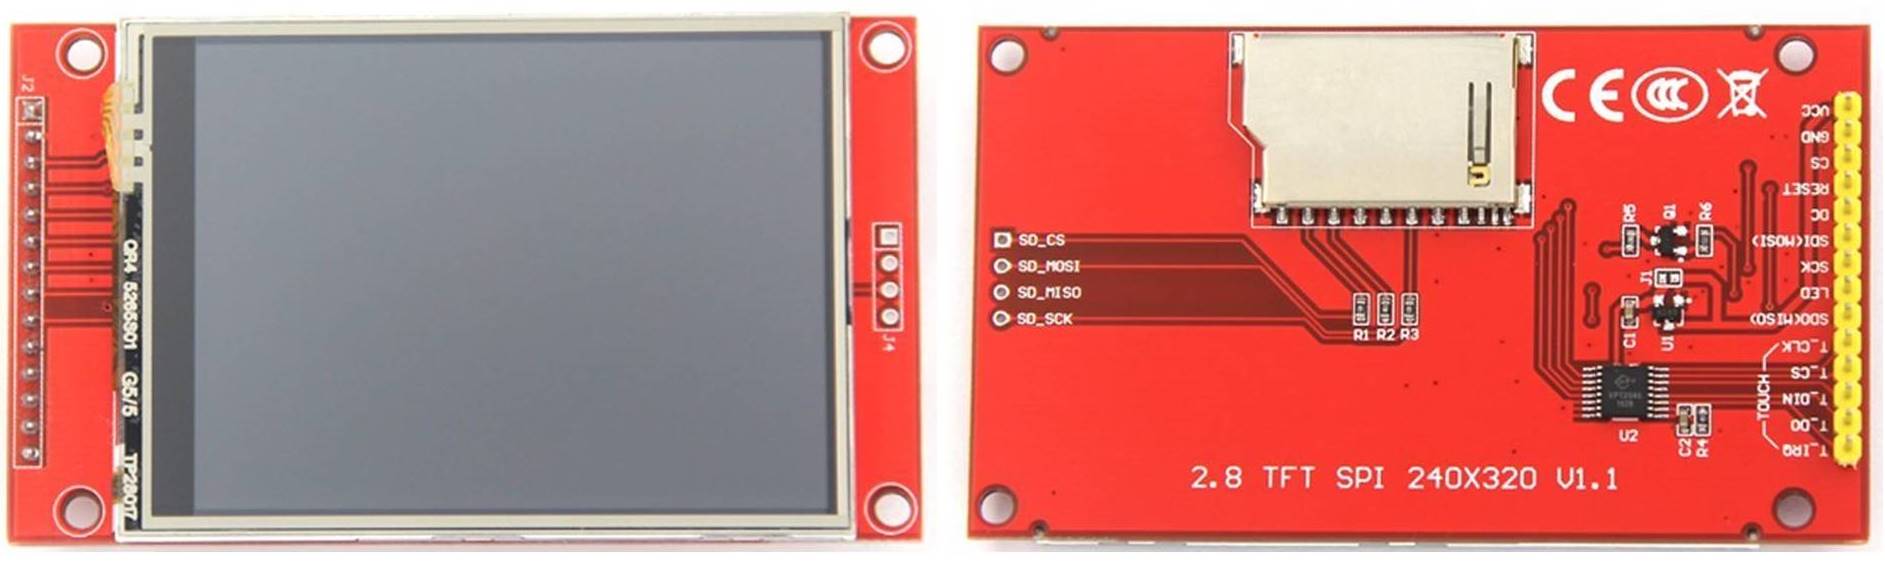
The ILI9341 uses a SPI interface so it’s very easy to connect to the ESP32.
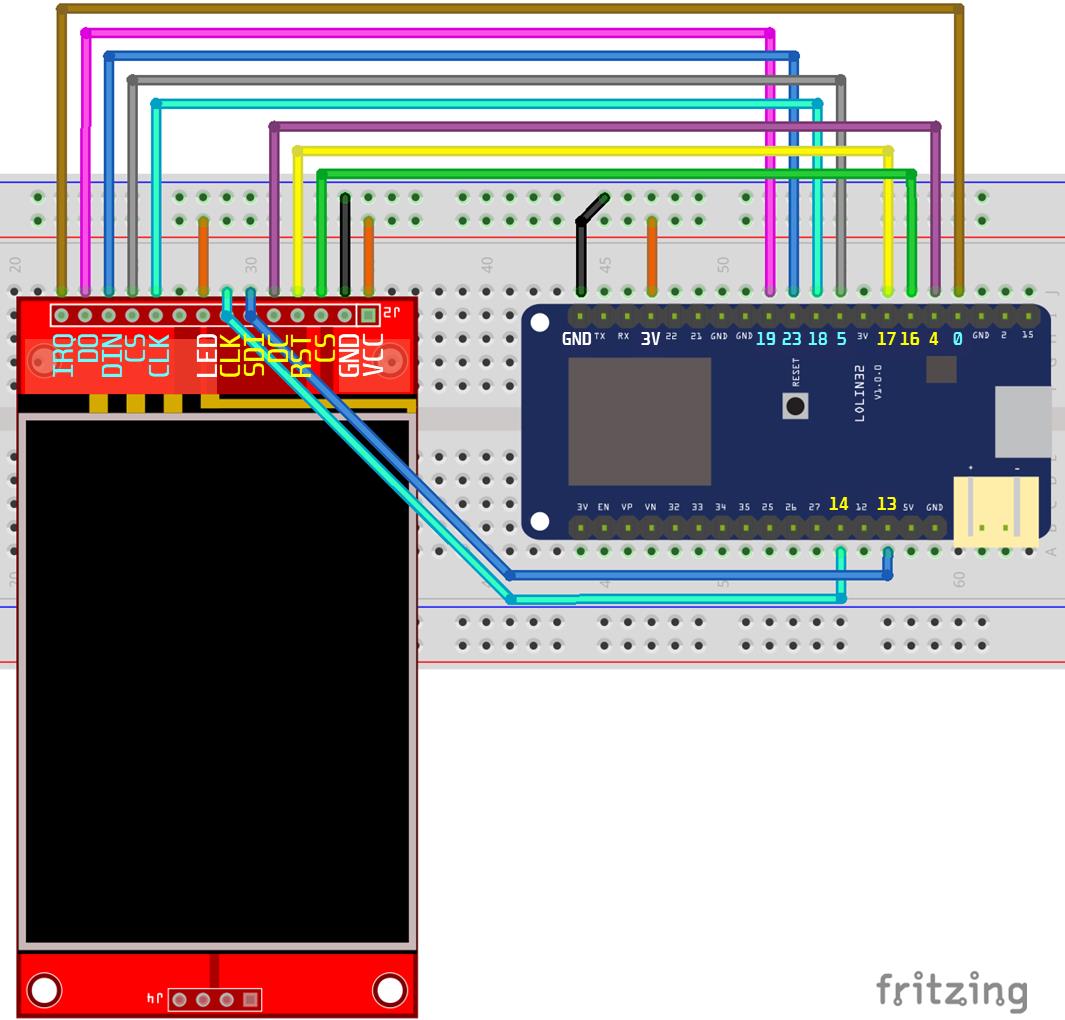
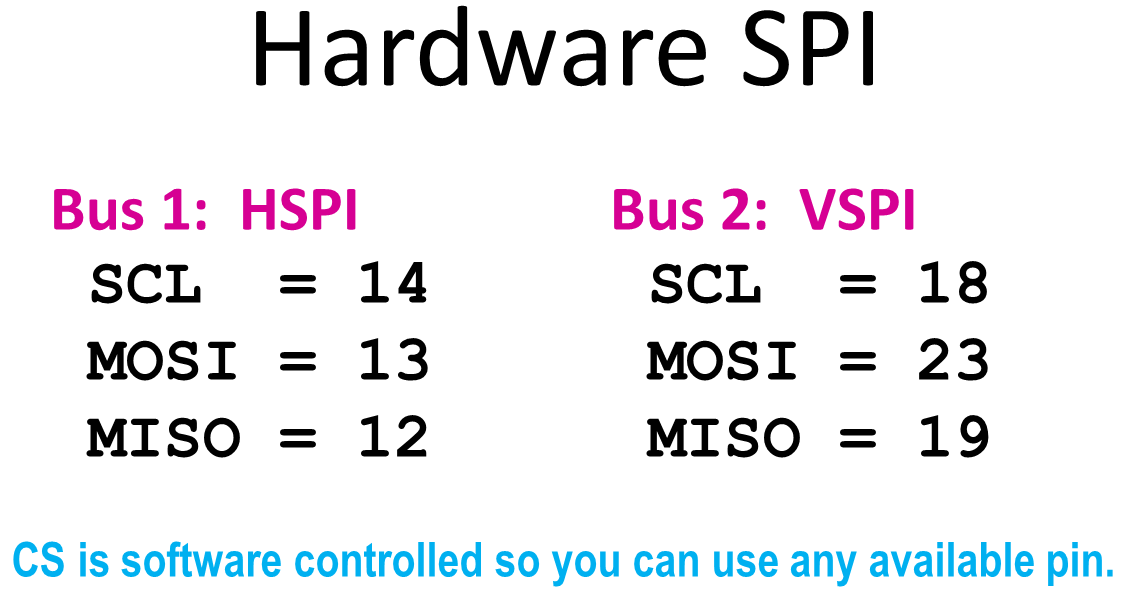
The touch screen IRQ (interrupt) pin is connected to GPIO 0 on the ESP32. The touch screen DO (Data Out) pin is connected GPIO 19 which is MISO (Master In Slave Out) on the ESP32’s hardware VSPI bus. The touch screen DIN (Data In) is connected to GPIO 23 which is the VSPI MOSI (Master Out Slave In). The touch screen CS (Chip Select) pin is connected to GPIO 5. The touch screen CLK (Clock) pin is connected to GPIO 18 which is the VSPI clock. The SPI interfaces for the touch screen and LCD display are broken out into separate pins. Normally I would daisy chain the 2 SPI devices on the same bus to save pins, but unfortunately they run at very different speeds. The LCD display can run at over 50 MHz which is great for fast drawing, but the touch controller generates a lot errors if you go over 1 MHz. Fortunately, MicroPython exposes 2 of the ESP32’s hardware SPI interfaces. SPI Bus 1 is HSPI and bus 2 is VSPI.
The LCD display clock pin is connected to GPIO 14. The LCD display SDI pin is connected to GPIO 13 which is the ESP32 HSPI MOSI. DC which selects between data and command mode is connected to GPIO 4. The reset pin is connected to GPIO 17. The LCD CS pin is connected to GPIO 16. The ground pins of both boards are connected. The 3.3 V pins of both boards are connected and the LCD back light pin is connected to 3.3 V. Some ILI9341 boards have the back light pin connected to a transistor so it can be controlled from a GPIO pin. This is convenient if you want to turn the back light LED on and off from code such as if you wanted to implement a sleep mode. My board didn’t come with the transistor so I just wired it directly to 3.3 V.
I designed a case in SketchUp to hold the display, the ESP32 and a LiPo battery. A slot on the side will hold a stylus like the old Palm Pilot. There are 2 other openings on the sides for a slide switch and the ESP32’s micro USB port.
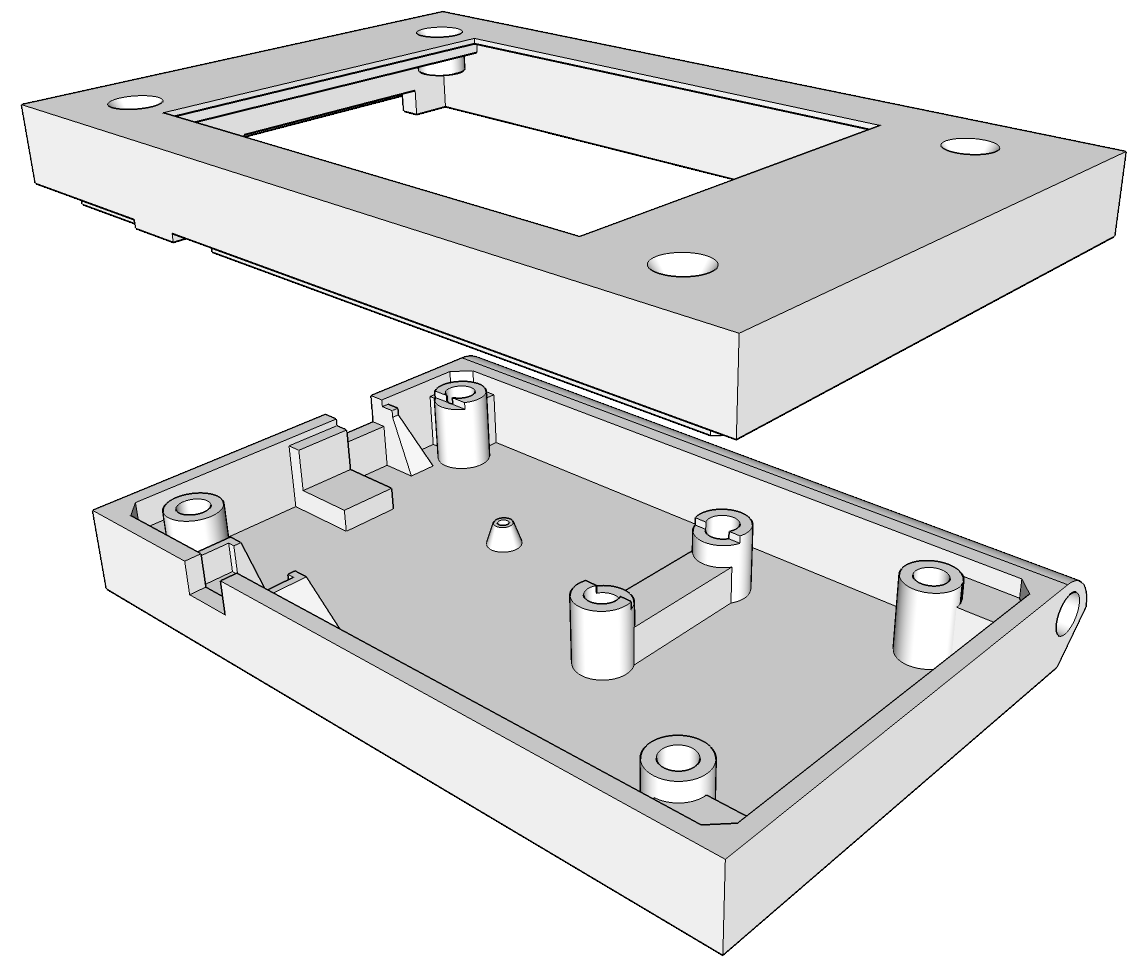
Here is the bottom and top halves of the 3D printed case. They are printed using Prusament PLA Royal Blue.
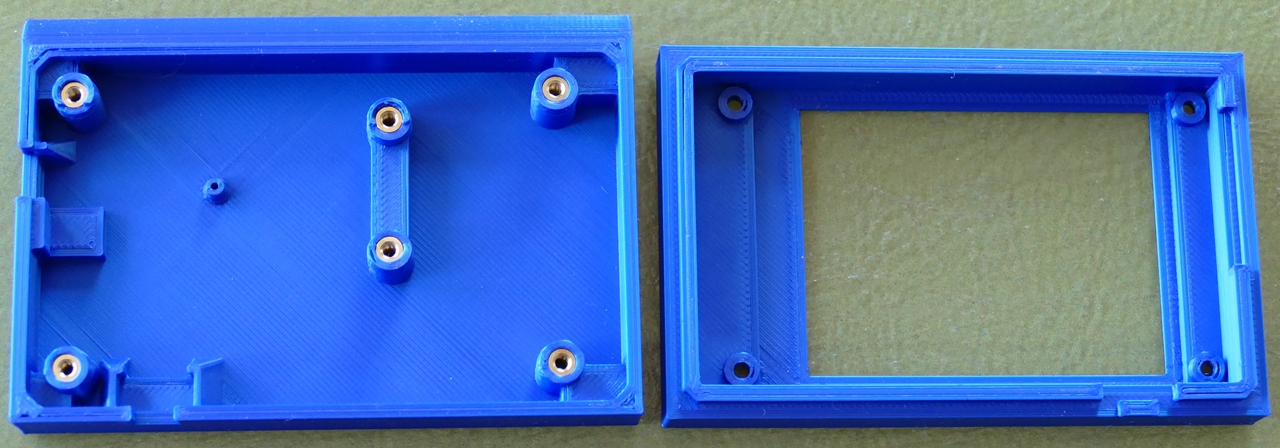
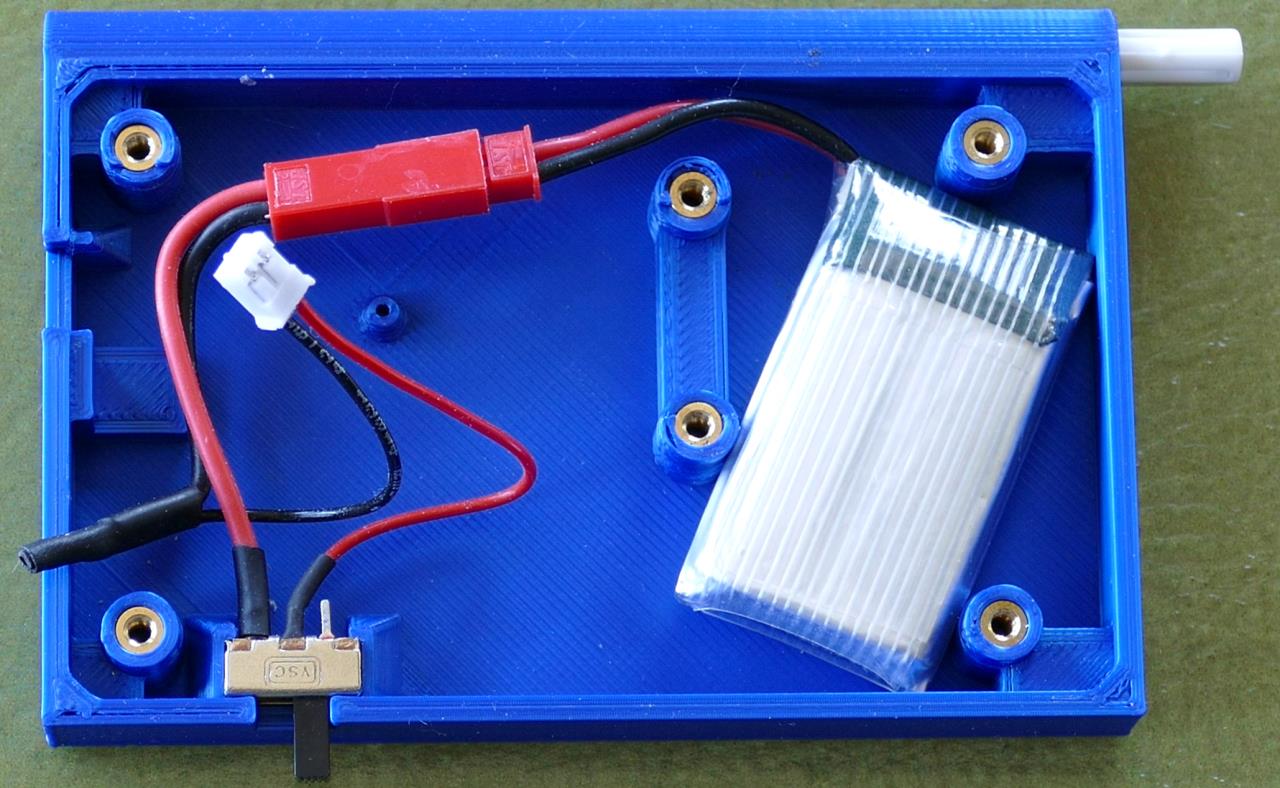
I installed 2.5 mm threaded brass inserts. The 4 outer ones hold the case together and retain the display. The 2 inner ones secure the ESP32 board. A soldering iron set to 205°C (400°F) is used press the brass inserts into the PLA plastic. I added a small through hole on the bottom so the ESP32 reset button can still be pressed when the case is closed using a paper clip. The mount on the bottom snugly holds a mini slide switch. The ESP32 is powered by a 3.7 V, 750 mAh Lipo battery. It fits securely between the threaded inserts.
The ESP32 board is held down by two M2.5 screws. The ESP32 micro-USB jack lines up with hole on the left side of the case. I soldered the wires connecting the 2 boards and secured them with hot glue.
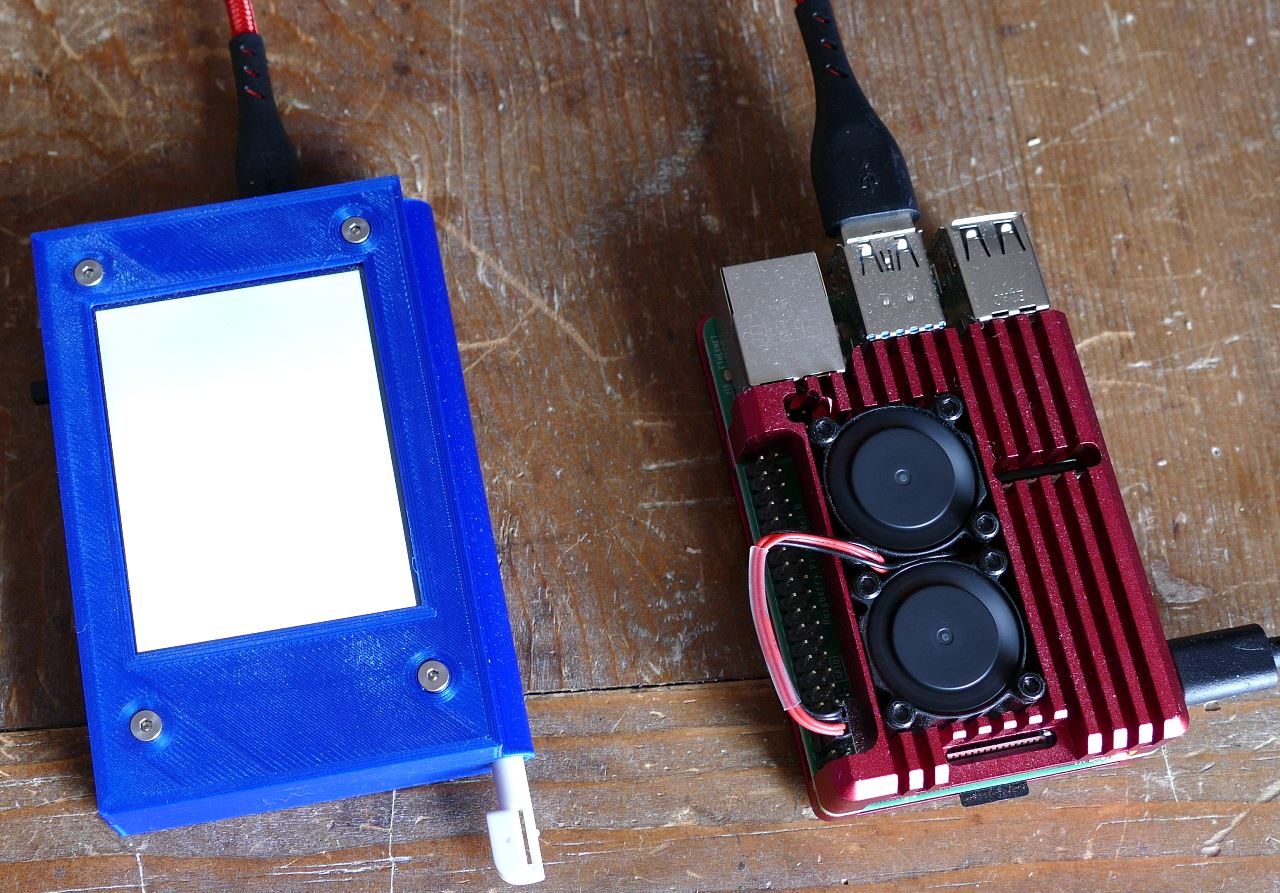
A micro-USB cable connects the ESP32 to a Raspberry Pi 4. The Pi provides REPL access for the ESP32 and helps with initial file management.
I have created several video tutorials about MicroPython on the ESP32. If you are new to MicroPython, I recommend you check out my first MicroPython tutorial which demonstrates how to load the firmware on the ESP32, install necessary tools such as Rshell and ESPTool, WiFi access and sample programs. I prefer FTP for file management. There’s a great lightweight MicroPython FTP server created by RobertHH. I normally write MicroPython using a source code editor such as Atom or VS Code. Both of these programs support FTP extensions that work well with the MicroPython FTP server.
All the code used in this project can be downloaded from my MicroPython ILI9341 repo on GitHub. The ILI9341 LCD driver is a port of my MicroPython OLED SSD1351 library. All the commands for drawing shapes, images, sprites and fonts are the same and I have another tutorial detailing its use. New to the ILI9341 repo is an XPT2046 touch screen driver, a touch keyboard class and a MicroPython port of Mike Pound’s Pwned Password API lookup repo. The MicroPython version called pwn_search.py contains a single class called PwnLookup.
class PwnLookup(object):
    def __init__(self, spi1, spi2, dc=4, cs1=16, rst=17, cs2=5, rotation=270):
        # Set up display
        self.display = Display(spi1, dc=Pin(dc), cs=Pin(cs1), rst=Pin(rst),
                               width=320, height=240, rotation=rotation)
        # Load font
        self.unispace = XglcdFont('fonts/Unispace12x24.c', 12, 24)
        # Set up Keyboard
        self.keyboard = TouchKeyboard(self.display, self.unispace)
        # Set up touchscreen
        self.xpt = Touch(spi2, cs=Pin(cs2), int_pin=Pin(0),
                         int_handler=self.touchscreen_press)
        self.wlan = WLAN(STA_IF)
The PwnLookup init method takes 2 SPI buses for the LCD display and touch screen. A rotation parameter is necessary because some ILI9341 displays have the touch screen applied in different orientations. Therefore, to ensure the X, Y coordinates of the touch screen line up with the pixel coordinates of the LCD display, it might be necessary to adjust the display rotation by 180 degrees. In this case either 90 degrees or 270 degrees. An ILI9341 display is instantiated along with an XGLCD font which will display text above the touch keyboard which is also loaded. An XPT2046 touch screen driver is loaded and variable wlan will be used to monitor the WiFi connection. A method called Lookup checks a password against the online Rest API and returns the number of times the password has appeared in data breaches.
    def lookup(self, pwd):
        """Return the number of times password found in pwned database.

        Args:
            pwd: password to check
        Returns:
            integer: password hits from online pwned database.
        Raises:
            IOError: if there was an error due to WiFi network.
            RuntimeError: if there was an error trying to fetch data from dB.
            UnicodeError: if there was an error UTF_encoding the password.
        """
        sha1pwd = sha1(pwd.encode('utf-8')).digest()
        sha1pwd = hexlify(sha1pwd).upper().decode('utf-8')
        head, tail = sha1pwd[:5], sha1pwd[5:]

        if not self.wlan.isconnected():
            raise IOError('WiFi network error')

        hits = 0
        gc.collect()
        with get('https://api.pwnedpasswords.com/range/' + head) as response:
            for line in response.iter_lines():
                l = line.decode(response.encoding).split(":")
                if l[0] == tail:
                    hits = int(l[1])
                    break
        gc.collect()

        return hits
The sha1 hash of the password is generated and converted to a 40 digit hexadecimal string which is split into 2 pieces. Head is the first 5 digits and tail is the remaining 35 digits. The haveIbeenpwned Rest API is only sent the head which is relatively innocuous. The REST API will then return all the tails that match the head and their corresponding hit counts. The get method can be memory intensive so I’m using a forked version of the MicroPython Requests library by Chris Borrill. The program loops through each line in the response. A key component of the k-anonymity obfuscation is a large response of around 500 lines. The iter_lines method allows processing of 1 line at a time to save memory. The built-in MicroPython requests library currently doesn’t have this functionality. Instead it loads the entire response into memory which I found resulted in allocation errors. This is probably exacerbated because I’m using an ESP32 board with the older WROOM32 chip. The newer WROVER chips add several megabytes of PSRAM memory. A password match is indicated if a returned tail equals the tail from the original hash. Notice a key advantage of the k-anonymity model is that the actual password matching occurs on your local machine as opposed to on a remote web server. If there’s a match then the hits are returned.
The touchscreen_press method is interrupt driven. It’s called when the touch screen is pressed and passed the corresponding X, Y coordinates.
def touchscreen_press(self, x, y):
        if self.keyboard.handle_keypress(x, y, debug=False) is True:
            self.keyboard.locked = True
            pwd = self.keyboard.kb_text

            self.keyboard.show_message("Searching...", color565(0, 0, 255))
            try:
                hits = self.lookup(pwd)

                if hits:
                    # Password found
                    msg = "PASSWORD HITS: {0}".format(hits)
                    self.keyboard.show_message(msg, color565(255, 0, 0))
                else:
                    # Password not found
                    msg = "PASSWORD NOT FOUND"
                    self.keyboard.show_message(msg, color565(0, 255, 0))
            except Exception as e:
                if hasattr(e, 'message'):
                    self.keyboard.show_message(e.message[:22],
                                               color565(255, 255, 255))
                else:
                    self.keyboard.show_message(str(e)[:22],
                                               color565(255, 255, 255))

            self.keyboard.waiting = True
            self.keyboard.locked = False
The pressed X, Y coordinates are passed to the touch keyboard class which stores the typed password.
The touch keyboard returns true when the search key is pressed which calls the aforementioned lookup method and returns the number of times the password appeared in the haveibeenpwned database. The results are displayed on the LCD display and the program waits for a screen press to continue.

 NOTE: A viewer noted that the keyboard drawing speed was a bit slow when switching screens. The draw_image method used in the TouchKeyboard class is optimized to conserve memory because I’m using an older ESP32 chip with minimal memory. Newer ESP32 chips add several MB of PSRAM. With more memory it is possible to use sprites which are substantially faster. A single sprite image consisting of the 4 keyboard screens can be loaded during the TouchKeyboard init method.
self.kb_sprite = display.load_sprite('images/kb_sprite_320x768.raw', 320, 768)
def load_keyboard(self):
    """Display the currently selected keyboard."""
    SIZE = const(122880)  # width (320) x height (192) x bytes of color (2)
    offset = SIZE * self.kb_screen
    self.display.draw_sprite(self.kb_sprite[offset: offset + SIZE], 0, 47, 320, 192)