
This tutorial demonstrates how to send emails from Python and Node.js applications on the Raspberry Pi. In addition, SendGrid webhooks allow email interaction with the Raspberry Pi and connected hardware. Emails sent to the Raspberry Pi run code based on the email contents.
 SendGrid provides a powerful API to send and receive emails. They offer a free plan which allows 12,000 messages per month (reduced to 100 free messages per day now). I’m using a Raspberry Pi 2 with a clean install of the latest version of Raspbian. Please make sure your Pi is up-to-date with sudo apt-get update and upgrade.
sudo apt-get update
sudo apt-get upgrade
I have received a lot of requests for more Node.js code so I’m providing both Python and JavaScript examples. The version of Node.js that comes with the latest version of Raspbian is too old, so curl and apt-get install are used to download the latest version which as of this post is 5.9.
curl -sL https://deb.nodesource.com/setup_5.x | sudo -E bash
sudo apt-get install -y nodejs
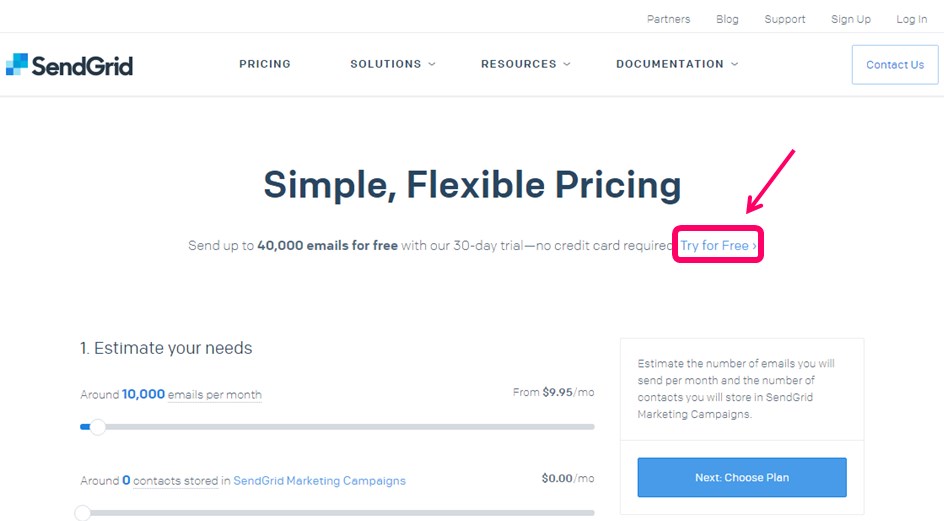
A free SendGrid account is required. Browse to the SendGrid pricing page, scroll all the way down and click Try for Free. This lets you sign up for their free trial plan for 40K messages per month. After 1 month the plan will expire and you will automatically be switched to the 100 free messages per day plan.
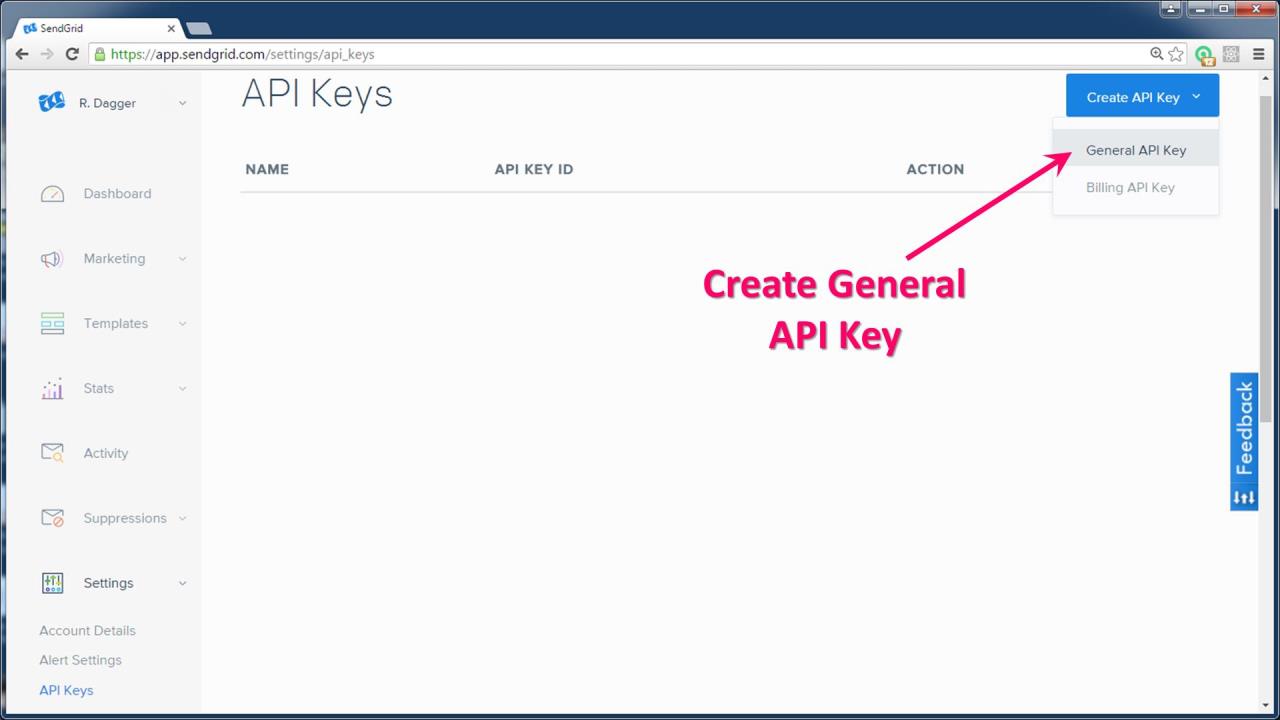
SendGrid reviews each new account (I assume to reduce SPAM). Therefore, it could take a while for your account to be approved. However, I’ve never had it take more than 5 minutes. After your account is provisioned, sign in and browse to Settings – API Keys. Click Create API Key and select General API Key. The API key provides authentication for your code when sending emails and is more secure than using login credentials.
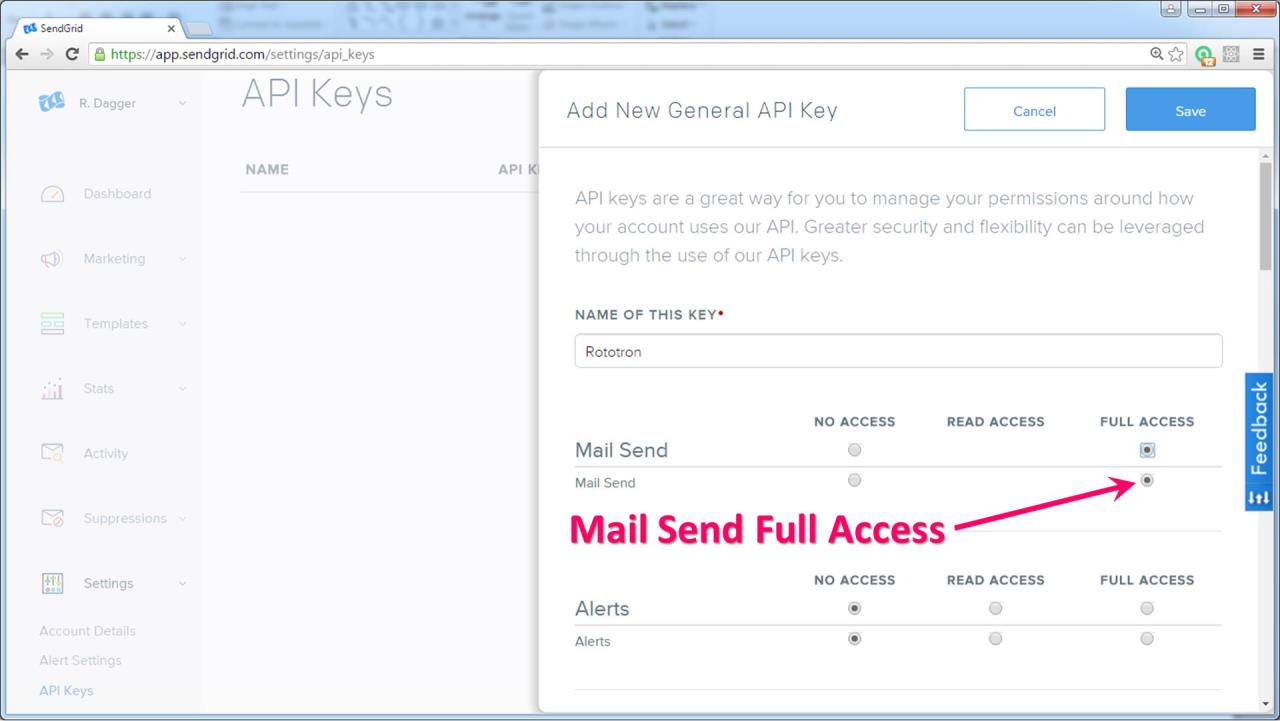
Give the key a name and then click Mail Send Full Access to give the key mail send permission.
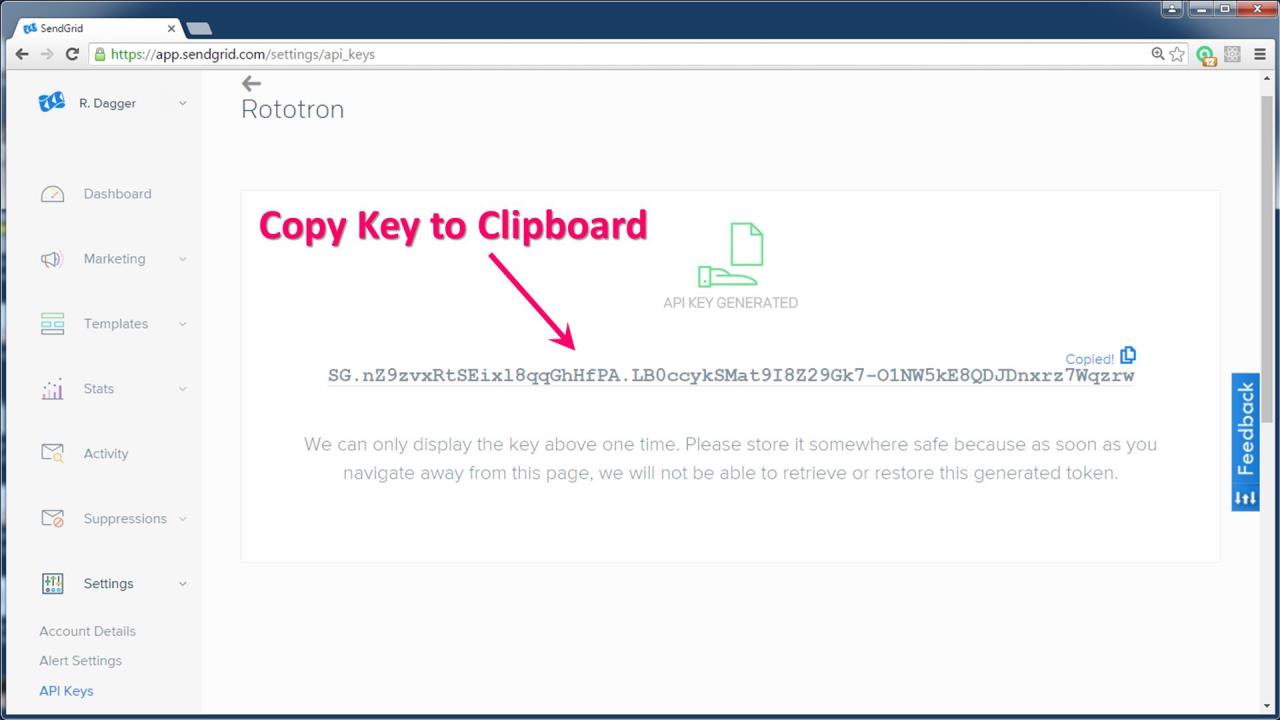
The newly generated key is only displayed once so you need to copy it to the clipboard. It is important to keep the key secure. If your key gets compromised, your account could get hacked. You can always delete and create another key which is what I’ll do after this tutorial. It’s also a good security practice to periodically regenerate your API keys.
The first example uses Python to send an email. Use pip to install the SendGrid python library.
sudo pip install sendgrid
 UPDATE: the SendGrid library has breaking changes since the video was published. I have updated the code accordingly.
The code below imports the SendGrid library that was just installed. An api is instantiated using the SendGrid API key that was previously copied to the clipboard. Variables for recipient, sender, subject and body fields and assigned. A mail message is instantiated with the specified fields. The program sends the email and a response is returned. Run the program and an email will be sent.
# https://github.com/sendgrid/sendgrid-python
import sendgrid
from sendgrid.helpers import mail

# api key
api = sendgrid.SendGridAPIClient(apikey='YOUR API KEY')

recipient = mail.Email('recipient@address.com')
sender = mail.Email('your@address.com')
subject = 'Sending with SendGrid is fun'
body = mail.Content('text/plain', 'and easy to do anywhere, even with Python')

email = mail.Mail(sender, subject, recipient, body)
response = api.client.mail.send.post(request_body=email.get())

print(response.status_code)
print(response.body)
print(response.headers)
If the above code throws an Authorized Error, this indicates that you specified an invalid API key.
 Please note that for demo purposes, I hard-coded the API key into the program. This is dangerous in terms of security. The safer way to handle keys is to store them in a settings file that is outside your program. Also make sure that the settings file is secure and excluded from GitHub because hackers continually trawl public repositories with automated scripts.
 Next the code is rewritten in Node.js. Create a new folder and CD into it. Use npm init to initialize a new program. You will be prompted for info regarding your new program. It’s OK to hit enter to skip any or all prompts. The SendGrid package for Node.js is installed with npm install.
mkdir sendgrid_node
cd sendgrid_node
npm init
npm install --save sendgrid
The JavaScript code is almost identical to the python code above. Please note that like the python code there are breaking changes since the video released. The updates are reflected below.
// https://github.com/sendgrid/sendgrid-nodejs
const helper = require('sendgrid').mail;
const sendgrid = require('sendgrid')('YOUR API KEY');

const recipient = new helper.Email('recipient@address.com');
const sender = new helper.Email('your@address.com');
const subject = 'Sending with SendGrid is Fun';
const body = new helper.Content('text/plain', 'and easy to do anywhere, even with NodeJS.');

const mail = new helper.Mail(sender, subject, recipient, body);
const request = sendgrid.emptyRequest({
    method: 'POST',
    path: '/v3/mail/send',
    body: mail.toJSON(),
});


sendgrid.API(request, (error, response) => {
    console.log(response.statusCode);
    console.log(response.body);
    console.log(response.headers);
});
Save the code to a file called index.js. Type node index to run the program which functions the same as the python version.
node index
Let’s spruce up the above code by having it read a DHT22 temperature/humidity sensor and email the readings. Use npm to install the raspi-sensors package which allows the Pi to read a DHT22.
Here is a schematic showing how to connect the DHT22 and an LCD display which will be used later. I have additional Raspberry Pi tutorials on just the DHT22 and LCD displays. DHT22 pin 1 goes to 3.3 V on the Pi. The data pin 2 goes to GPIO4. Please note that the raspi-sensors library uses the Pi board numbering instead of the BCM numbering so GPIO4 is referenced in the code as pin 7. The 3rd pin is left disconnected and the 4th pins is connected to ground. A 10 KΩ resistor is placed between pin 1 and 2.

Here is the updated code. The raspi-sensors package is imported and a DHT22 is instantiated on Pi pin 7 (GPIO4). The DHT22 fetch method takes a single callback which is called twice returning sensor readings (once for temperature and once for humidity). The fetch method is wrapped in a promise to insure both temperature and humidity are returned before the email is sent. When the promise resolves the email is sent. Sudo is required to run the node app because it accesses the GPIO pins.
"use strict"
const helper = require('sendgrid').mail;
const sendgrid = require('sendgrid')('YOUR API KEY');

const RaspiSensors = require('raspi-sensors');
const DHT22 = new RaspiSensors.Sensor({
  type : "DHT22",
  pin  : 0X7
}, "DHT22");

const dht22Promise = new Promise((resolve, reject)=> {
  let t = null, h = null;

  DHT22.fetch((err, data)=> {
    if(err) {
      reject(err.cause)
    }
    if(data.type === "Temperature") {
      t = data.value.toFixed(1);
    } else {
      h = data.value.toFixed(1);
    }
    if(t !== null && h !== null){
      resolve({ temperature : t, humidity : h });
    }
  });
});

dht22Promise.then((data)=> {
  const recipient = new helper.Email('recipient@address.com');
  const sender = new helper.Email('your@address.com');
  const subject = 'DHT-22 Sensor';
  const body = new helper.Content('text/html', `${data.temperature}°C / ${data.humidity}%`);

  const mail = new helper.Mail(sender, subject, recipient, body);
  const request = sendgrid.emptyRequest({
    method: 'POST',
    path: '/v3/mail/send',
    body: mail.toJSON(),
  });

  sendgrid.API(request, (error, response) => {
    console.log(response.statusCode);
    console.log(response.body);
    console.log(response.headers);
  });
}).catch((err)=>{
  console.log(err);
});
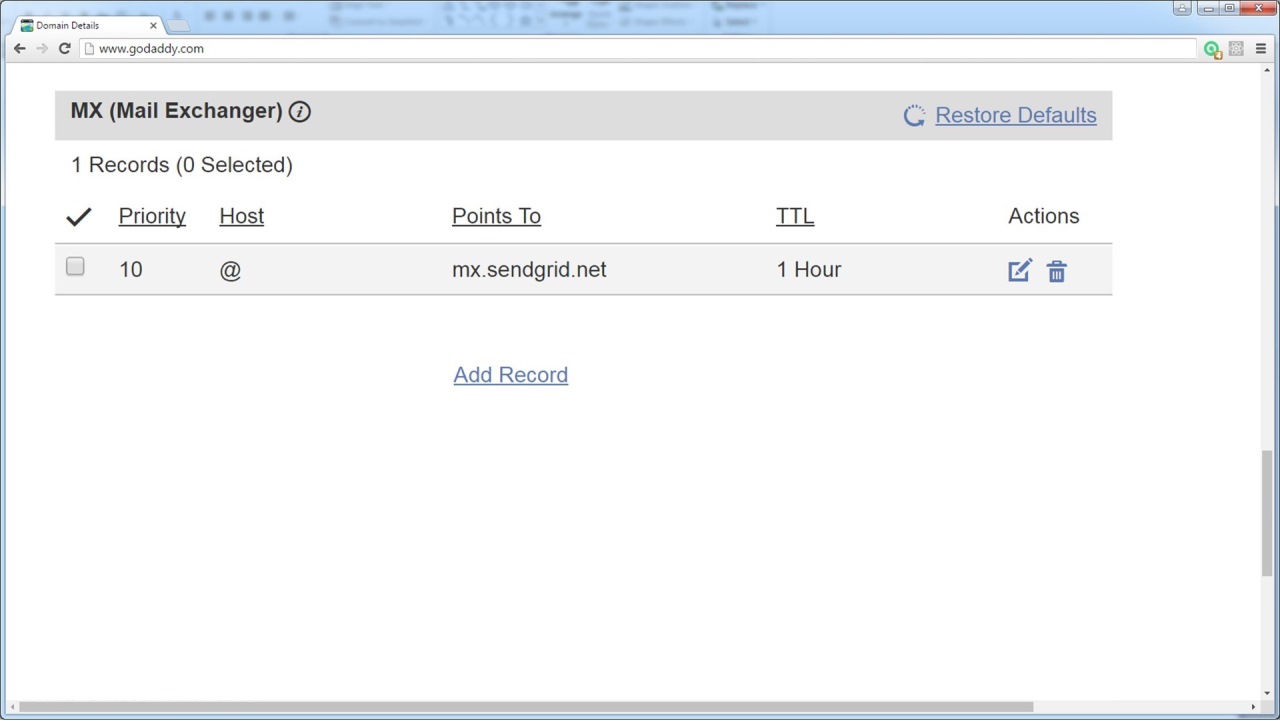
SendGrid Inbound Parse Webhook API allows an app on the Pi to receive and parse email via HTTP push notifications. A domain name is required to receive email. You cannot use an email service like Gmail or Hotmail. If you don’t already have a domain, there are several Internet registrars where you can buy domains such as GoDaddy, eNom and Google Domains. I’ll be using rototron.info. Login to your registrar and point the MX Record of your domain to mx.sendgrid.net. Registrars have different systems to create MX records, but they all should have 3 basic fields: address, host and priority. Here is a pic of the GoDaddy settings for my domain. Points To is the SendGrid address (mx.sendgrid.net). If you are not using a subdomain, then the host is left blank or set to the @ symbol. Priority 10 works well.
The first webhook example uses Python. A light weight web framework called Flask is required. It can be installed with pip.
sudo pip install Flask
Flask is imported and an app is instantiated. A decorator is place before the sendgrid_parser function. It will handle all HTTP posts to the parse route. The post from SendGrid includes a form with fields for To, From, Subject, Body Text, Attachment Count and more. Every time an email comes in the program will log the email data. It is important to return “OK”. Otherwise, SendGrid will keep re-posting the email.
from flask import Flask, request
app = Flask(__name__)

@app.route('/parse', methods=['POST'])
def sendgrid_parser():
    # Get header info
    recipient = request.form.get('to')
    sender = request.form.get('from')
    subject = request.form.get('subject')
    body = request.form.get('text')

    # Process attachments if any
    attachment_count = int(request.form.get('attachments')) if request.form.get('attachments').strip() else 0
    attachments = []
    if attachment_count > 0:
        for num in range(1, (attachment_count + 1)):
            attachment = request.files.get(('attachment%d' % num))
            attachments.append(attachment.read())

    print("To:   " + recipient)
    print("From: " + sender)
    print("Subj: " + subject)
    print("Body: " + body)
    print("Attachment Count: {0}".format(attachment_count))

    return "OK"

if __name__ == '__main__':
    app.run()
Run the python program to start listening for HTTP posts.
* Running on http://127.0.0.1:5000/ (Press CTRL+C to quit)
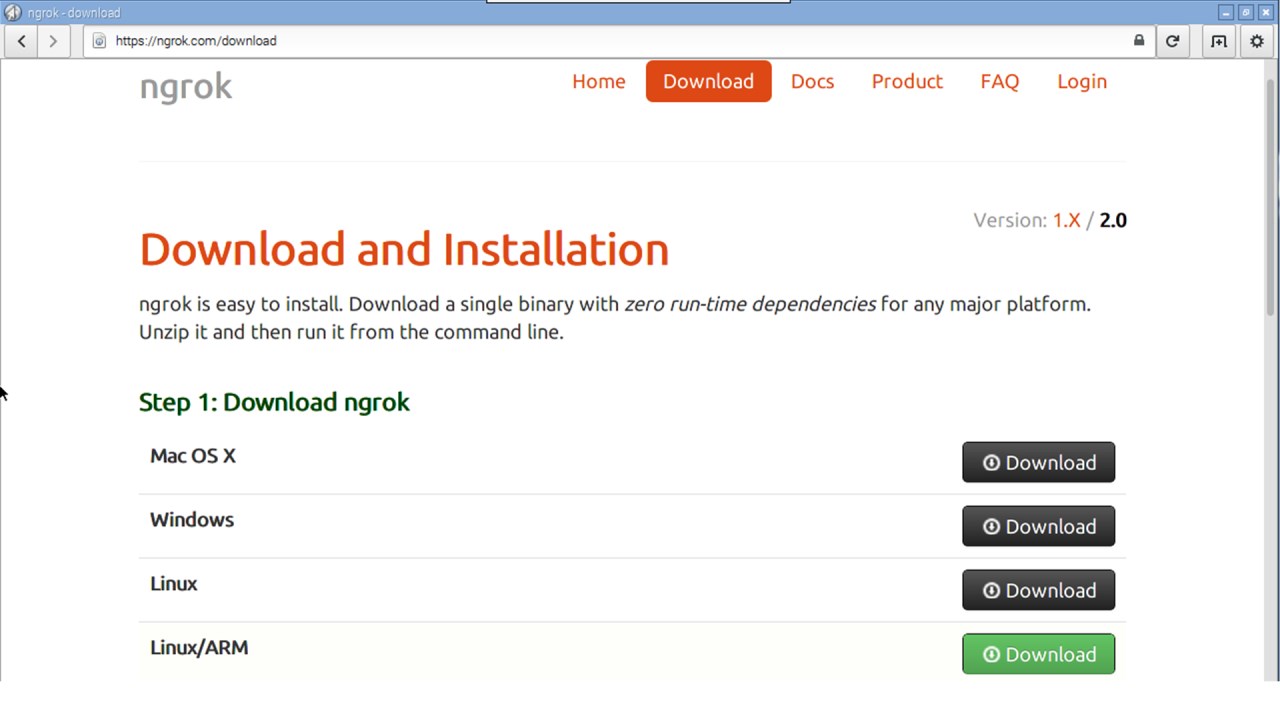
Currently, the web server is only running locally on the PI on port 5000. A free service called Ngrok will be used to host the web server on the public Internet. Browse to ngrok.com and sign up for an account. Afterwards, go to the download page and download the Linux/Arm version.
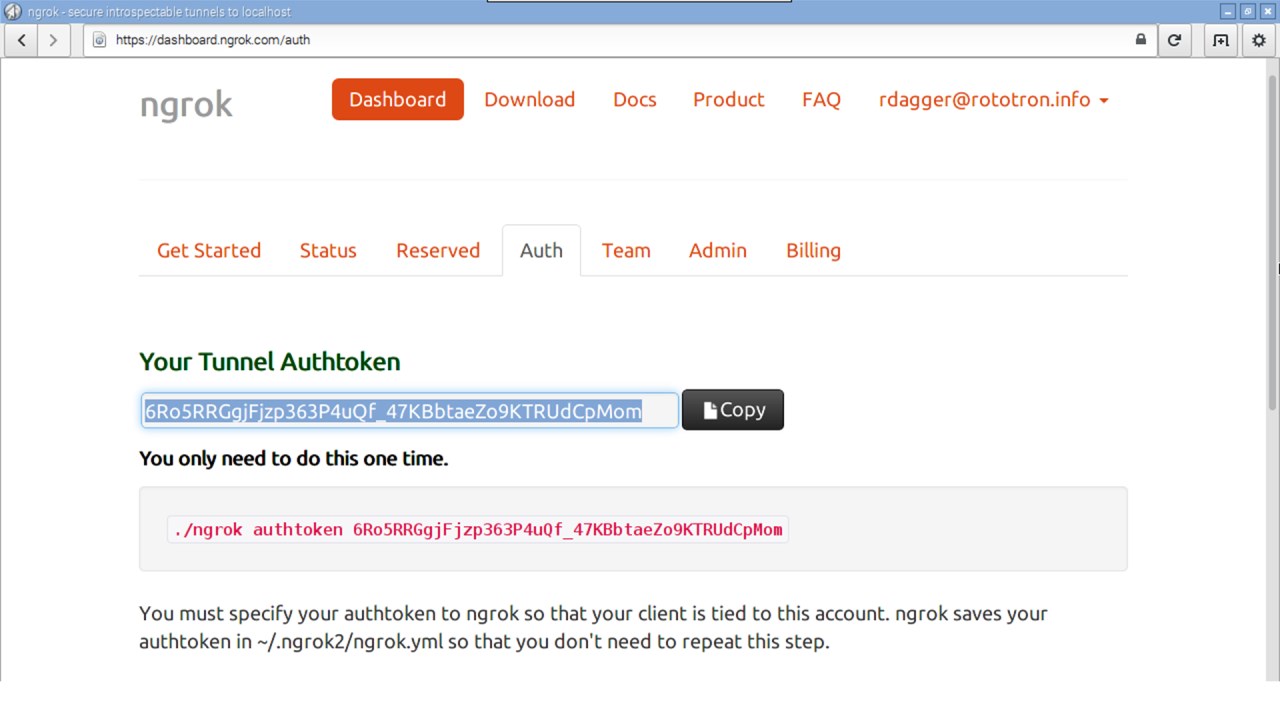
Go to the dashboard auth page and copy the Tunnel AuthToken to the clipboard. This will provide HTTPS secure communication.
Open a terminal and create a directory called ngrok. CD into the new folder and unzip the Ngrok download. Run Ngrok with the authtoken switch using the token you just copied to the clipboard. This only has to be done once. Use the http switch to start the Ngrok service on port 5000.
cd ~
mkdir ngrok
cd ngrok
unzip ~/Downloads/ngrok-stable-linux-arm.zip
./ngrok authtoken <Ngrok AuthToken>
./ngrok http 5000
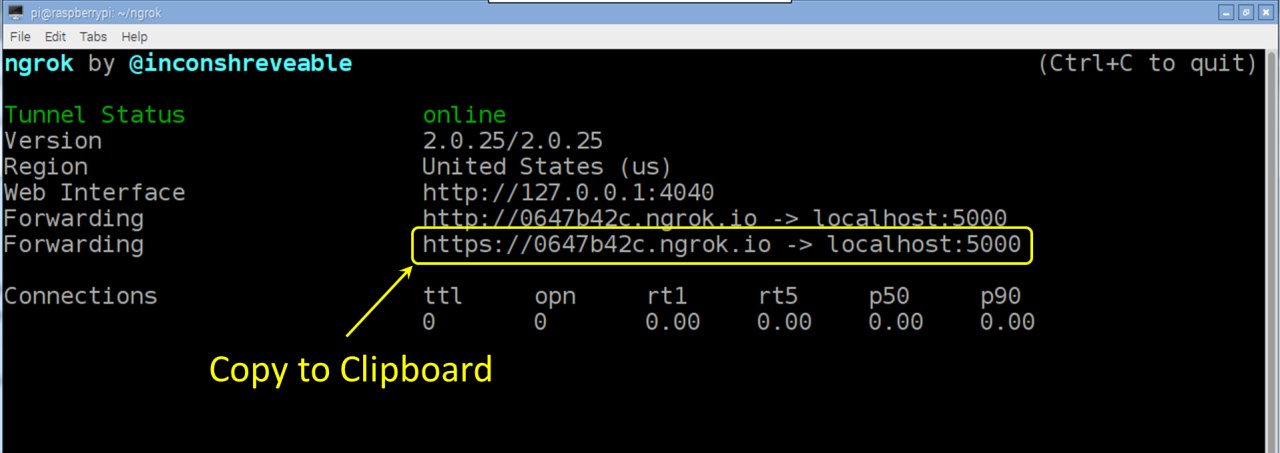
The status screen indicates your Pi is now on the Internet. Copy the https forwarding address to the clipboard. This is your Pi’s public web address.
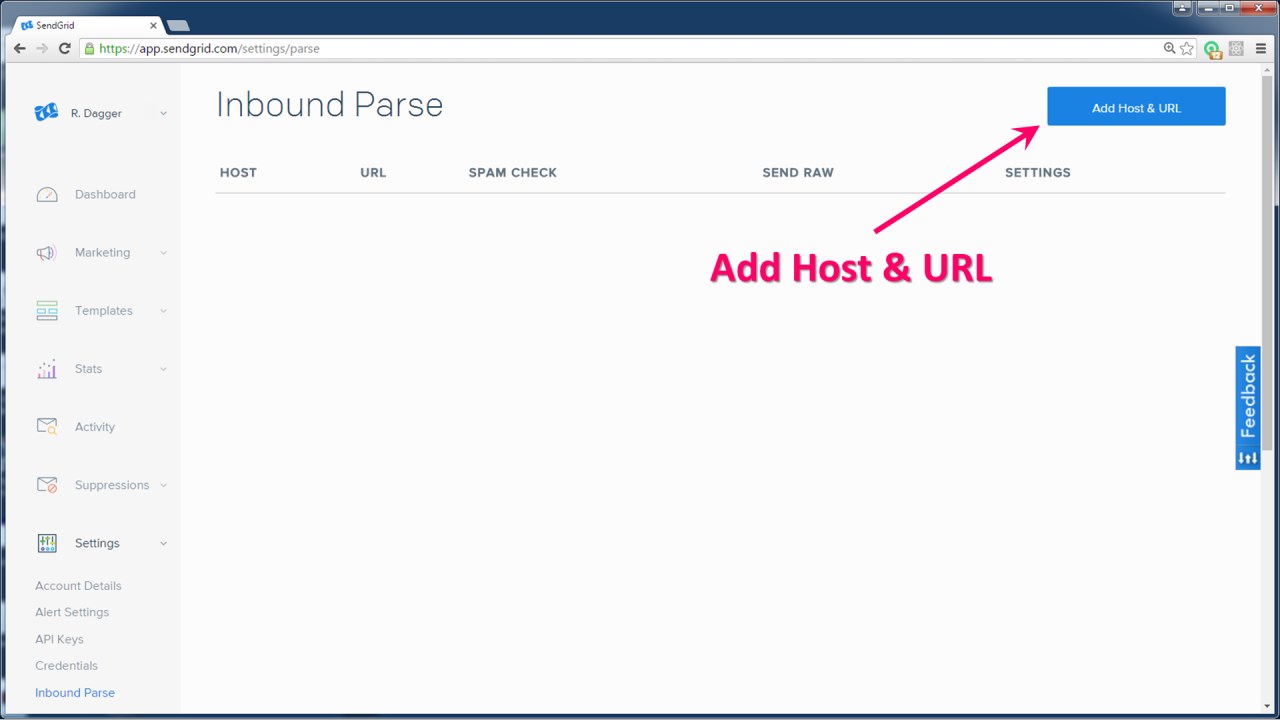
Back on the SendGrid settings webpage, click the Inbound Parse tab and then click the Add Host & URL button.
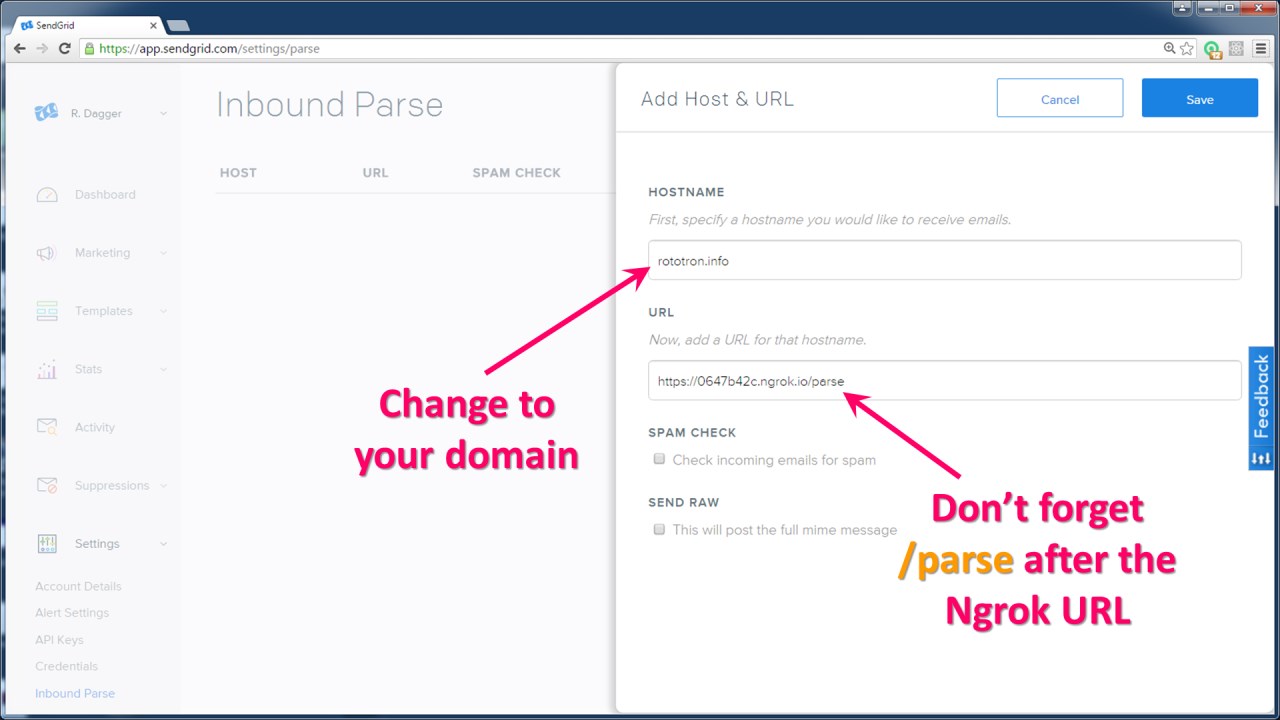
Enter your domain for the hostname. For the URL field paste the Ngrok address followed by the folder parse.
Send an email to any address at your domain. SendGrid will receive the email and post the data to your Python program. The contents will be printed to the console.
Now for the Node.js version. The npm package Express is used instead of Flask for the web framework. Multer is a middleware used to handle the email form data. In a new folder, both can be installed with a single npm install.
cd ~
mkdir webhook_node
cd webhook_node
npm init
npm install --save express multer
The code imports express and multer. The upload variable handles email attachments. You can add additional array elements if you need more than 2 attachments. An app is instantiated with port 5000 specified. A route is set to handle all posts to the parse path. App listen starts the web server. Again, the functionality is the same as the python version.
const express = require('express');
const multer  = require('multer');
const upload = multer().fields([
    { name: 'attachment1', maxCount: 1 },
    { name: 'attachment2', maxCount: 1 }
  ]);
const app = express();
app.set('port', process.env.PORT || 5000);
app.post('/parse', function (req, res) {
  upload(req, res, function(err){
    if(err){
      console.log(err);
      res.sendStatus(200);
    } else {
      const recipient = req.body.to;
      const sender = req.body.from;
      const body = req.body.text;
      const subject = req.body.subject;
      const attachment_count = req.body.attachments;
      const attachments = [];
      for (i = 1; i <= attachment_count; i++){
        attachments.push(req.files['attachment' + i]);
      }
      console.log('To: ' + recipient);
      console.log('From: ' + sender);
      console.log('Subj: ' + subject);
      console.log('Body: ' + body);
      console.log('Attachment Count: ' + attachment_count);
      res.sendStatus(200);
    }
  })
});

const server = app.listen(app.get('port'), function() {
  console.log('Listening on port %d', server.address().port);
});
Now let’s upgrade the above code to display the email subject and body on a 16×2 LED display. An npm package called lcd will drive the LCD display.
npm install --save lcd
The lcd package is imported and an lcd is instantiated specifying the command/data GPIO pins and the dimensions 16×2. Instead of logging the email contents to the console, the LCD display is used. First the display is cleared. This method takes a callback that fires when the LCD is ready to accept text. The print method is used to show the subject on the first line. This method also takes a callback that fires when the operation completes. Next setCursor is used to position additional text on the beginning of the 2nd line. Print is used again to display the email body text. Replace is used to strip any new line characters from the text which would otherwise show up as gibberish.
const Lcd = require('lcd');
const lcd = new Lcd({rs: 21, e: 20, data: [16, 7, 8, 25], cols: 16, rows: 2});

const express = require('express');
const multer  = require('multer');
// Add additional attachments to array if you need more than 2
const upload = multer().fields([
    { name: 'attachment1', maxCount: 1 },
    { name: 'attachment2', maxCount: 1 }
  ]);
const app = express();
app.set('port', process.env.PORT || 5000);
app.post('/parse', function (req, res) {
  upload(req, res, function(err){
    if(err){
      console.log(err);
      res.sendStatus(200);
    } else {
      const subject = req.body.subject;
      const body = req.body.text;

      lcd.clear(()=> {
        lcd.print(subject, ()=> {
          lcd.setCursor(0,1);
          lcd.print(body.replace(/(\r\n|\n|\r)/gm,""));
        });
      });

      // Must send OK to SendGrid
      res.sendStatus(200);
    }
  })
});

const server = app.listen(app.get('port'), function() {
  console.log('Listening on port %d', server.address().port);
});
 Attachments: I received an inquiry regarding sending attachments so I wrote a simple python example to send an email with a picture. The python base64 library is imported because attachments need to be base64 encoded. Make sure to specify the correct MIME type for the attached file. Disposition determines if the photo is an attachment or displayed inline. Content Id is unique ID for each attachment. SendGrid recommends to keep the combined size of all attachments to less than 10MB per email.
import sendgrid
from sendgrid.helpers import mail
import base64

# api key
api = sendgrid.SendGridAPIClient(apikey='YOUR API KEY')
recipient = mail.Email('recipient@address.com')
sender = mail.Email('your@address.com')
subject = 'Sending attachments with SendGrid is fun'
body = mail.Content('text/plain', 'and easy with Python')
email = mail.Mail(sender, subject, recipient, body)

# load file attachment
path = '/usr/share/pixel-wallpaper/islands.jpg' # File to Send
with open(path,'rb') as f:
	content = f.read()
	f.close()

# Create attachment and add to email
attachment = mail.Attachment()
attachment.set_content(base64.b64encode(content)) # Use base64
attachment.set_type('image/jpeg')  # MIME Type of Attachment
attachment.set_filename('islands.jpg')
attachment.set_disposition('attachment') # attachment or inline
attachment.set_content_id('Islands')
email.add_attachment(attachment)

response = api.client.mail.send.post(request_body=email.get())