
This tutorial will demonstrate how to set up a full-fledged Internet chat server on the Raspberry Pi 2. In addition, a bot will be configured to interact with chat room users. The bot will respond to commands, send out notifications and interface with hardware connected to the Pi’s GPIO pins.
 Rocket.Chat will be used for the chat server. It is a full-featured open-source web chat platform. A Raspberry Pi 2 with a clean install of Raspbian will be the host. An older Pi is not recommended because it won’t be compatible with these instructions and it would require manual building.
Before starting please make sure your Pi is up-to-date with sudo apt-get update and upgrade.
sudo apt-get update
sudo apt-get upgrade
 UPDATE: Since I released this tutorial in 2016, the installation process has become much easier thanks to the Rocket Chat Raspberry Pi repo which provides a Snap daemon installer.
On a Raspberry Pi running the latest version of Raspbian snap can be installed directly from the command line. Afterwards reboot the Pi. After this, install the snapd snap in order to get the latest snapd.
sudo apt install snapd
sudo reboot
sudo snap install snap
Unfortunately, it looks like the latest channel is not supported. Please check with the Rocket Chat forum for updated information. The latest version that currently works is 4.x/stable. To install Rocket.Chat Server 4.x, simply use the following command:
sudo snap install rocketchat-server --channel=4.x/stable
I have left the old install instructions from the video below for reference, but they are no longer necessary if you use the Snap installer above. Detailed instructions are available on the RocketChat website for manual installations.
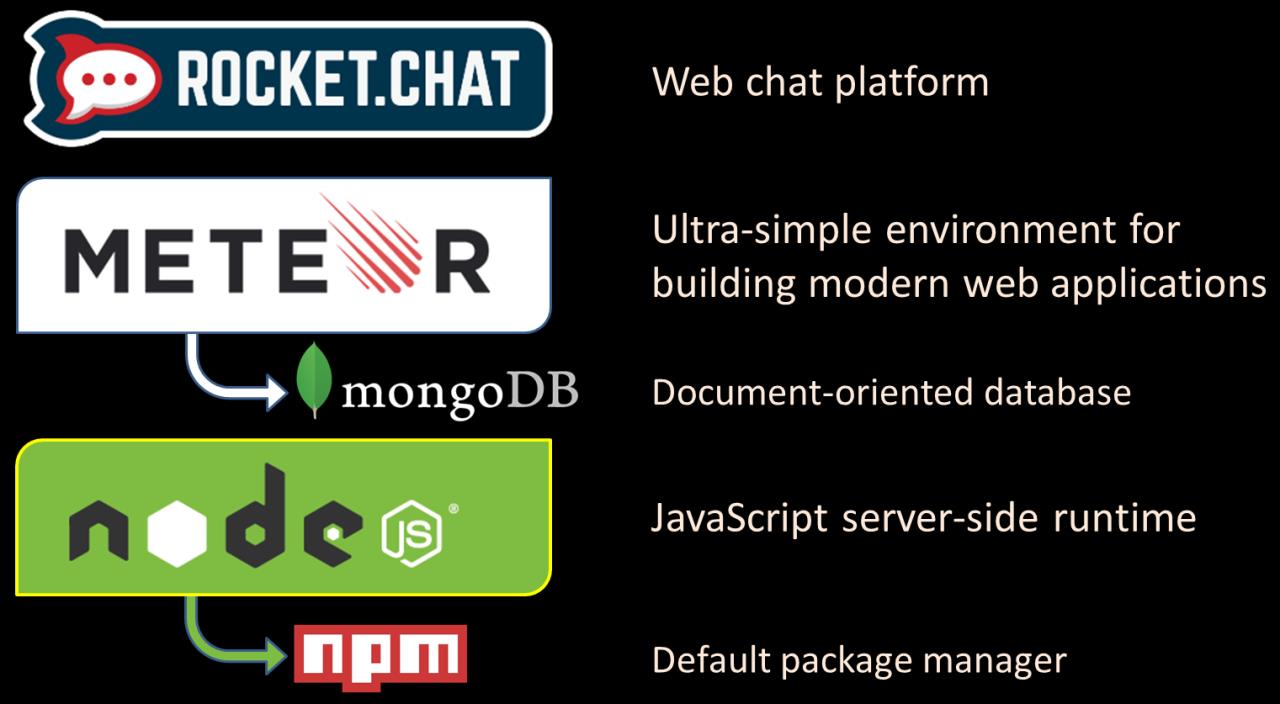
Rocket.Chat is built with Meteor, which is a great open source JavaScript framework that makes it very easy to write powerful web applications. Use git to download the Meteor universal fork which is built for the ARM processor used by the Pi. Then run meteor with the version switch to download the pre-built dev_bundle and finish the installation. The bundle includes Node.js. This will probably take at least 10 minute to finish.
cd ~
git clone --depth 1 https://github.com/4commerce-technologies-AG/meteor.git
meteor/meteor -v
 If you get a certificate error, please see this git issue.
Create a rocketchat directory and CD into it. Download Rocket.Chat with curl. Use tar to uncompress the archive file.
mkdir rocketchat
cd rocketchat
curl https://cdn-download.rocket.chat/build/rocket.chat-pi-develop.tgz -o rocket.chat.tgz
tar zxvf rocket.chat.tgz
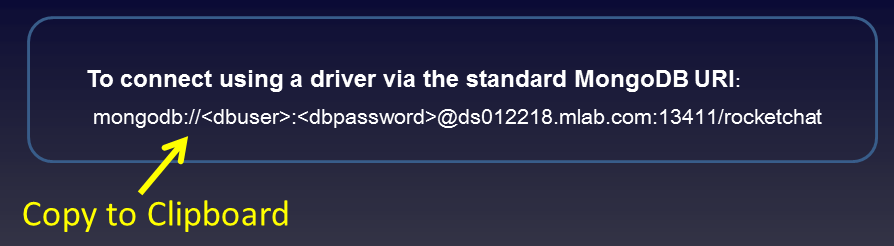
A MongoDB database is required to store our chat data. MongoDB could be installed on the Pi, but because of the high write volume it’s probably not too good for your SD card and there is a high risk of data corruption. mLab.com (previously known as Mongo Lab) provides a cloud database service. Their free sandbox package provides a single database with 500 megabytes and no credit card is required.
Sign up and create a free mLab sandbox database. Name the database rocketchat. Afterwards, create a database user account and give it write access to the new database. mLab will provide a URI to access your new database. You will need the URI later so copy it to the clipboard. It is necessary to replace the placeholders for the database user credentials.
Back in terminal, the Node.js package manager (npm) will be used to install the Rocket.Chat dependencies. CD to rocketchat/bundle/programs/server folder and type meteor/dev_bundle/bin/npm install.
cd $HOME/rocketchat/bundle/programs/server
$HOME/meteor/dev_bundle/bin/npm install
Rocket.Chat is now ready to go. So far, we’ve installed Rocket.Chat, Meteor and Node.js. We’ve also set up an online MongoDB database.
Rocket.Chat will be started from the bundle folder. There are a few environment variables so I’ll create a startup script called blastoff and give it execute permissions. Use nano to edit the blank startup script.
cd $HOME/rocketchat/bundle
touch blastoff
chmod +x blastoff
nano blastoff
Set port equal to 3000. The ROOT_URL can change so a variable $1 is substituted. This ROOT_URL value must be passed as an argument to the script. Change the MONGO_URL to the mLab URI that you copied to the clipboard earlier. Be sure to replace the placeholders for username and password with your actual database username and password.
#!/bin/bash
export PORT=3000
export ROOT_URL=$1
export MONGO_URL=<mLab URI>
$HOME/meteor/dev_bundle/bin/node main.js
Save the blastoff startup script and run it. This script will launch Rocket.Chat. Localhost is passed for the ROOT_URL.
./blastoff http://localhost:3000
After a couple of minutes the server should start. Then open a web browser and go to http://localhost:3000 to access Rocket.Chat. You will need to register a new user which will become the administrative account. You can also access the server from other computers on your home network by using the Pi’s IP address. Just change localhost to the IP address which you can get from a terminal with hostname –I.
hostname –I
You’ll probably want other people on the Internet to access your chat server. For security reasons, I don’t ever recommend opening ports on your home or business router. Instead there is a free service called Ngrok which provides secure introspectable tunnels to your localhost. In other words, it’s a slightly safer way to put your chat server on the Internet. It is still a good idea to make sure your Pi is secure which is beyond the scope of this tutorial, but at the very least make sure you change the default password to a tough password, disable any unused services, throttle login attempts, use public-key or two-factor authentication and regularly update and back up your Pi. It may not seem like a big deal if someone hacks your Pi, but once in, hackers can use it as a platform to attack other devices on your network or conduct other illegal activity.
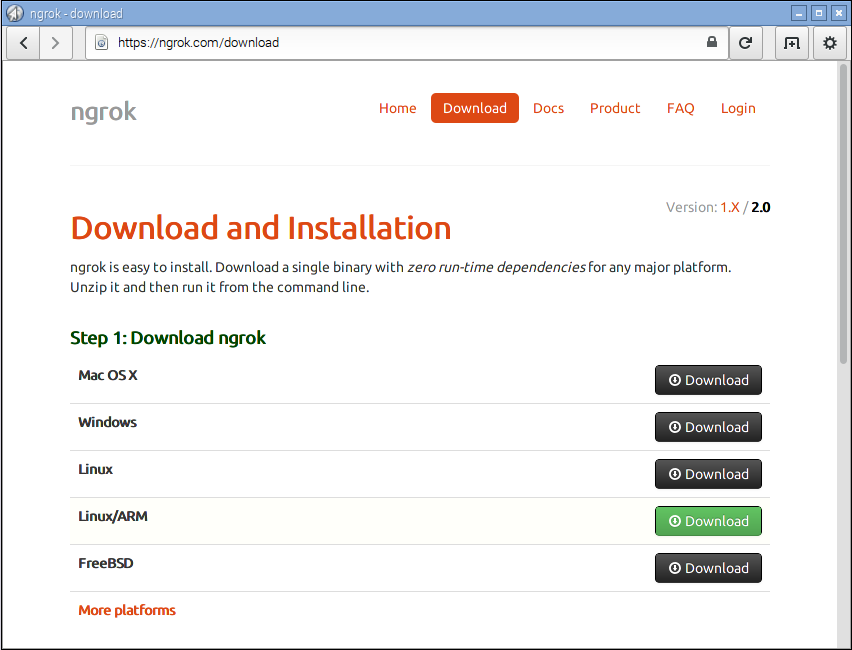
Sign up for a free Ngrok account and then go to the download page and download the Linux/ARM version of Ngrok.
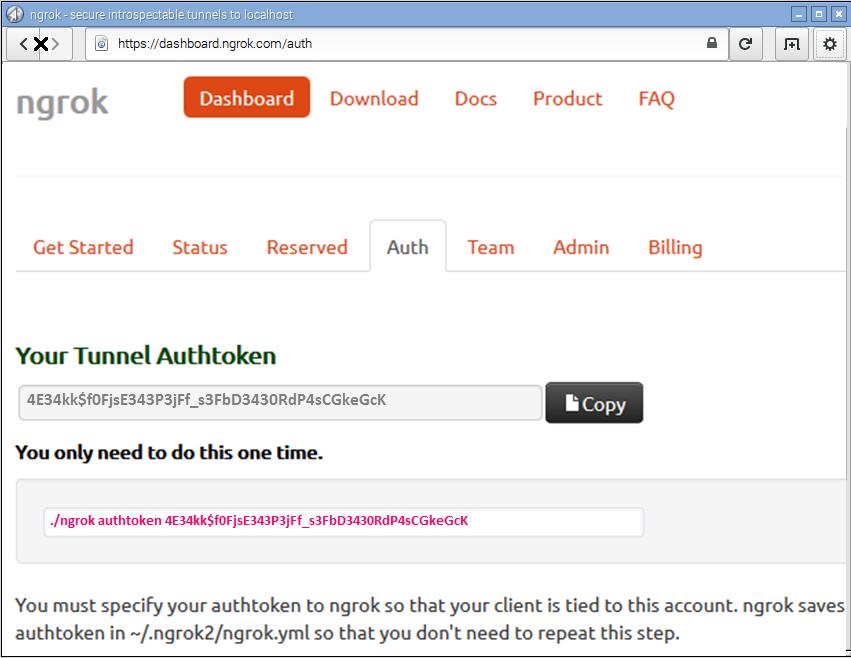
On the Ngrok Dashboard – Auth page, copy the provided Tunnel AuthToken to the clipboard. You will need it later to enable HTTPS access for your chat server. This token should be kept confidential. If necessary, it can be reset under the Admin tab.
Create a new folder called ngrok and CD into it. Unzip the Ngrok download. Run Ngrok with the authtoken switch to set the authentication token. Paste in the token we just copied to the clipboard from the Ngrok website. You only need to do this procedure once. Now you can start Ngrok with the http switch set to port 3000.
cd ~
mkdir ngrok
cd ngrok
unzip ~/Downloads/ngrok-stable-linux-arm.zip
./ngrok authtoken <Ngrok AuthToken>
./ngrok http 3000
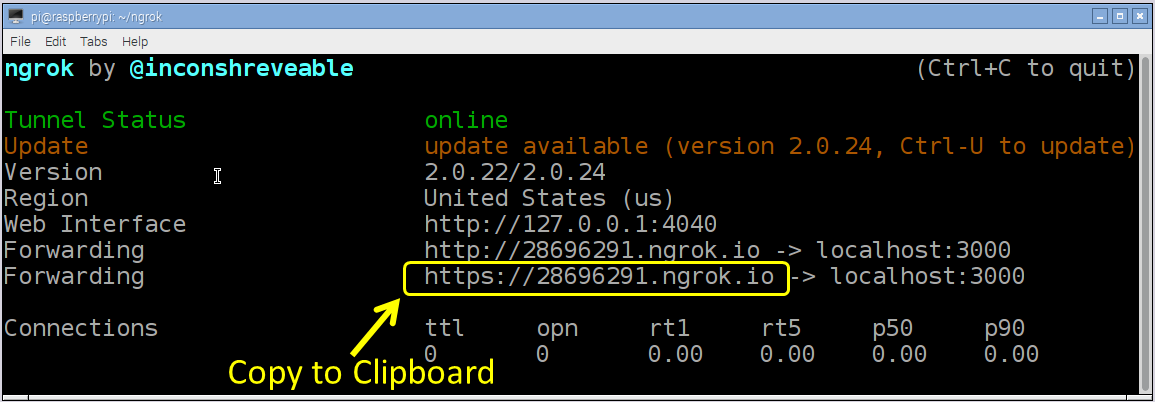
The Ngrok status screen will provide you with an https URL that you can now use to access your Pi from the public Internet. Copy this URL to the clipboard.
It will be necessary to restart Rocket.Chat. Ctrl-C is used to stop the server. Run the blastoff startup script again but this time use the copied Ngrok URL for the ROOT_URL argument.
./blastoff https://28696291.ngrok.io
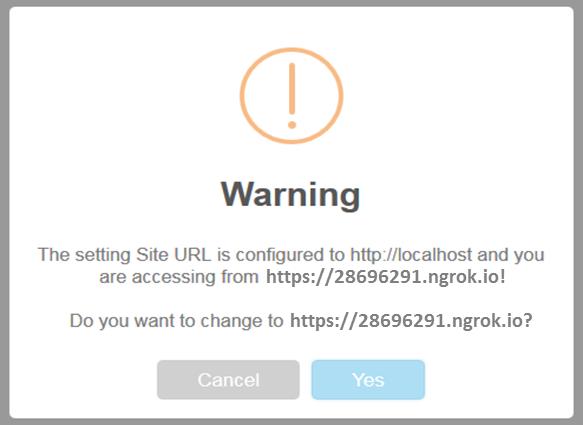
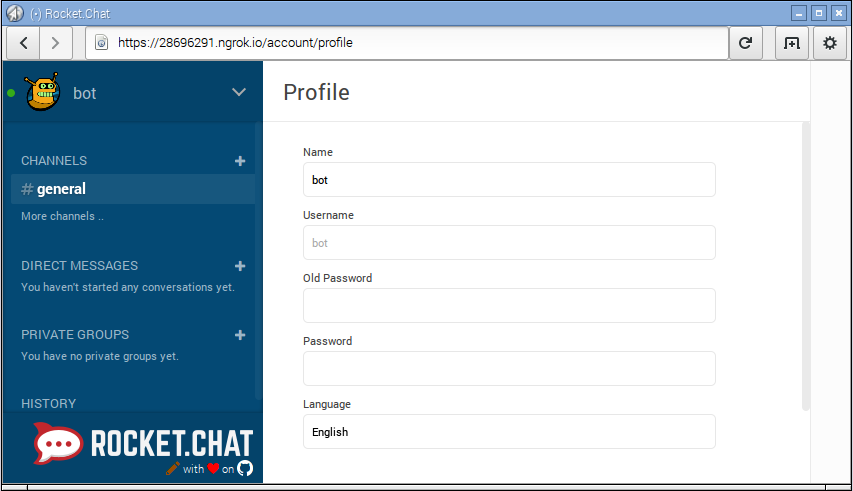
Instead of localhost, paste the Ngrok URL into your web browser address and log back into Rocket.Chat. You should get a warning that the Site URL has changed. Click Yes to confirm the new setting. If you don’t get the warning you can confirm the setting under Administration – Settings – General. I found that the mobile apps will not work unless this setting is correct.
 It may also be necessary to clear the storage cache on your mobile app.
The chat server is live on the Internet. The Ngrok URL is the public address.
Now let’s give users in the chat rooms the ability to interact with the Raspberry Pi.
Hubot is a bot that monitors the chat rooms and responds to commands or keywords. You can write custom scripts to perform actions such as turning on devices like an LED, motor or a solenoid. You can read inputs such as a switch or a sensor. You can also have Hubot post messages to chat rooms in response to events such as motion detection or a temperature warning.
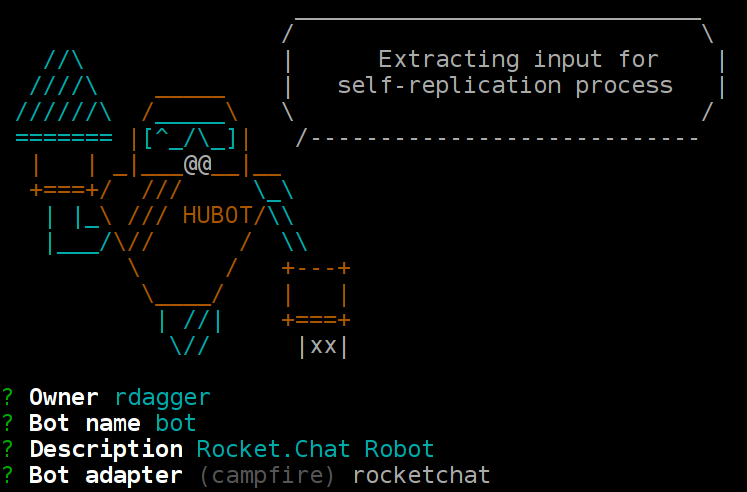
From the Rocket.Chat Administrator screen logout and register a new account. Use bot for the username. I like to use a recognizable avatar to distinguish the bot from other users. Logout after you create the account.
Add the Meteor bin to the $PATH. It is important to use npm update with the global switch to insure the Node.js package manager is up-to-date. Then use npm to install the hubot generator. The install takes around 15 minutes and you may receive a few warnings and errors but it still works.
PATH=$PATH:~/meteor/dev_bundle/bin
npm update -g npm
sudo env "PATH=$PATH" npm install -g yo generator-hubot
Make a hubot folder. From this folder, generate a new hubot. Yo will take a couple of minutes.
cd ~
mkdir hubot
cd hubot
yo hubot
You will be prompted to answer several questions. Use your username or email for the Owner. Bot name should be bot. Description is for your own reference. The Bot adapter should be rocketchat.
There are 5 environment variables so I will use a script to start Hubot. Create a script in the hubot folder called robot_activate. Add execute permission with chmod. Open the blank script in nano for editing.
touch robot_activate
chmod +x robot_activate
nano robot_activate
The general room will be used by Hubot if you don’t specify a ROCKETCHAT_ROOM. Use the credentials from the bot user created earlier for ROCKETCHAT_USER AND ROCKETCHAT_PASSWORD. ROCKETCHAT_AUTH is the type of authentication which will be “password”. Meteor bin is added to the path. Hubot will be started with the rocketchat adapter.
#!/bin/bash
export ROCKETCHAT_ROOM=''
export LISTEN_ON_ALL_PUBLIC=true
export ROCKETCHAT_USER=bot
export ROCKETCHAT_PASSWORD=mysecretpassword
export ROCKETCHAT_AUTH=password
PATH=$PATH:~/meteor/dev_bundle/bin
bin/hubot -a rocketchat
Before starting Hubot, we need to create a script. Scripts are programs that control how Hubot interacts with the chat rooms and the Pi. There is a sample script called example.coffee in the Hubot scripts folder. All Hubot scripts are written in CoffeeScript which is a “little language” that transpiles into JavaScript. Many people find it similar to Python. First npm will be used to install onoff which is a Node.js package to allow GPIO access and interrupt detection. There are a substantial number of Raspberry Pi related packages for Node.js available via npm.
$HOME/meteor/dev_bundle/bin/npm install onoff
Next open the example.coffee file with nano. It will make a good template.
nano scripts/example.coffee
I modified the example below. The program will import the onoff package and instantiate an LED ouput on GPIO 21 and a button input on GPIO20. The button.watch function reports the state of the button whenever it changes. The robot hear methods will allow users to toggle the illumination of an LED and also request a GPIO pinout illustration. The exit method insures everything is cleaned up when the bot is stopped.
module.exports = (robot) ->
   Gpio = require('onoff').Gpio
   led = new Gpio(21, 'out')
   button = new Gpio(20, 'in', 'both')

   button.watch((err, value) ->
      console.log(err)
      msg = if value then "Button pressed." else "Button released"
      robot.send({room: 'general'}, msg))

   robot.hear /led on/i, (res) ->
      res.send "LED is now on."
      led.writeSync(1)

   robot.hear /led off/i, (res) ->
      res.send "LED is now off."
      led.writeSync(0)

   robot.hear /gpio pinout/i, (res) ->
      res.send "https://www.element14.com/community/servlet/JiveServlet/previewBody/73950-102-4-309126/GPIO_Pi2.png"

   exit = () ->
      led.unexport()
      button.unexport()
      process.exit()

   process.on('SIGINT', exit)
Type ./robot_activate to start Hubot.
./robot_activate
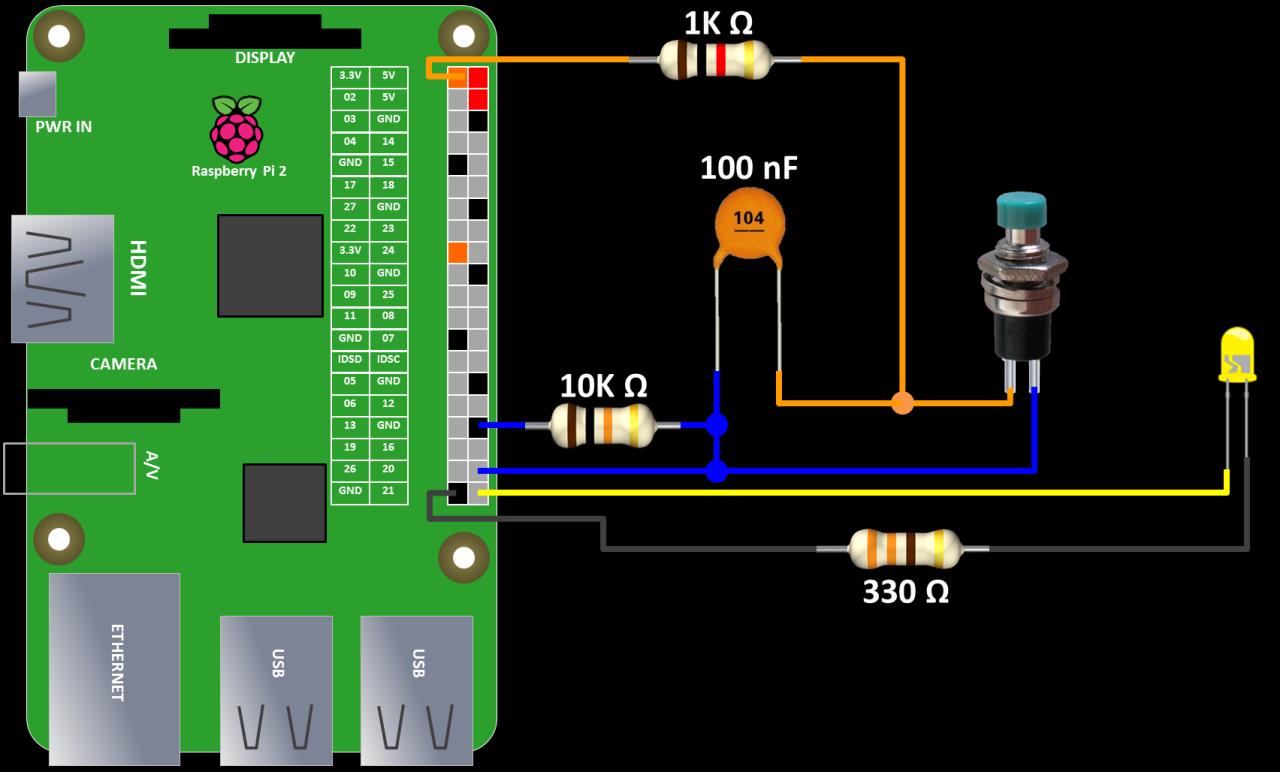
Here is the test schematic for the sample script. The 330Ω resistor limits current to the LED. The 1kΩ resistor limits current through the push button switch. A 10kΩ pull down resistor insures that the switch input does not float and a 100 nF capacitor debounces the switch.
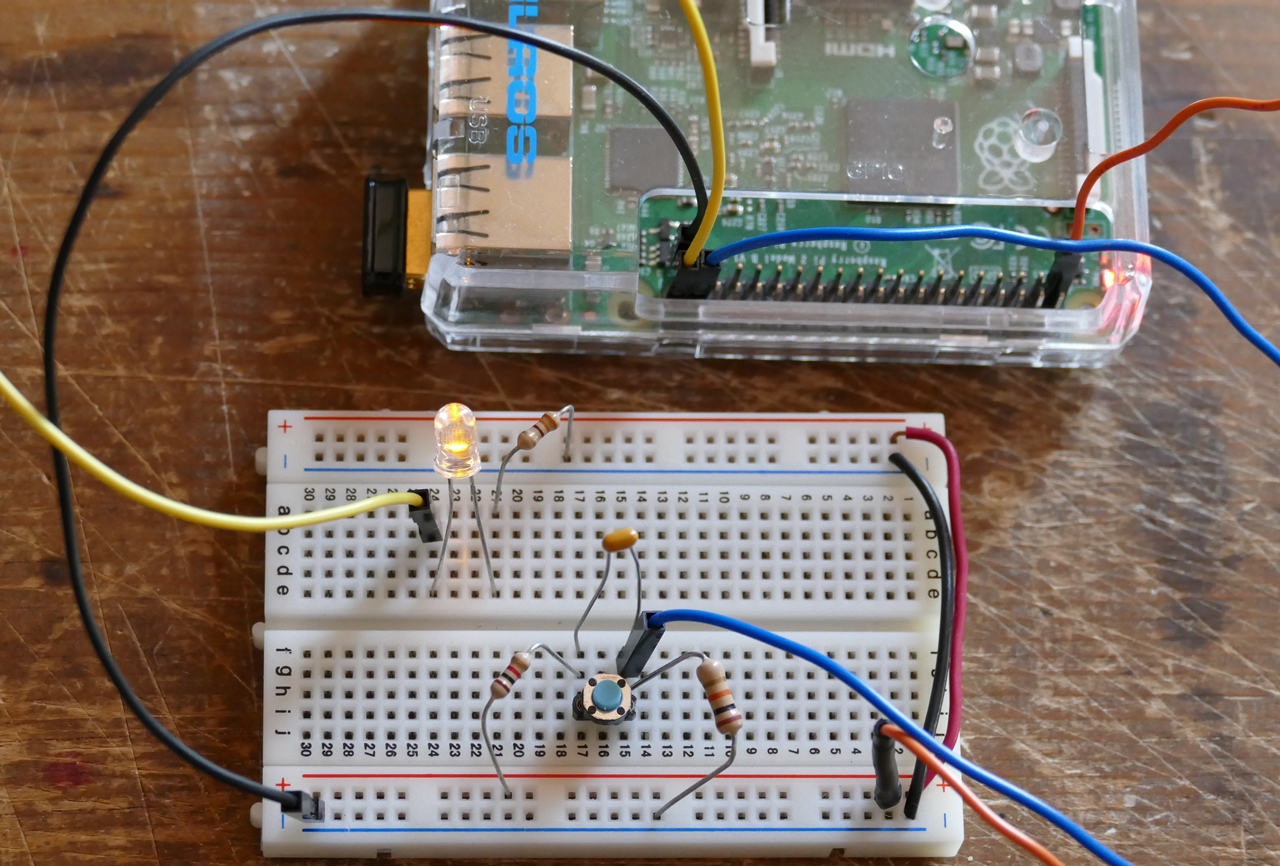
On a small breadboard, the LED and switch are connected to the Pi.
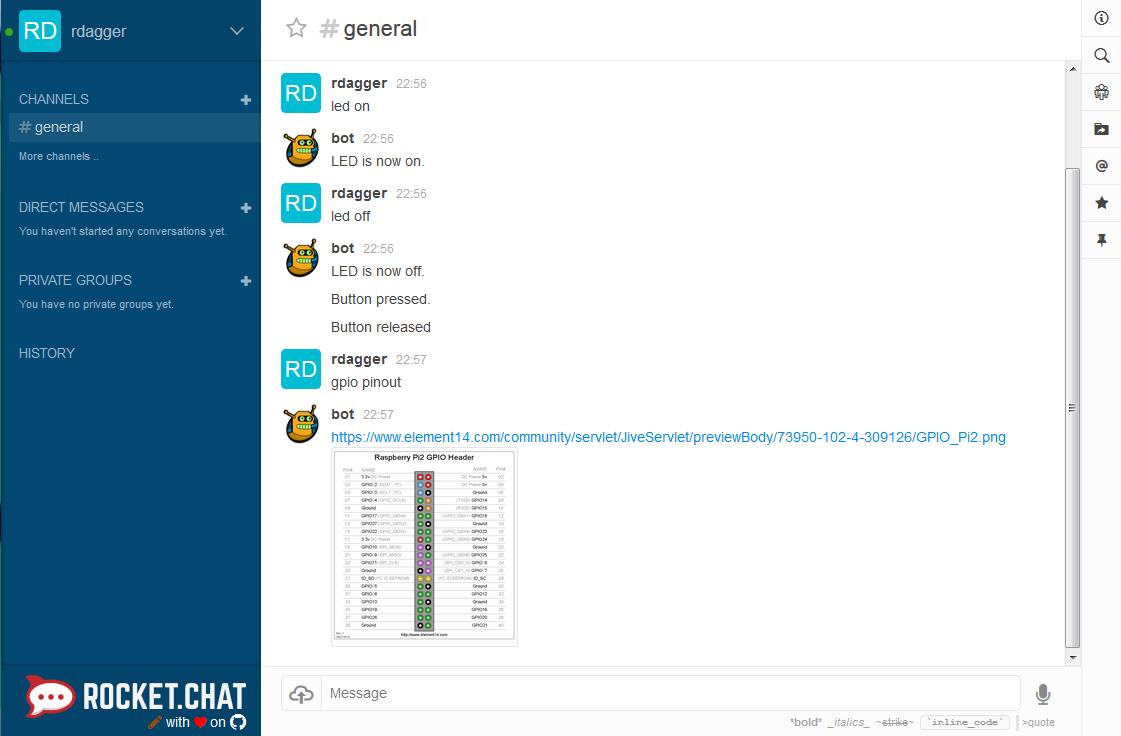
The chat room shows the bot responding to commands and the button events.
Please review the Rocket.Chat  before asking questions. This tutorial was inspired by resources provided by Rocket.Chat Raspberry Pi. I also recommend you check out the RockOnPi chat room for 24×7 community help.