
I received a request to demonstrate how to consume JSON web services from a Raspberry Pi. This tutorial demonstrates how to connect to an Internet weather API in python and display city temperatures and conditions from around the world on a 16×2 LCD display. A DHT22 sensor is also connected to display local temperature and humidity.
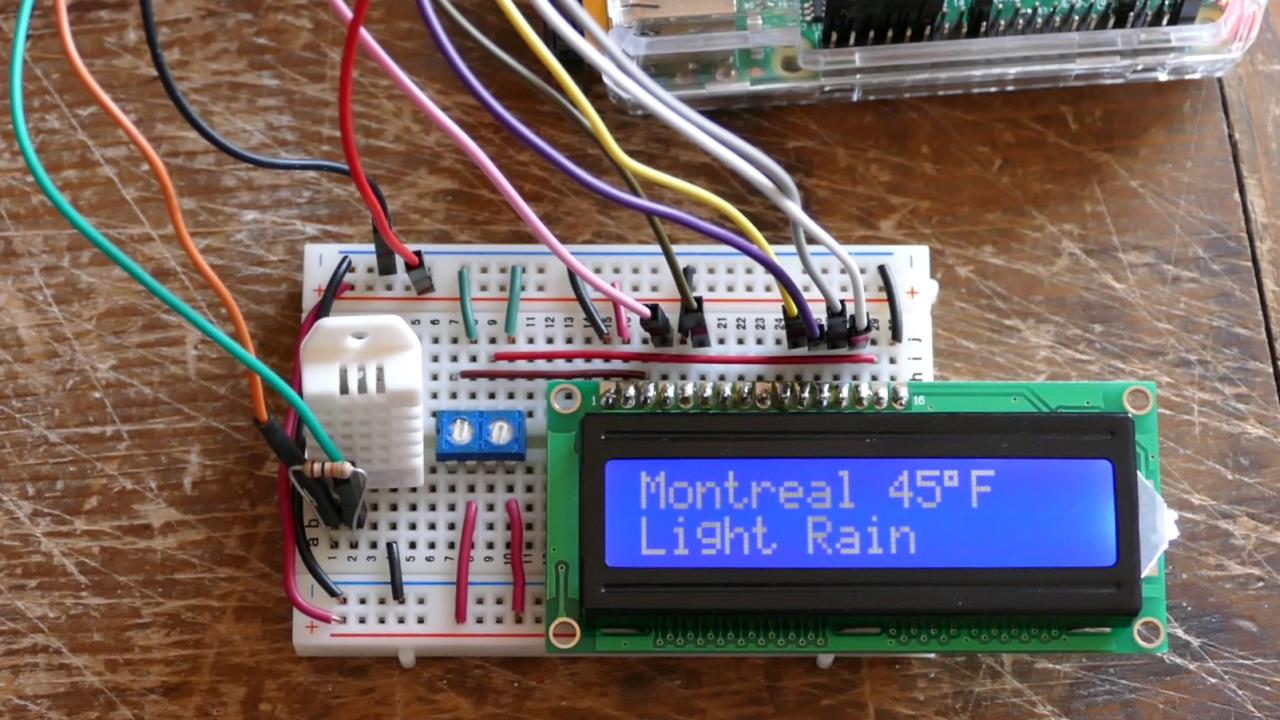
On a small breadboard I have a 16×2 LCD display, a DHT22 temperature/humidity sensor and dual potentiometers to control contrast and brightness.
Here’s a simplified schematic. The LCD display requires 6 GPIO pins on the Pi. You can pick any pins you like. I’m using GPIO 26 for RS, 19 for enable and 13, 6, 5 and 11 for data 4 through 7 respectively. The LCD Vcc is connected to 5 V on the Pi. The ground, read/write and backlight cathode are connected to the PI’s ground. The DHT22 sensor runs at 3.3 V unlike the LCD display which is 5 V. The data line is connected to GPIO 4. A mandatory 10 KΩ pull-up resistor is placed between the DHT22 Vcc pin 1 and the data pin 2. Pin 3 is left disconnected. Pin 4 goes to ground.
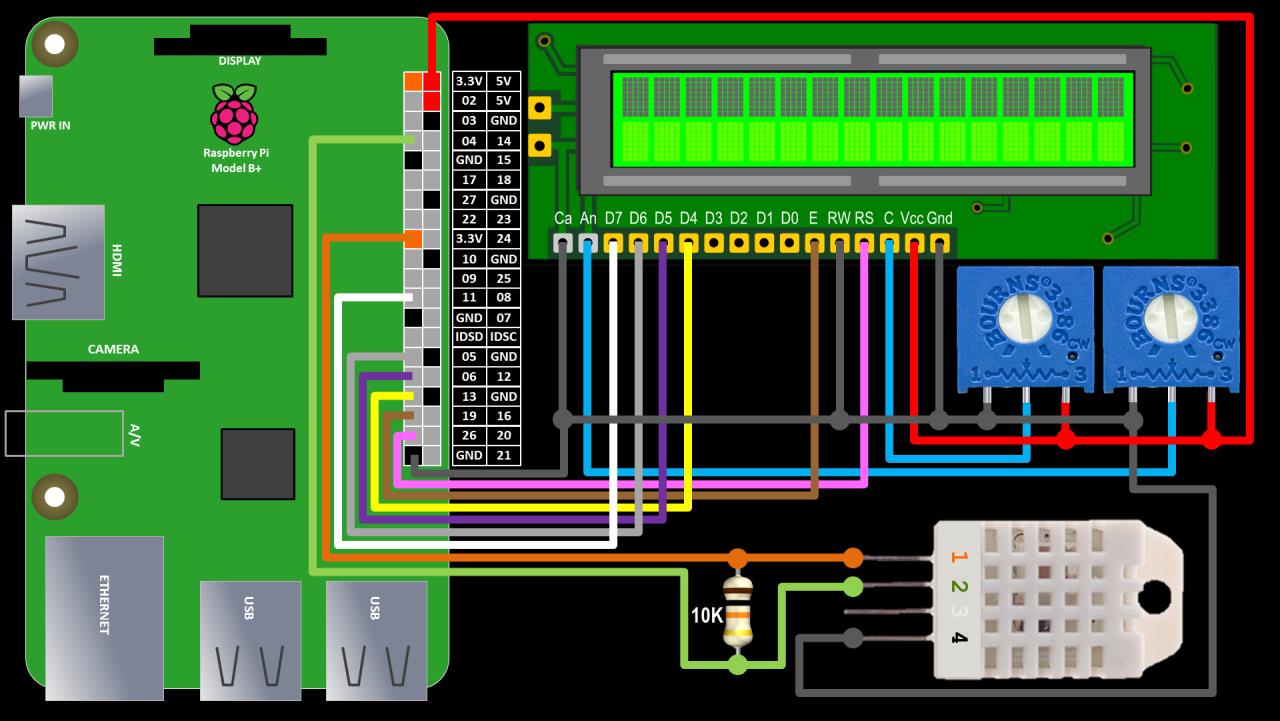
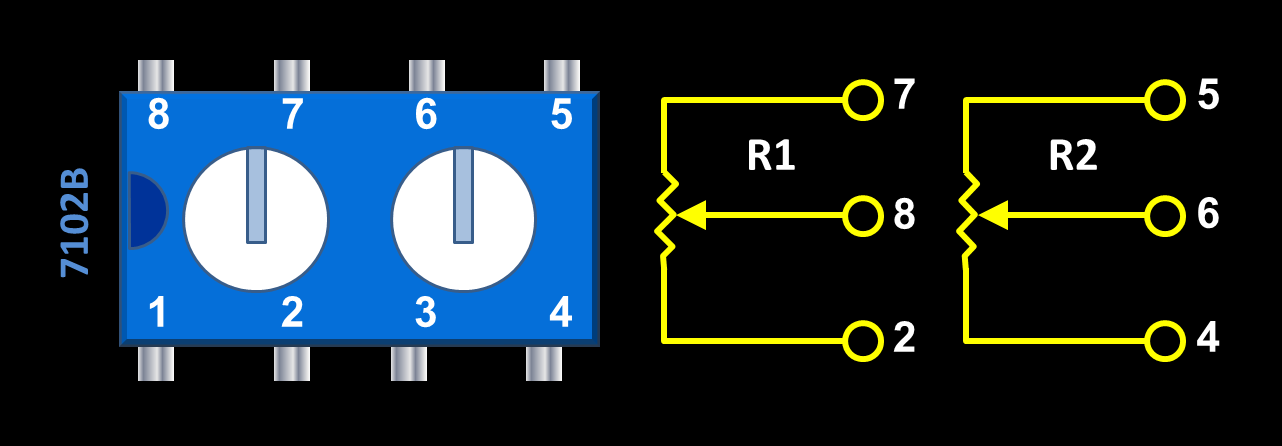
The LCD contrast pin and the backlight anode pin are connected to wipers on the pots. The other 2 terminals on each pot are connected to a ground and a 5 V pin. Please check your display datasheet to insure your backlight will tolerate 5 V. You might have to add a resistor if it requires a lower voltage. Instead of 2 pots, I’m using a single Bourns 7102B on the breadboard which I like because of the small form factor and it also stays securely in place. It’s basically 2 potentiometers in a single dip package.
I’m running the latest release of Raspbian OS on a Raspberry Pi 2. However, I’ve tested the Adafruit LCD and DHT22 code on earlier Pi’s with Wheezy. I recommend you always start tutorials with a freshly installed OS and perform apt-get update and apt-get upgrade from a terminal to insure the latest packages.
sudo apt-get update
sudo apt-get upgrade
Use pip to install the Adafruit CharLCD library to control the LCD display.
sudo pip3 install adafruit-charlcd
The DHT22 library requires build essentials and python-dev which are installed with apt-get install.
sudo apt-get install build-essential python-dev
Git clone is used to download the Adafruit Python DHT sensor library. The DHT22 library needs to be installed. CD into the downloaded folder and run sudo python setup.py install. Don’t forget to reboot (it’s required).
cd ~
git clone https://github.com/adafruit/Adafruit_Python_DHT.git
cd Adafruit_Python_DHT
sudo python3 setup.py install
sudo reboot
After the Pi reboots open a terminal and run idle with gksu to insure you have the necessary super user privileges. (Update: super-user privileges are no longer required for GPIO access with the latest version of Raspbian.) The Idle IDE no longer comes with the latest version of Raspbian. It has been replaced by the Thonny Python IDE.
/usr/bin/gksu -u root idle
To consume JSON web services the python requests library will be used. It is a well-designed library that provides very powerful web capabilities.

The following code for the international weather clock is available for download.
In a python file after the shebang line, requests is imported. Sleep, datetime and sys are also imported.
#!/usr/bin/env python
import requests
from time import sleep
from datetime import datetime
Import the Adafruit_CharLCD library.
# Import Adafruit LCD Display Library
from Adafruit_CharLCD import Adafruit_CharLCD
An lcd is instantiated and cleared. The pins selected for the control and data lines are passed as parameters. The display dimensions are also passed. You can use different GPIO pins but you must specify them when you create the lcd. Please note that Adafruit has made breaking changes to the library since the video. The code below has been updated to reflect the changes.
lcd = Adafruit_CharLCD(rs=26, en=19, d4=13, d5=6, d6=5, d7=11, cols=16, lines=2)
lcd.clear()
The Adafruit DHT library is imported as dht. The Adafruit installation program took care of adding the DHT library to the path.
import Adafruit_DHT as dht
A list of tuples of city names and ID’s is declared. The Yahoo Weather API will be used to provide the weather forecast data.
 UPDATE: As of January 3, 2019, Yahoo has retired their weather API that I used in the video, but they have a new weather API. It requires an API key, but the service is still free. There are several alternative free API’s such as OpenWeatherMap, MetaWeather and FreeCodeCamp. I added a working example using the FCC API to the downloads below.
# Yahoo Weather City ID's more available at https://weather.yahoo.com
cities = [ ('Amsterdam', '727232'),
           ('Bangkok',  '1225448'),
           ('Beijing', '2151330'),
           ('Berlin', '638242'),
           ('Chicago', '2379574'),
           ('Istanbul', '2344116'),
           ('London',   '44418'),
           ('Los Angeles', '12795609'),
           ('Montreal', '3534'),
           ('Mumbai', '2295411'),
           ('New York', '2459115'),
           ('Paris', '615702'),
           ('Stockholm', '906057'),
           ('Tokyo', '1118370'),
           ('Venice', '725746'),
           ('Warsaw', '523920') ]
In addition to the list, a string delimited list of just the ID’s will be required for the weather API query. Join is used with list comprehension to extract the codes to a string from the list above.
city_codes = ",".join([c[1] for c in cities])
If you would like to add cities to the list, you can obtain the city ID by going to Yahoo weather and searching for the desired city. In the browser address bar the city ID will be located next to the city name.
 .
.
A method called getWeatherConditions uses the python Request library to poll the online weather service. First the url of the web service is specified. Two query strings are required. Query strings are basically data appended to the end of a url. They are passed with the web request similarly to how parameters are passed to a function. The first query string is q which stands for query. It is a select statement to query the weather API. In this case, it returns all weather forecasts matching the city ID’s in the city_codes string. The 2nd query string is format which specifies the format of the response to our request. JSON is specified for the format. Headers to disable caching are also included. I’m not sure if they are necessary, but it doesn’t hurt to add just to be sure the data is always current. The requests.get method takes the url, query strings and headers. The method returns a web response which should contain the forecast data in JSON format. The getWeatherCondtion method returns the forecast data. The json method is used to parse the JSON data into a nested dictionary format that works well with python. The method is wrapped with try except to catch and return any errors.
def getWeatherConditions() :
    try :
        url = 'https://query.yahooapis.com/v1/public/yql'
        # encode query string for request
        query = ('select item.condition from weather.forecast where woeid in ('
                + city_codes + ')')
        query_strings = {'q': query, 'format' : 'json'}
        # headers to disable caching (in theory)
        headers = {'Pragma': 'no-cache', 'Cache-Control': 'no-cache'}
        # get weather data from Yahoo
        r = requests.get(url, params=query_strings, headers=headers)
        # return data formatted to JSON
        return r.json()
    except Exception:
        return "Feed Error"
If you prefer Celsius, the query line would be changed as follows:
query = ("select item.condition from weather.forecast where woeid in ("
                + city_codes + ") and u='c'")
To work with the returned JSON data in python, it is important to understand nested dictionaries. A python dictionary is as an unordered set of key: value pairs. The keys are unique identifiers that point to a corresponding value. This value can be another dictionary which would be considered nested and it could contain additional nested dictionaries and on and on. For example, the following dict of animals contains keys for birds and mammals which point to nested dictionaries of specific animals including duck and dog which point to the animal sounds quack and woof. Bracket notation is used to reference nested items:
>>> animals={'birds':{'duck':'quack'}, 'mammals':{'dog':'woof'}}
>>> animals['mammals']['dog']
'woof'
Here is an example of what the returned JSON weather forecast data looks like:
{"query":{"count":16,"created":"2016-01-10T18:25:06Z","lang":"en-US","results":{"channel":[
  {"item":{"condition":{"code":"29","date":"Sun, 10 Jan 2016 6:55 pm CET","temp":"41","text":"Partly Cloudy"}}},
  {"item":{"condition":{"code":"29","date":"Mon, 11 Jan 2016 1:00 am ICT","temp":"81","text":"Partly Cloudy"}}},
  {"item":{"condition":{"code":"33","date":"Mon, 11 Jan 2016 2:00 am CST","temp":"19","text":"Fair"}}},
  {"item":{"condition":{"code":"33","date":"Sun, 10 Jan 2016 6:49 pm CET","temp":"36","text":"Fair"}}},
  {"item":{"condition":{"code":"28","date":"Sun, 10 Jan 2016 11:53 am CST","temp":"16","text":"Mostly Cloudy"}}},
  {"item":{"condition":{"code":"11","date":"Sun, 10 Jan 2016 7:49 pm EET","temp":"52","text":"Light Rain Shower"}}},
  {"item":{"condition":{"code":"33","date":"Sun, 10 Jan 2016 5:49 pm GMT","temp":"45","text":"Fair"}}},
  {"item":{"condition":{"code":"26","date":"Sun, 10 Jan 2016 10:00 am PST","temp":"57","text":"Cloudy"}}},
  {"item":{"condition":{"code":"11","date":"Sun, 10 Jan 2016 12:59 pm EST","temp":"37","text":"Light Rain"}}},
  {"item":{"condition":{"code":"22","date":"Sun, 10 Jan 2016 8:29 pm IST","temp":"79","text":"Smoke"}}},
  {"item":{"condition":{"code":"26","date":"Sun, 10 Jan 2016 12:50 pm EST","temp":"58","text":"Cloudy"}}},
  {"item":{"condition":{"code":"33","date":"Sun, 10 Jan 2016 7:00 pm CET","temp":"39","text":"Fair"}}},
  {"item":{"condition":{"code":"27","date":"Sun, 10 Jan 2016 6:49 pm CET","temp":"30","text":"Mostly Cloudy"}}},
  {"item":{"condition":{"code":"33","date":"Mon, 11 Jan 2016 3:00 am JST","temp":"43","text":"Fair"}}},
  {"item":{"condition":{"code":"20","date":"Sun, 10 Jan 2016 6:19 pm CET","temp":"45","text":"Fog"}}},
  {"item":{"condition":{"code":"26","date":"Sun, 10 Jan 2016 7:00 pm CET","temp":"32","text":"Cloudy"}}}]}}}
The main while loop will run until interrupted. The above getWeatherConditions method is called. The returned data is checked to make sure it is of type dict and that it does not contain an error message. Any errors are logged and the program pauses for 4 seconds.
if __name__ == "__main__":
    while 1:
        data = getWeatherConditions()
        if( type(data) != type(dict()) or "error" in data):
            # Error
            print (data)
            lcd.clear()
            lcd.message("FEED\nERROR")
            sleep(4)
If no errors, the total count of returned city data forecasts is retrieved from the JSON data. This should equal the length of the cities list.
        else:
            count = data["query"]["count"]
The program loops through all the cities. City name is returned from the cities list. Forecast condition text and temperature is returned from the JSON data. Note how the python dict syntax allows us to extract deeply nested JSON data with a single line of code.
            # Loop through cities
            for c in range(0, count):
                # Retrieve city name, condition and temperature
                city = cities[c][0]
                cond = data["query"]["results"]["channel"][c]["item"]["condition"]["text"]
                temp = data["query"]["results"]["channel"][c]["item"]["condition"]["temp"]
Clear is used to clear the LCD display. The lcd.message method is used to display the city name and temperature on the first line.
 UPDATE: the Adafruit library changed the name of the write4bits method to write8.
The lcd.write8 method is used to append a degree symbol to the display. LCD display symbols often vary depending on the display and region. Usually the datasheet will contain a character map that has the value of all character symbols. On my display 223 is the decimal value for degree. An ‘F’ for Fahrenheit is appended followed by ‘\n’ for new line which move the cursor to the bottom line of the display. The weather condition text is displayed on the bottom line and the program pauses for a second.
                lcd.clear()
                # Display city temperature and condition
                lcd.message(city + " " + temp)
                lcd.write8(223, True)
                lcd.message("F\n" + cond)
                sleep(1)
Next, the dht.read_retry method is used to poll the DHT22 sensor connected on GPIO 4 for temperature and humidity. The temperature is returned in Celsius and then converted to Fahrenheit. Omit the conversion line and change the F to a C below if you prefer Celsius.
                # Poll DHT22
                h,t = dht.read_retry(dht.DHT22, 4)
                t = t * 9/5.0 + 32
The display is cleared and the date/time are displayed on the first line. Python’s strftime is used to format the date and time. The directives are not very intuitive but they are well documented on the strftime website. The local temperature and humidity from the DHT22 are displayed on the bottom line. The program pauses for 2 seconds and then the loop continues.
                lcd.clear()
                # Display time
                lcd.message(datetime.now().strftime('%I:%M %p %b %d'))
                # Display temperature an humidity
                lcd.message("\n{0:0.1f}".format(t))
                lcd.write8(223, True)
                lcd.message("F   {0:0.1f}%".format(h))
                sleep(2)
I have additional tutorials specifically for the DHT22 sensor and LCD displays with the Raspberry Pi.
Downloads:
Original code for international weather clock – (updated 09-23-2016). (no longer works)
Revised code added local city time & timeout – (updated 10-02-2016). (no longer works)
LATEST code. Replaced Yahoo Weather API with FCC API (04-09-2019). Requires pytz which is installed with sudo pip3 install pytz. Here’s a list of the pytz timezone codes.
 DHT22 Troubleshooting Tips.