
This tutorial demonstrates how to connect a DHT22 temperature and humidity sensor to an ESP32 running MicroPython. The sensor data is transmitted wirelessly to a Raspberry Pi using MQTT protocol and the results are displayed on I2C OLED display.
This tutorial builds on my last tutorial which shows how to load the MicroPython firmware on to an ESP32 and use Rshell to manipulate files and run python code in the REPL. I recommend you check it out first.
 There’s been 1 breaking change since the last video with respect to loading the firmware which I’d like to address. It’s now necessary to specify hex address 0x1000 (instead of zero) when writing the MicroPython firmware to the ESP32.
esptool.py --port /dev/ttyUSB0 write_flash 0x1000 <path to firmware file>
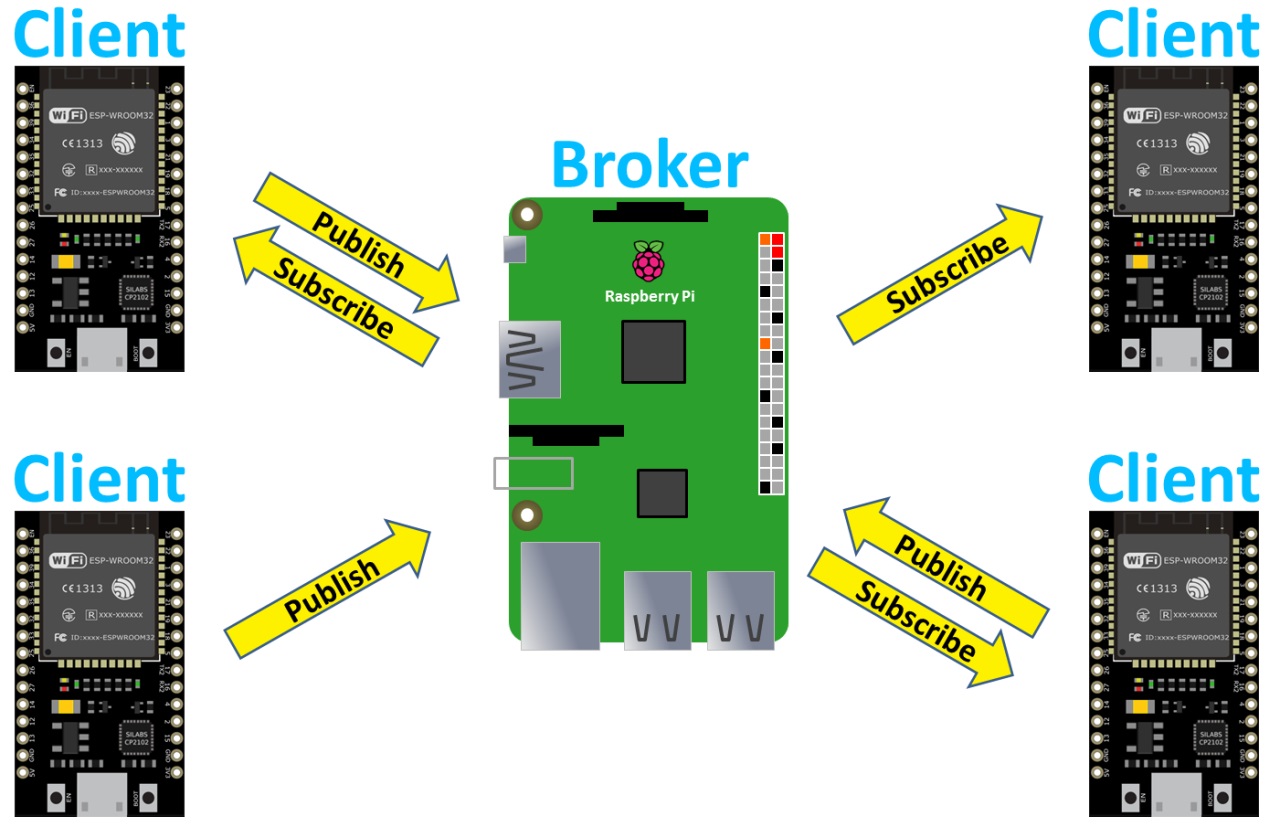
MQTT is a very light weight connectivity protocol. It is very popular with IOT devices because it requires much less code and memory compared to other approaches such as a REST API.
It uses a publish subscribe model. A single broker acts as a server and manages messages among multiple clients. A client can publish a message to a topic and any client that subscribes to the topic will get the message.
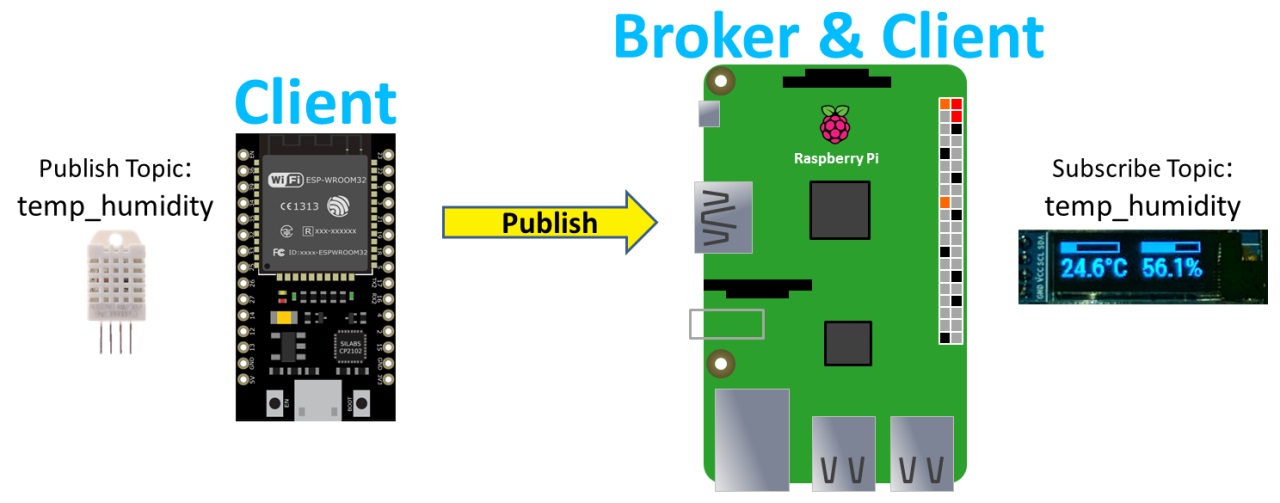
For this video an ESP32 client connected to a DHT22 temperature and humidity sensor will publish the sensor data to a topic called temp humidity. A Raspberry Pi will be the broker and it will also be a client. A Python MQTT client running on the Pi will subscribe to the temp_humidity topic and show the results on an OLED display.
Topics are usually organized in a hierarchical order using slashes like the file system on a computer. They are then referred to as topic trees and it is possible to reference them with wild cards. + for single level and # for multilevel. For example you could have topics called sensors/temperature/attic and sensors/temperature/workshop. You could subscribe to both by using sensors/temperature/#. For this example there will be just 1 topic: temp_humidity.
Again this is a very simple example. You could have multiple ESP32’s publishing and subscribing to topics with all types of sensors such as solar power tracking, water pressure, motion detection, GPS, beacons, etc. And it doesn’t have to be limited to sensors, you could fire relays, activate home automation macros, run programs, etc.
Mosquitto will be used for the server. It is an open source message broker that implements the MQTT protocol. It can be installed on the Raspberry Pi using apt-get install. Mosquitto clients is also installed. It is a command line MQTT client that is helpful for debugging.
sudo apt-get install mosquitto mosquitto-clients
 UPDATE: Mosqitto v.2.0 restricts access to the localhost only be default. Modifications are required to the mosquitto.conf file which is located in the /etc/mosquitto directory. Append the 2 following lines to the .conf file to allow remote computers to access the Mosquitto broker without authentication (then reboot Pi):
listener 1883 0.0.0.0
allow_anonymous true
In addition to the Pi we’ll need a MicroPython MQTT client for the ESP32. A good one is umqtt.simple which is available from the Micropython-lib repository. After downloading the simple.py file, copy it into a folder called umqtt on the ESP32 using rshell.
rshell --buffer-size=30 -p /dev/ttyUSB0
mkdir /pyboard/umqtt
cp simple.py /pyboard/umqtt/
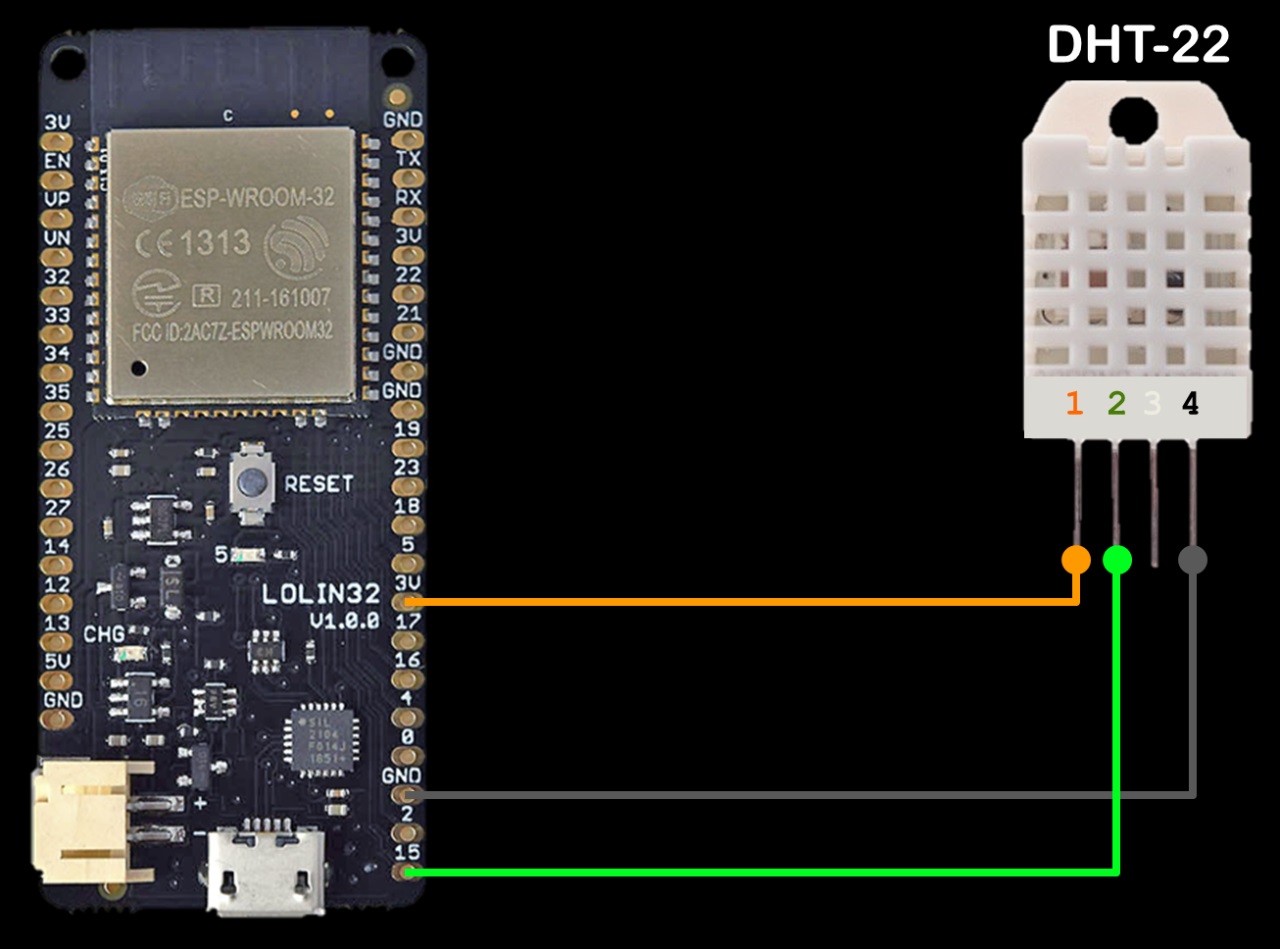
The DHT-22 temperature/humidity sensor is easy to connect to the ESP32. Pin 1 Vcc on the DHT22 is connected to a 3.3V pin on the ESP32. Pin 2, the DHT-22 data line is connected to GPIO15. You can use any available GPIO pin because it will be specified int he code. It’s a good practice in terms of reliability to keep the data wire short, preferably under 15 cm. Pin 3 is left disconnected and pin 4 ground is connected to a ground on the ESP32. Normally you would connect a pull-up resistor between the data line and the 3.3V line, but it’s not necessary because the ESP32 GPIO pins have internal pull-ups that can be turned on from code.
Here is the MQTT client code that will run on the ESP32. It polls the DHT-22 and publishes the sensor data to a topic called temp_humidity.
from time import sleep
from umqtt.simple import MQTTClient
from machine import Pin
from dht import DHT22

SERVER = '192.168.1.22'  # MQTT Server Address (Change to the IP address of your Pi)
CLIENT_ID = 'ESP32_DHT22_Sensor'
TOPIC = b'temp_humidity'

client = MQTTClient(CLIENT_ID, SERVER)
client.connect()   # Connect to MQTT broker

sensor = DHT22(Pin(15, Pin.IN, Pin.PULL_UP))   # DHT-22 on GPIO 15 (input with internal pull-up resistor)

while True:
    try:
        sensor.measure()   # Poll sensor
        t = sensor.temperature()
        h = sensor.humidity()
        if isinstance(t, float) and isinstance(h, float):  # Confirm sensor results are numeric
            msg = (b'{0:3.1f},{1:3.1f}'.format(t, h))
            client.publish(TOPIC, msg)  # Publish sensor data to MQTT topic
            print(msg)
        else:
            print('Invalid sensor readings.')
    except OSError:
        print('Failed to read sensor.')
    sleep(4)
Save the python to a file called dht_publish.py. Copy the file to the ESP32 root directory using rshell. Then start the MicroPython REPL.
cp dht_publish.py /pyboard
repl
Before running the client publishing code, it’s necessary to connect the ESP32 to a WiFi network.
import network
station = network.WLAN(network.STA_IF)
station.active(True)
station.connect("<your SSID>", "<your WiFi password>")
Import dht_publish runs the client code.
import dht_publish
The ESP32 should now be polling the DHT-22 and publishing the temperature and humidity data to the MQTT broker. We can test that data is actually be published by using the Mosquitto command line client to subscribe to the topic temp_humidity.
mosquitto_sub -d -t "temp_humidity"
Ctrl-C is used to exit the Mosquitto client. The command line is great for debugging, but now let’s create a python client program that’s a little more useful. Install the Paho MQTT Python Client library using pip.
sudo pip3 install paho-mqtt
The python client will run on the same Rasbperry Pi that is also serving as the Mosquito MQTT broker and display the temperature and humidity readings on an SSD1306 OLED display. Adafruit provides a simple SSD1306 python library for driving OLED displays which can also be installed using pip.
sudo pip3 install adafruit-ssd1306
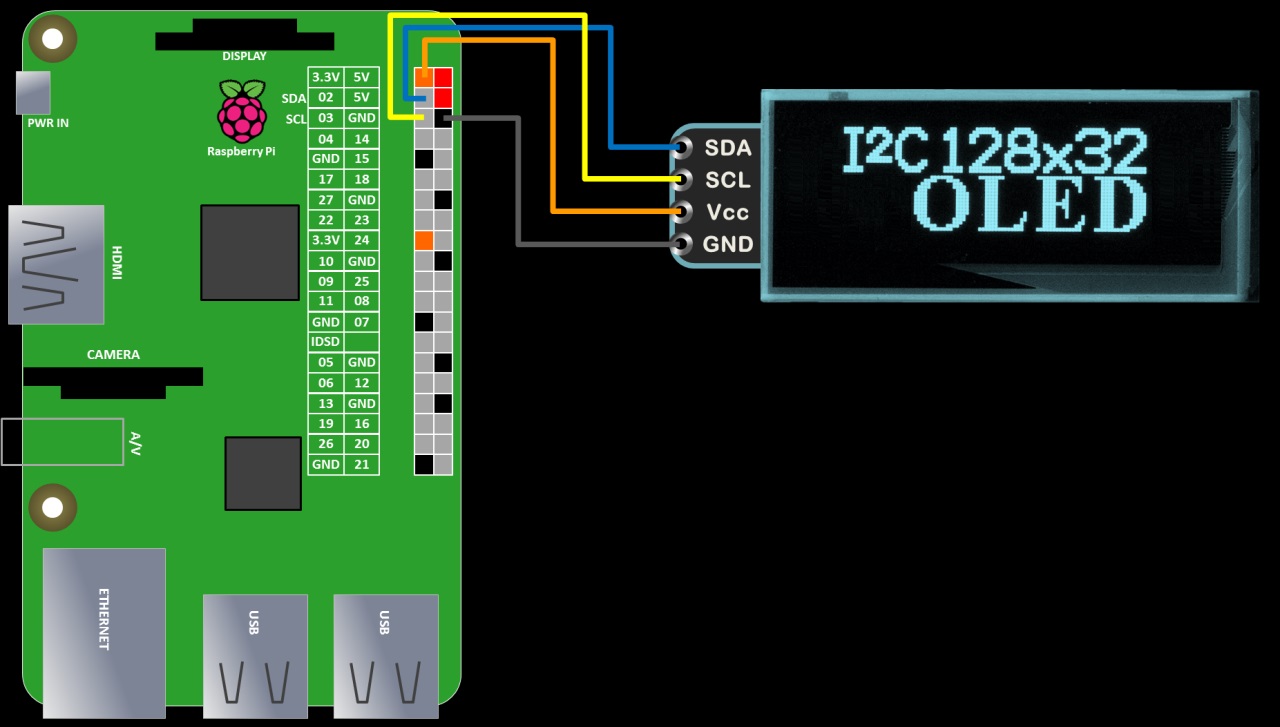
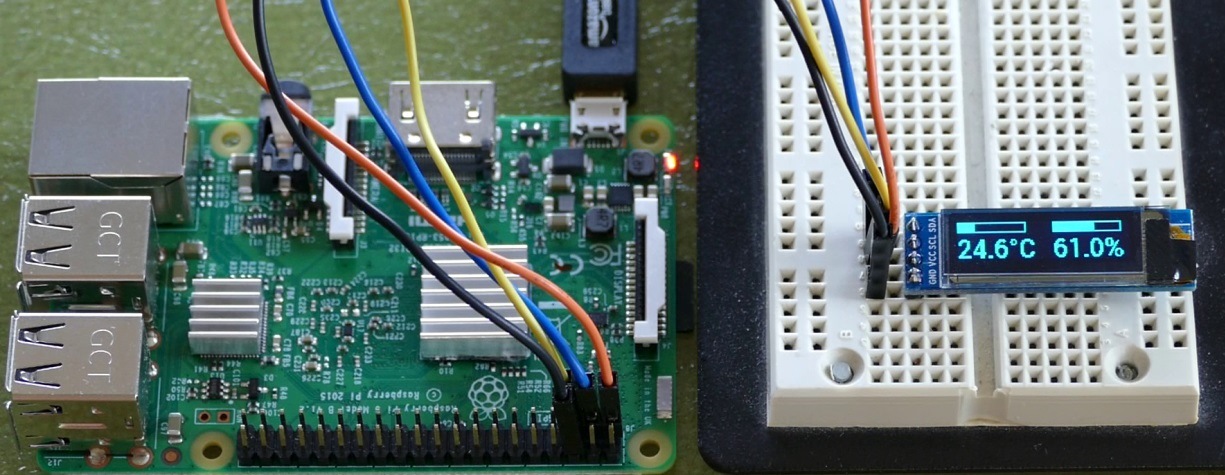
The I2C SSD1306 OLED display is very easy to connect to the Pi. The display’s SDA pin is connected to the Pi’s SDA pin which is GPIO 2. The display’s SCL pin is connected the Pi’s SCL which is GPIO 3. The Vcc pin is connected to a 3.3V pin on the Pi and the grounds are connected.
Here is the Raspberry Pi Python MQTT client code that will subscribe to the temp_humidity topic and present the results to an OLED display.
import paho.mqtt.client as mqtt
import Adafruit_SSD1306
from PIL import Image, ImageDraw, ImageFont

disp = Adafruit_SSD1306.SSD1306_128_32(rst=0)
disp.begin()
FONT_PATH = '/usr/share/fonts/truetype/piboto/PibotoCondensed-Regular.ttf'
FONT = ImageFont.truetype(FONT_PATH, 22)

def display_data(t, h):
    image = Image.new('1', (disp.width, disp.height))
    draw = ImageDraw.Draw(image)
    # Draw temperature / Humidity values.
    draw.text((0, 8), '{0}°C'.format(t),  font=FONT, fill=255)
    draw.text((71, 8), '{0}%'.format(h), font=FONT, fill=255)
    # Draw bar charts.
    draw.rectangle((0, 0, 50, 8), outline=255, fill=0)
    draw.rectangle((71, 0, 121, 8), outline=255, fill=0)
    draw.rectangle((0, 0, t / 100.0 * 50, 8), outline=255, fill=255)
    draw.rectangle((71, 0, 71 + (h / 100.0 * 50), 8), outline=255, fill=255)
    # Send to OLED display.
    disp.clear()
    disp.image(image)
    disp.display()

	# Callback fires when conected to MQTT broker.
def on_connect(client, userdata, flags, rc):
    print('Connected with result code {0}'.format(rc))
    # Subscribe (or renew if reconnect).
    client.subscribe('temp_humidity')


# Callback fires when a published message is received.
def on_message(client, userdata, msg):
	# Decode temperature and humidity values from binary message paylod.
    t,h = [float(x) for x in msg.payload.decode("utf-8").split(',')]
    print('{0}°C {1}%'.format(t, h))
    display_data(t, h)  # Display data on OLED display.


client = mqtt.Client()
client.on_connect = on_connect  # Specify on_connect callback
client.on_message = on_message  # Specify on_message callback
client.connect('localhost', 1883, 60)  # Connect to MQTT broker (also running on Pi).

# Processes MQTT network traffic, callbacks and reconnections. (Blocking)
client.loop_forever()
A pic of the temperature and humidity being displayed.
 If you having connection issues with the MicroPython Lib MQTT client, I recommend you take a look at the LoBo build of MicroPython which comes with an MQTT client that is more robust. It has an autoreconnect feature and it also allows you to poll the MQTT state to accommodate Wi-Fi disruptions. Here is an example:
station = WLAN(STA_IF)

client = mqtt(CLIENT_ID, SERVER,
              autoreconnect=True,
              cleansession=True,
              connected_cb=conncb,
              disconnected_cb=disconncb,
              published_cb=pubcb,
              data_cb=datacb)
status = client.status()[1]
if status == 'Stopped':
    try:
        if station.isconnected():
            print('Trying to start.')
            client.start()
        else:
            print('Station disconnected.')
    except:
        print('Failed to start.')
There is more information on the LoBo build in Part 6 of this tutorial.
 The Adafruit SSD1306 Python driver is deprecated so here’s the updated code for CircuitPython.
from board import SCL, SDA
import busio
import adafruit_ssd1306
import paho.mqtt.client as mqtt
from PIL import Image, ImageDraw, ImageFont

i2c = busio.I2C(SCL, SDA)
disp = adafruit_ssd1306.SSD1306_I2C(128, 32, i2c)

FONT_PATH = '/usr/share/fonts/truetype/piboto/PibotoCondensed-Regular.ttf'
FONT = ImageFont.truetype(FONT_PATH, 22)

def display_data(t, h):
    image = Image.new('1', (disp.width, disp.height))
    draw = ImageDraw.Draw(image)
    # Draw temperature / Humidity values.
    draw.text((0, 8), '{0}°C'.format(t),  font=FONT, fill=255)
    draw.text((71, 8), '{0}%'.format(h), font=FONT, fill=255)
    # Draw bar charts.
    draw.rectangle((0, 0, 50, 8), outline=255, fill=0)
    draw.rectangle((71, 0, 121, 8), outline=255, fill=0)
    draw.rectangle((0, 0, t / 100.0 * 50, 8), outline=255, fill=255)
    draw.rectangle((71, 0, 71 + (h / 100.0 * 50), 8), outline=255, fill=255)
    # Send to OLED display.
    disp.fill(0)
    disp.image(image)
    disp.show()
The Adafruit Blinka and CircuitPython SSD1306 drivers are installed using the following:
sudo pip3 install adafruit-blinka
sudo pip3 install adafruit-circuitpython-ssd1306
Part 3 of this tutorial demonstrates setting up a web server on an ESP32.