
This tutorial demonstrates how to set up a MicroPython web server on an ESP32.
This is the 3rd installment in a series of ESP32 tutorials. The first tutorial explains the basics of installing and using MicroPython with an ESP32 and also how to connect and control NeoPixel LED’s. The 2nd tutorial uses MQTT to publish temperature and humidity readings from a DHT-22 sensor. I recommend you check them out first. Building on the 2 previous tutorials, a web page will be created that shows the temperature and humidity from a DHT-22 sensor connected to an ESP32. The page will automatically update with new sensor readings. Next another web page with a JavaScript dial will afford remote color and brightness control of a NeoPixel RGB LED.
For the web server we’ll be using an open source MicroPython library called MicroWebSrv created by a fantastic programmer named Jean-Christophe. He’s done a great job making a very powerful lightweight web server that’s easy to get up and running on ESP32’s and also Pycom modules. The library is very feature-rich:
• Use it to embed a cool Web site in yours modulesHandle POST requests to interract with user and configure options
• Exchange in JSON format on HTTP methods to make an embedded full REST API
• Serve files on the fly to export any data to the user
• Play with AJAX to interact speedily with a Web application
• Use WebSockets for fast and powerful data exchange
• Make HTML/Python files for rendering more efficient web pages
The library can serve most of the popular web MIME types such as HTML, CSS, JavaScript, images, PDF, CSV, ZIP, XML, and more. You just place your files in the web path and they can be requested by a web browser.
 UPDATE: Jean-Christophe released version 2.0 of microWebSrv which is more robust, more efficient and faster.
Use git clone to download the original repo.
git clone https://github.com/jczic/MicroWebSrv.git
Change into the download directory and list the contents using tack A (almost all) to display hidden items.
cd MicroWebSrv
ls -A
In addition to the library files (microWebSrv.py, microWebTemplate.py and microWebSocket.py) there is an example web server file called main.py. Main is a reserved file name in MicroPython that will automatically run at boot after the boot.py file. Since the ESP32 does not currently retain WiFi settings, I usually create a main.py file to connect to my WiFi access point at boot. It would look something like this:
import network
station = network.WLAN(network.STA_IF)
station.active(True)
station.connect("<your ssid>", "<password>")
You could prepend the main.py example with the above code or you can rename the main.py example so it doesn’t automatically run at start up. For example, you could rename it start.py.
mv main.py start.py
The MicroWebSrv library was originally written for Pycomm modules which have a slightly different root path than the ESP32. Therefore when on an ESP32, it is necessary to modify the web server example to specify the webPath when the MicroWebSrv class is instantiated.
srv = MicroWebSrv(routeHandlers=routeHandlers, webPath='/www/')
After making this one modification the example web server and supporting files can be transferred to the ESP32. Rshell can be used to sync an entire folder and subfolders to the ESP32. However, first delete the boot.py file so it doesn’t overwrite your existing boot.py file and I’d also recommend deleting any superfluous files to expedite the transfer.
rm boot.py
rm .git -rf
rm LICENSE.md
rm README.md
rm _config.yml
Now run Rshell . Make sure you are in the MicroWebSrv folder and then issue the rsync command.
rshell --buffer-size=30 -p /dev/ttyUSB0 -a -e nano
rsync .  /pyboard
The above command starts rshell and connects to the ESP32 on ttyUSB0. Tack A enables ASCII encode binary file transfers which I currently find to be more reliable. Tack E nano enables editing files directly on the ESP32 with the Nano text editor. Rsync copies all files in the current directory to the root directory of the ESP32. Once the sync is complete enter the repl and import start.py to start the web server.
repl
import start
The MicroWebSrv www folder contains several example files:
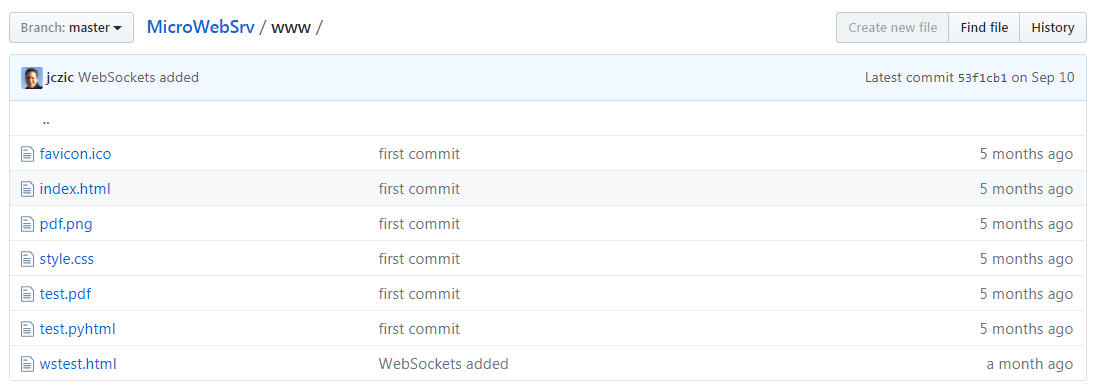
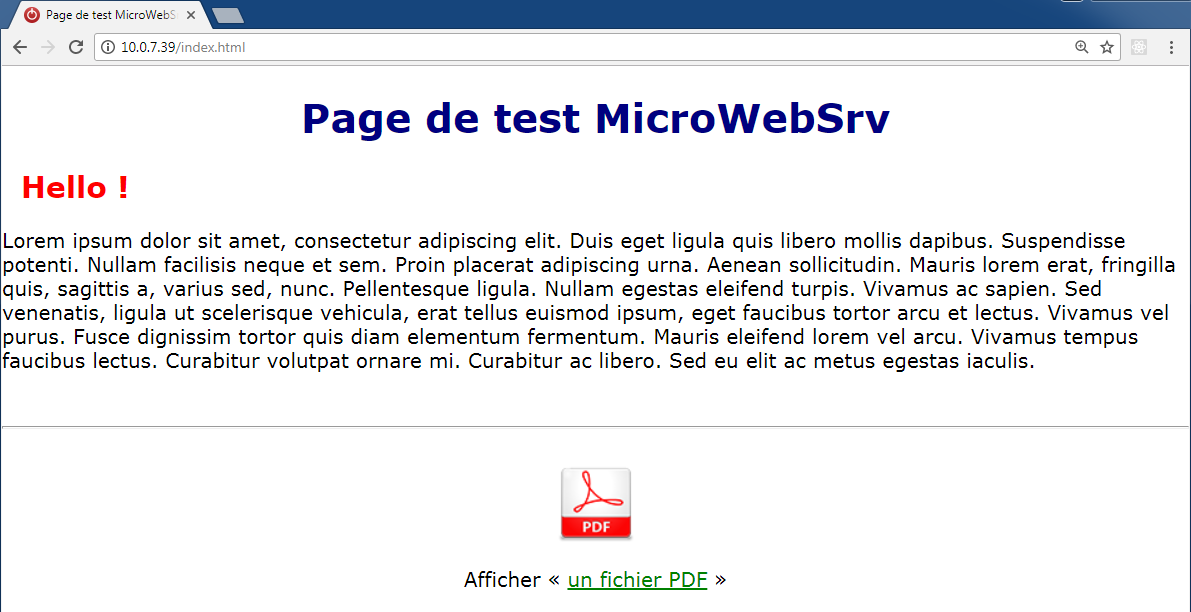
The example index.html demonstrates a simple HTML file. It includes a separate stylesheet and an image. It also has a link to download a PDF. In a web browser, enter the IP address of you ESP32 followed by /index.html.
Another example, test.pyhtml demonstrates the Python templating language. This allows you to dynamically generate content on the server using Python code. A third example, wstest.html provides websocket functionality which I’ll probably explore more in a future tutorial.
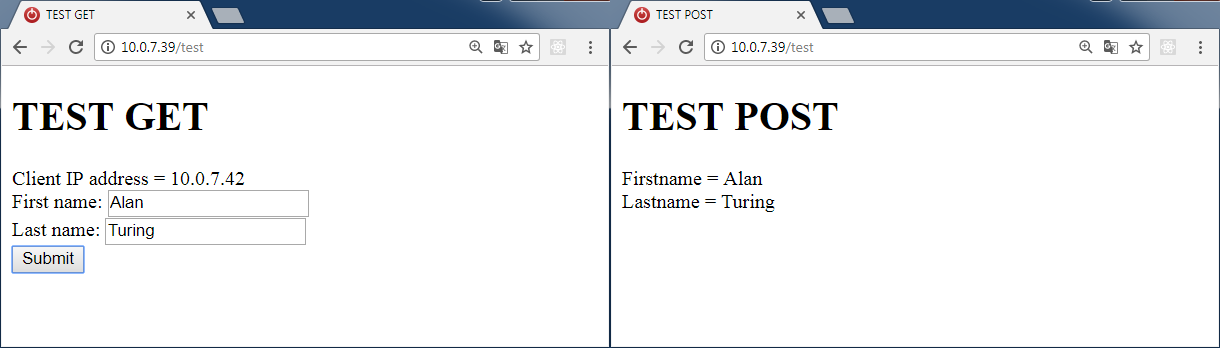
The start.py file (which I renamed above from main.py) also has route handling examples for gets and posts. Browsing to the test route brings up a sample form that hits the test route get handler. Submitting the form hits the test route post handler.
The ESP32 is a very powerful chip that can easily integrate with sensors and other electronic components. This makes it easy to display sensor data on a web page such as a DHT-22 temperature/humidity sensor. Controls can also be added to a web page to manipulate hardware attached to an ESP32 such as NeoPixel RGB LED’s.
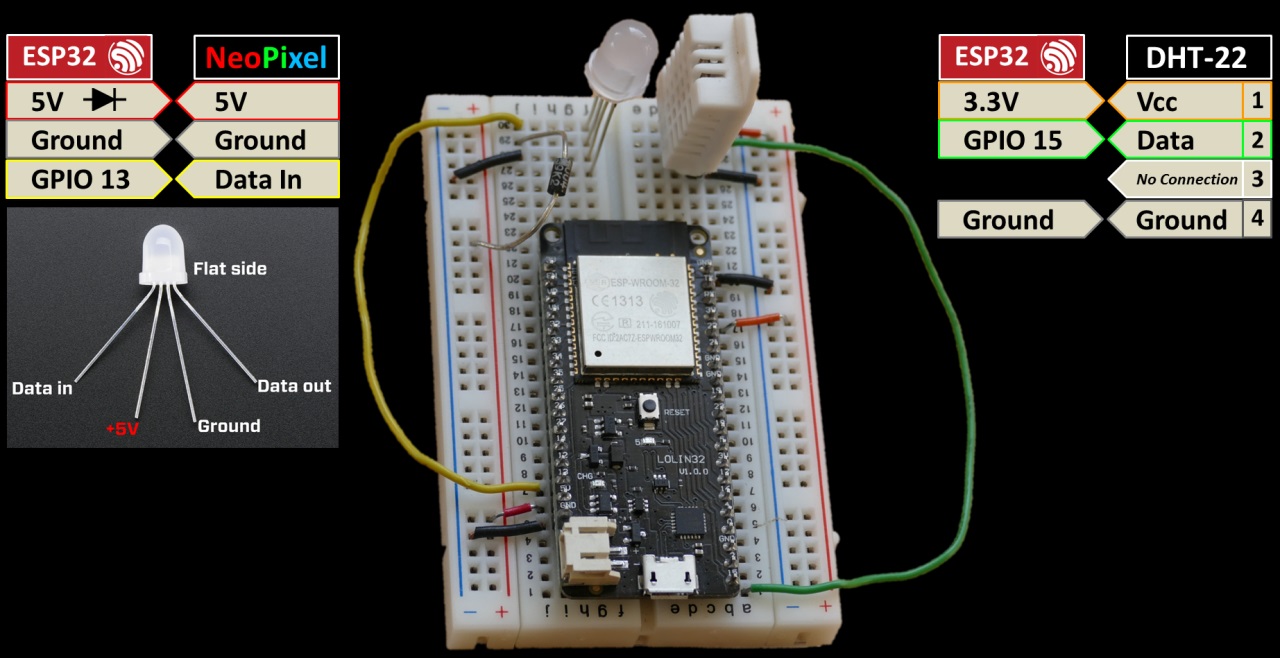
The wiring is very simple. The DHT-22 Vcc pin 1 is connected to a 3.3 V pin on the ESP32. The ground pin 4 is connected to a ground on the ESP32. The sensor data pin 2 is attached to GPIO 15. You could use any available GPIO pin as long as you specify it in your code. The NeoPixel LED Vcc is connected to a 5 V power pin on the ESP32. It is necessary to step down the 5 V to 4.3 V using a diode. The grounds are connected and the data-in line is attached to GPIO 13. Again any available pin could be used.
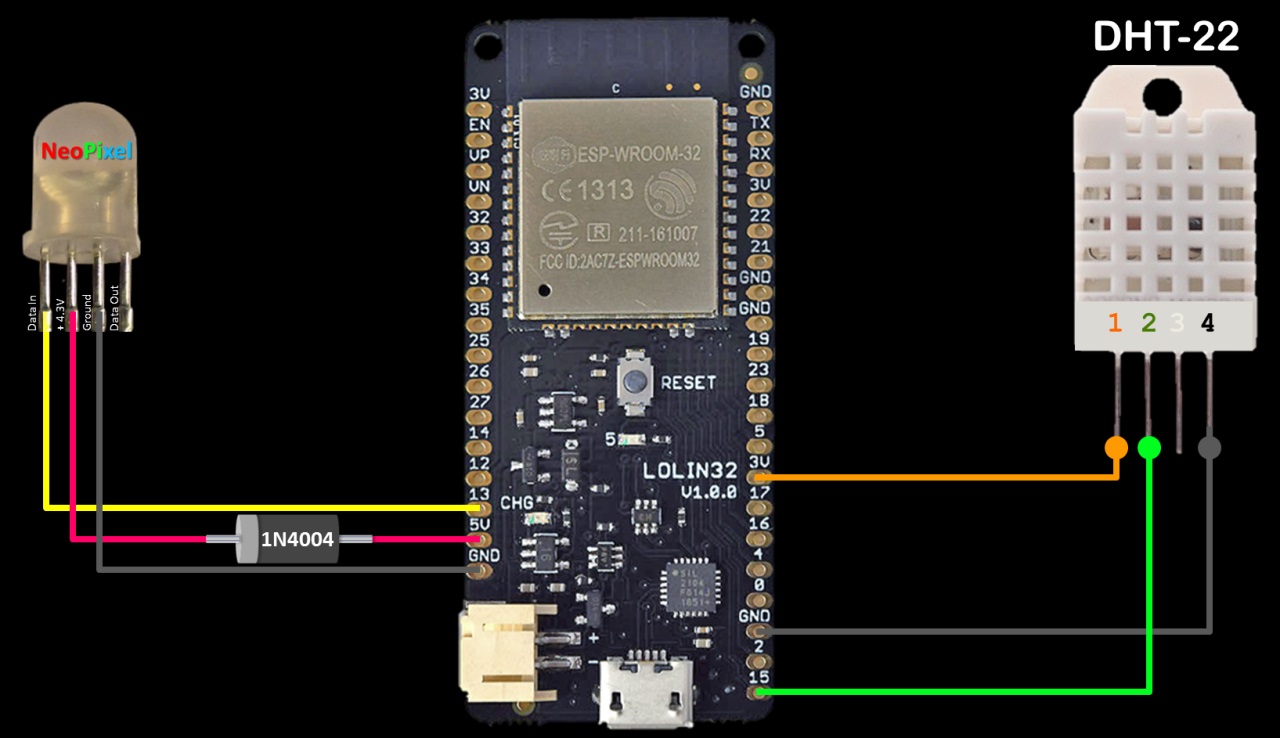
I’m using a Wemos Lolin32 ESP32 breakout board. It is inexpensive and is narrow so it fits on a breadboard. It also has a lithium battery jack and charging circuit.
Here’s the code for a web server that display real-time temperature humidity data. The single dht route polls the DHT-22 and returns a server-sent event stream.
from microWebSrv import MicroWebSrv
from machine import Pin
from dht import DHT22

sensor = DHT22(Pin(15, Pin.IN, Pin.PULL_UP))   # DHT-22 on GPIO 15

def _httpHandlerDHTGet(httpClient, httpResponse):
    try:
        sensor.measure()   # Poll sensor
        t, h = sensor.temperature(), sensor.humidity()
        if all(isinstance(i, float) for i in [t, h]):   # Confirm values
            data = '{0:.1f}°C {1:.1f}%'.format(t, h)
        else:
            data = 'Invalid reading.'
    except:
        data = 'Attempting to read sensor...'

    httpResponse.WriteResponseOk(
        headers = ({'Cache-Control': 'no-cache'}),
        contentType = 'text/event-stream',
        contentCharset = 'UTF-8',
        content = 'data: {0}\n\n'.format(data) )

routeHandlers = [ ( "/dht", "GET",  _httpHandlerDHTGet ) ]
srv = MicroWebSrv(routeHandlers=routeHandlers, webPath='/www/')
srv.Start(threaded=False)
Here’s the HTML page to connect to the DHT event source.
<!DOCTYPE html>
<html>
<head>
    <meta content="text/html;charset=utf-8" http-equiv="Content-Type">
    <meta content="utf-8" http-equiv="encoding">
</head>
<body>

<h1>MicroPython DHT-22 Sensor</h1>
<div id="result" style="color: SlateBlue; font-size: 200%; font-family: Monaco, monospace; margin: 20px"></div>

<script>
if(typeof(EventSource) !== 'undefined') {
    const source = new EventSource('http://' + window.location.hostname + '/dht');
    source.onmessage = function(e) {
        document.getElementById("result").innerHTML = e.data;
    };
} else {
    document.getElementById("result").innerHTML = "Sorry, your browser does not support server-sent events...";
}
</script>

</body>
</html>
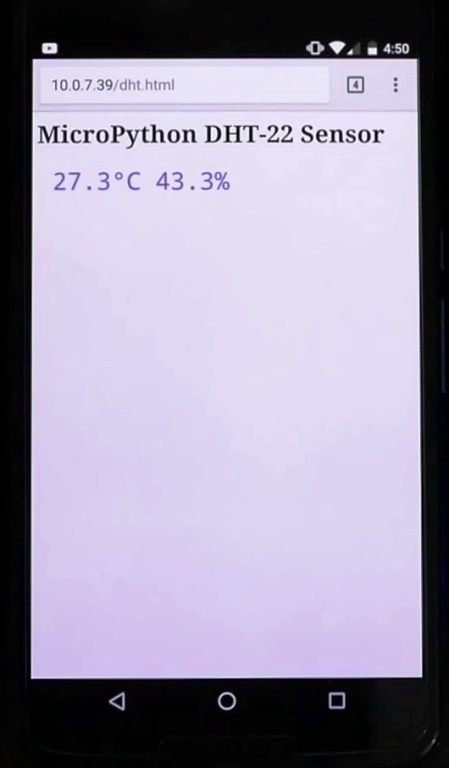
When you browse to the html file the sensor data is displayed and updated every few seconds.
Another MicroPython web server provides a single led route to handle JSON posts. The posted color data is read and the NeoPixel LED is set accordingly.
from microWebSrv import MicroWebSrv
from machine import Pin
from neopixel import NeoPixel
import json

np = NeoPixel(Pin(13), 1)

def _httpHandlerLEDPost(httpClient, httpResponse):
    content = httpClient.ReadRequestContent()  # Read JSON color data
    colors = json.loads(content)
    blue, green, red = [colors[k] for k in sorted(colors.keys())]
    np[0] = (green, red, blue)
    np.write()
    httpResponse.WriteResponseJSONOk()

routeHandlers = [ ( "/led", "POST",  _httpHandlerLEDPost ) ]
srv = MicroWebSrv(routeHandlers=routeHandlers, webPath='/www/')
srv.Start(threaded=False)
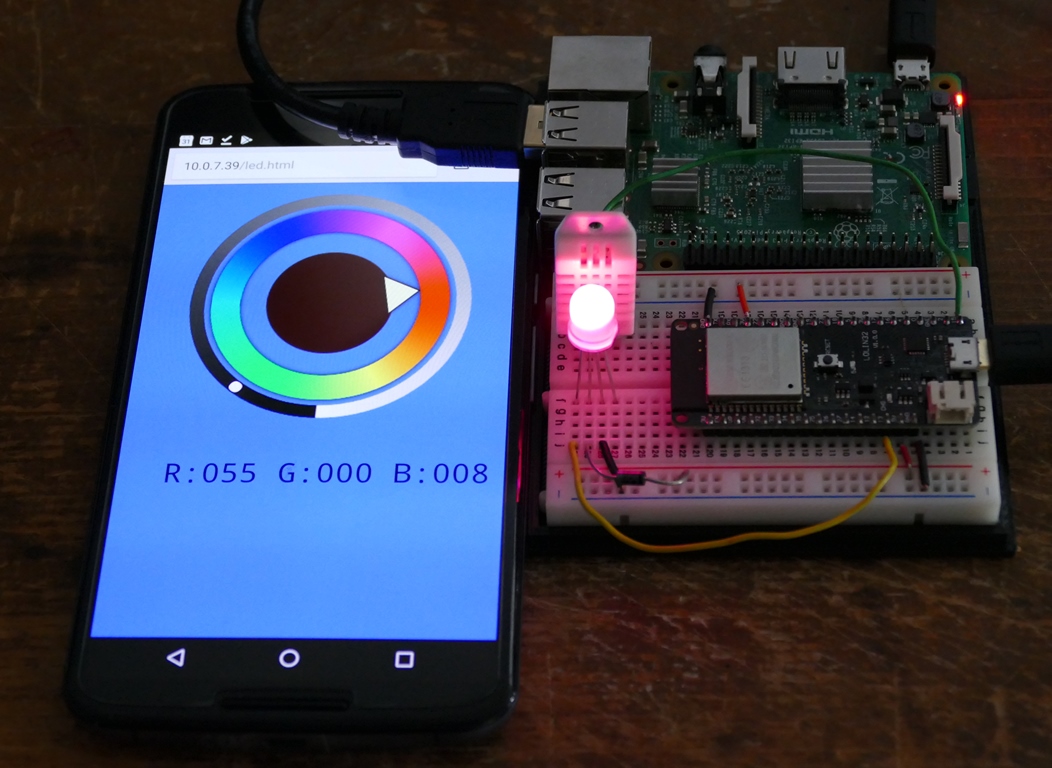
An associated HTML file provides an open source JavaScript hue wheel to control color and brightness. When the dial is changed the RGB values are posted to the LED route. The underscore.js library is used to throttle the number of posts.
<!DOCTYPE HTML>
<html>
<head>
    <meta http-equiv="Content-Type" content="text/html; charset=utf-8">
    <script src="huewheel.min.js"></script>
	<script src="https://cdnjs.cloudflare.com/ajax/libs/underscore.js/1.8.3/underscore-min.js"></script>
</head>
<body style="font-size: 200%; font-family: Monaco, monospace; background: CornFlowerBlue;">

	<div id="container" style="width:350px; margin:25px auto 0 auto;">
		<div id="huewheel"></div>
		<br>
		<div id="info"></div>
		<br>
	</div>

<script type="text/javascript">
	var throttleSetColor = _.throttle(setColor, 400);

	hw = new HueWheel('huewheel', {
		onChange:  throttleSetColor,
		saturation:  1.0,
		lightness:  0.5,
		colorSpace:  'hsl',
		diameter:  300,
		shadowBlur:  7,
		changeSaturation:  false,
		changeLightness:  true,
		showColor:  true,
		colorSpotWidth:  0.7,
		colorSpotBorder:  1,
		colorSpotBorderColor:  '#333',
		quality:  2,
		hueKnobSize:  0.12,
		hueKnobColor:  '#ffc',
		lightKnobColor:  '#ff0',
		hueKnobColorSelected:  '#fff',
		hueKnobShadow:  true,
		lightnessKnobColorSelected:  '#f00',
		lightnessRingClickable:  true,
		useKeys:  true,
		hueKeyDelta:  2,
		saturationKeyDelta:  1,
		lightnessKeyDelta:  1,
		shiftKeyFactor:  10
	});


	function setColor(e) {
		document.getElementById('info').innerHTML = 'R:' + ('000' + e.r).substr(-3) +
			'   G:' + ('000' + e.g).substr(-3) +
			'   B:' + ('000' + e.b).substr(-3);

		var colorJSON = '{"red":' + e.r + ', "green":' + e.g + ', "blue":' + e.b + '}';
		var xhttp = new XMLHttpRequest();
		xhttp.open('POST', 'http://' + window.location.hostname + '/led', true);
		xhttp.setRequestHeader('Content-type', 'application/json');
		xhttp.send(colorJSON);
	}

</script>
</body>
</html>
The NeoPixel LED attached to the ESP32 can now be controlled from any device with a web browser.
Part 4 of this tutorial demonstrates how to drive an OLED display and also looks at using the ADC pins and FTP file management.
Downloads:
MicroPython and HTML code for DHT-22 and NeoPixel web pages – (10-04-2017).