
In this tutorial I will demonstrate how to get an old EPROM programmer from the mid 90’s up and running using an early Windows 95 laptop so I can burn video games for a vintage Bally console.
One of my hobbies is old arcade machines and vintage video game consoles. One challenge is that many of the components are 4 decades old and long out of production. Being able to read and write chips from the 1970’s is quite handy.
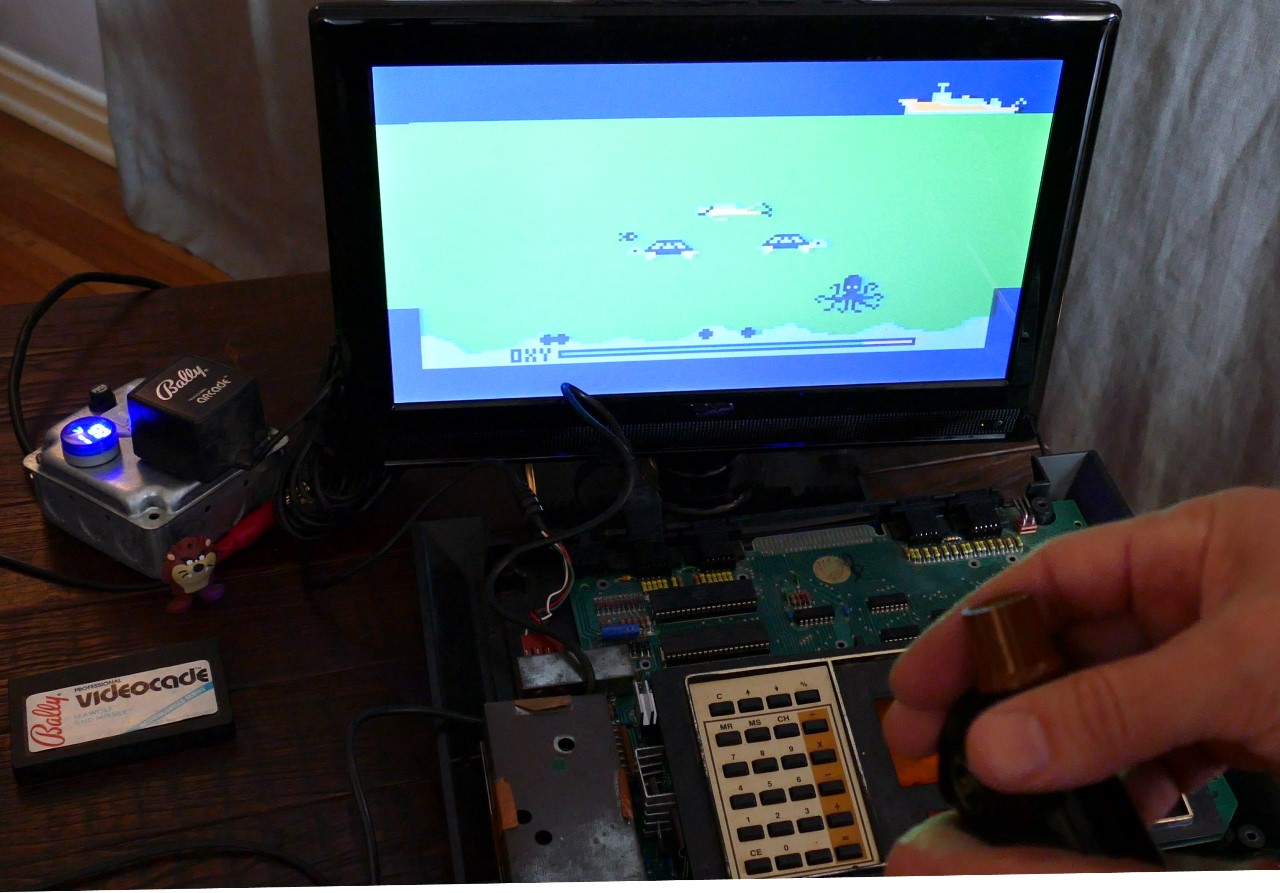
I’m currently restoring a 1978 Bally video game console.
To work on the Bally I need to be able to replace 8 bit 24 pin 8K ROM chips. I’m not aware of any modern pin compatible substitutes but surplus EPROMS are available. It is possible to adapt newer 28 pin chips but there are space considerations and keeping the pinout the same is much easier. In my previous tutorial Recover Bricked BIOS using FlashRom on a Raspberry Pi, I demonstrated how to program E-EPROM chips using a Raspberry Pi, but that method used a serial protocol which only requires 4 data lines (MOSI, MISO, Chip Select and Clock). For the console and its game cartridges I will be using vintage parallel EPROM chips. These are the ones with the quartz window on top.
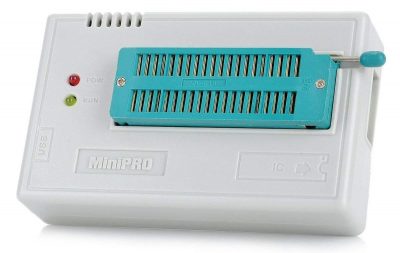
I have a TL866II which is a good inexpensive USB programmer that can do both parallel and serial.
However, these older EPROM chips are not currently supported by the TL866 and probably won’t ever because they require 25 volts for programming. I looked at other modern programmers that fit my requirements but they were very expensive. I have an old Needham’s Electronics PB-10 programmer which would work.
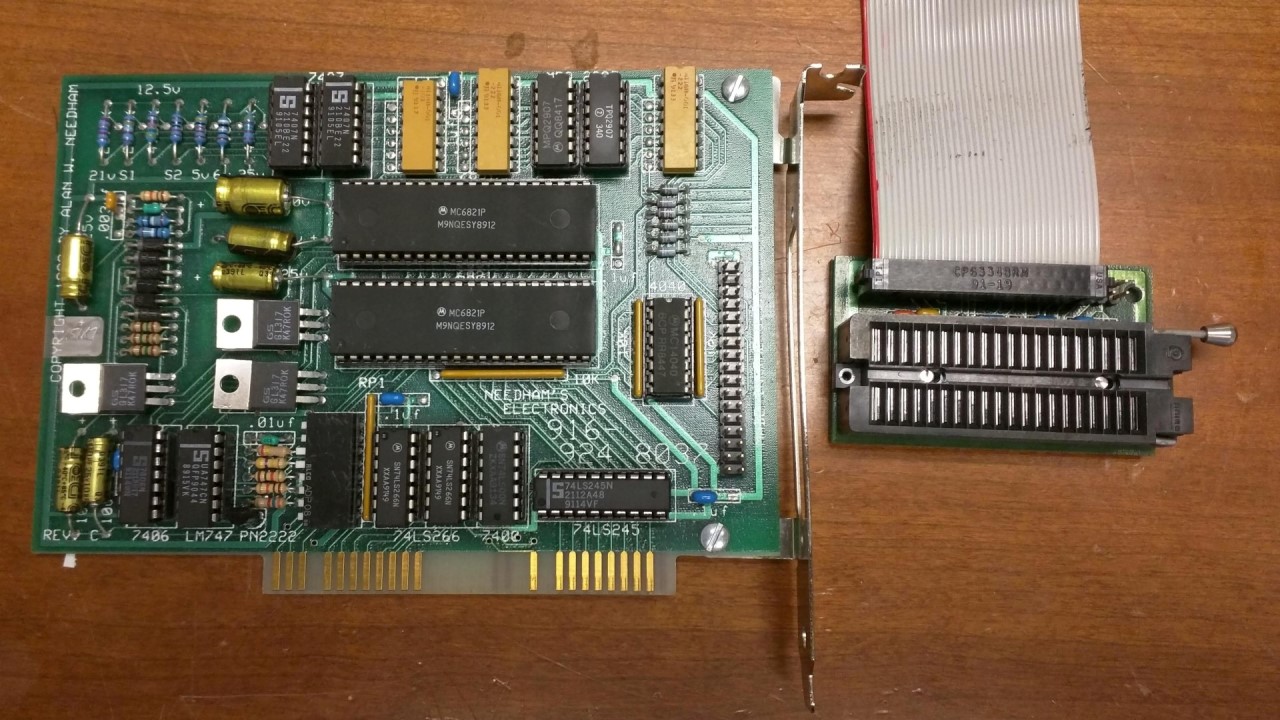
However, it requires an old school 8 bit ISA slot which was phased out of consumer PC motherboards around the turn of the century. I asked around if anyone had an old 286 or 386 in their garage, but struck out. I also looked on Craigslist and eBay and was surprised at the high prices. Apparently there are a lot of people building retro gaming computers, which does sound like a fun project.
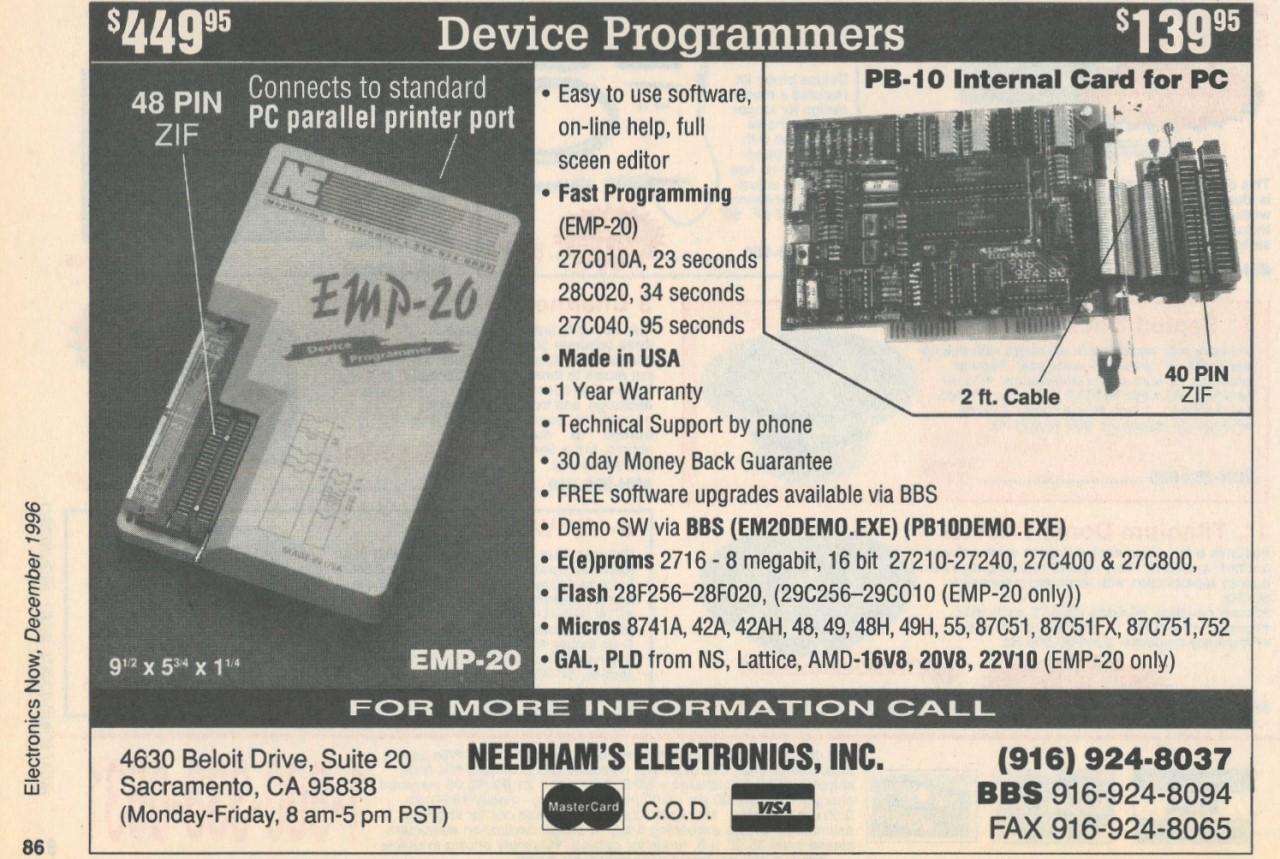
Instead I found an EMP-20 which is the parallel version of my Needham’s Electronics PB-10 ISA programmer on eBay for $40 dollar US. Next to the 48 pin ZIF socket is a SIM socket which is for personality modules. There are around 30 different SIM modules that let you program different families of devices. There are 1580 supported devices. I have 23A/B which is for complex programmable logic devices and would probably be used in conjunction with a PLCC to DIP adapter. I also have the 1A/B SIM which is for 8 bit EPROM’s which is probably all I will ever use. FYI, if you are in the market for an EMP-20 make sure it comes with the SIM modules you need. Otherwise, you might be able to make your own thanks to this helpful GitHub repo by Schlae. You can also buy modules from Ardent-tool.com.

Back in 1996, the EMP-20 sold for $449 and it’s an upgrade over my ISA version.
The EMP-20 was recommended by several users on the arcade forums. There’s a lot of great deals on vintage electronics which often work great for light hobby use. We live in a golden age for electronic hobbyists. There is so much info available and the cost of new tools and components has plummeted. Furthermore, some of the old equipment that used to be very expensive can now be bought for pennies on the dollar. The EMP-20 has a parallel interface which is also obsolete technology but not as rare as ISA ports. I had no trouble finding a free compatible laptop with a parallel port.
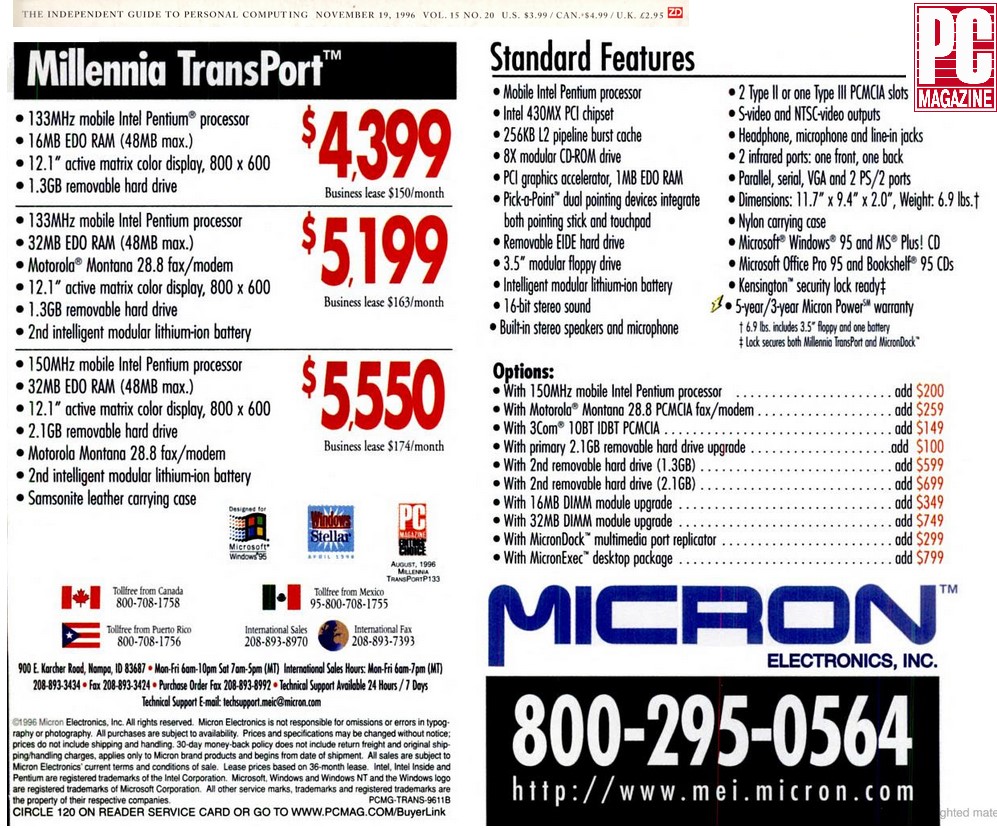
Here’s a Micron Transport Laptop also circa 1996. I was at a client’s office and noticed it was being used as a monitor stand. Despite being over 2 decades old the laptop booted up to Windows 95 without any issues.
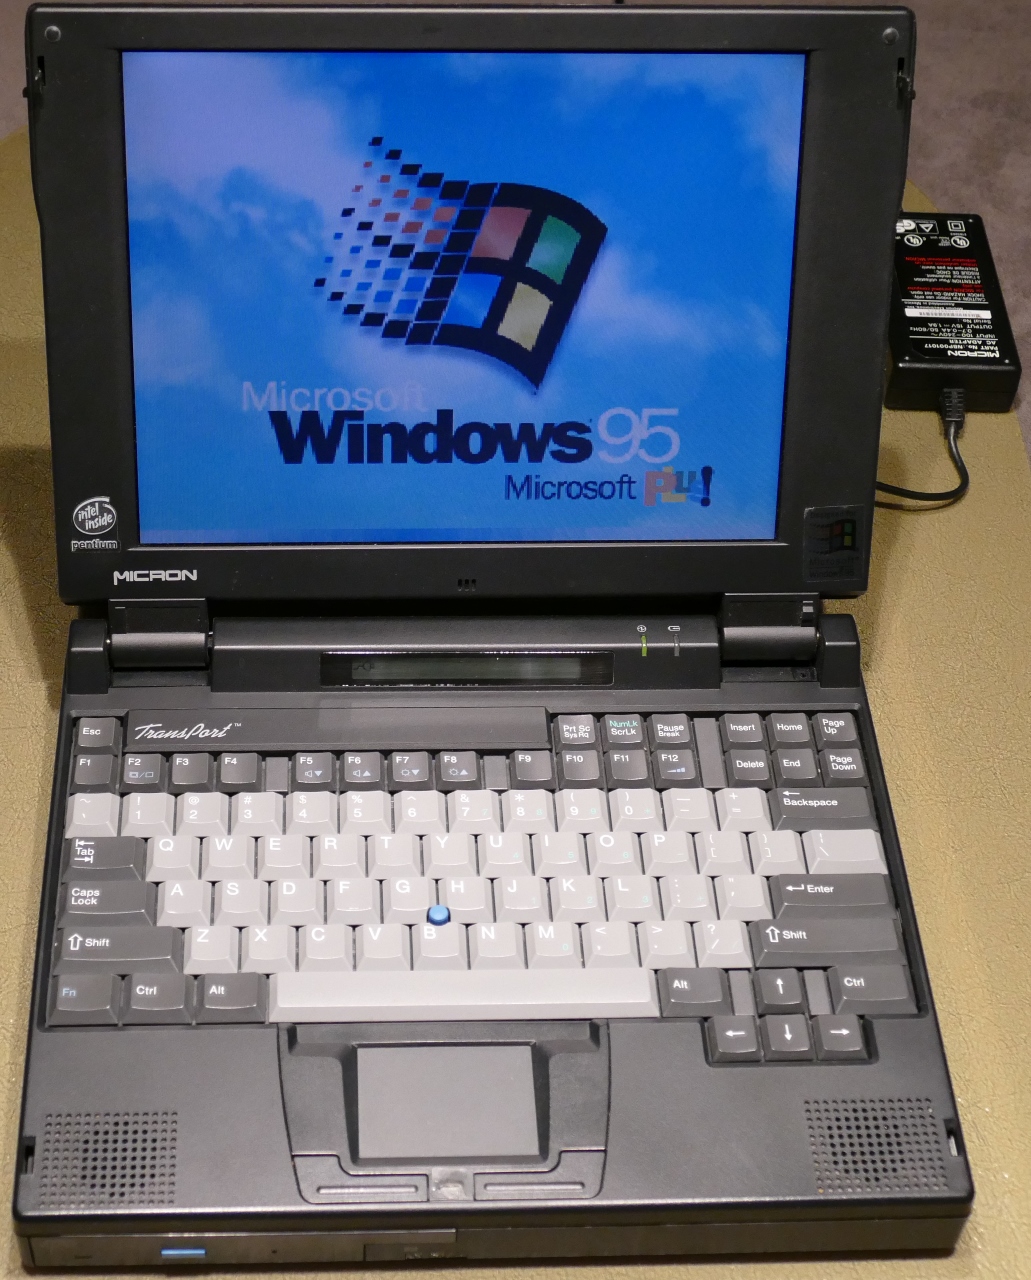
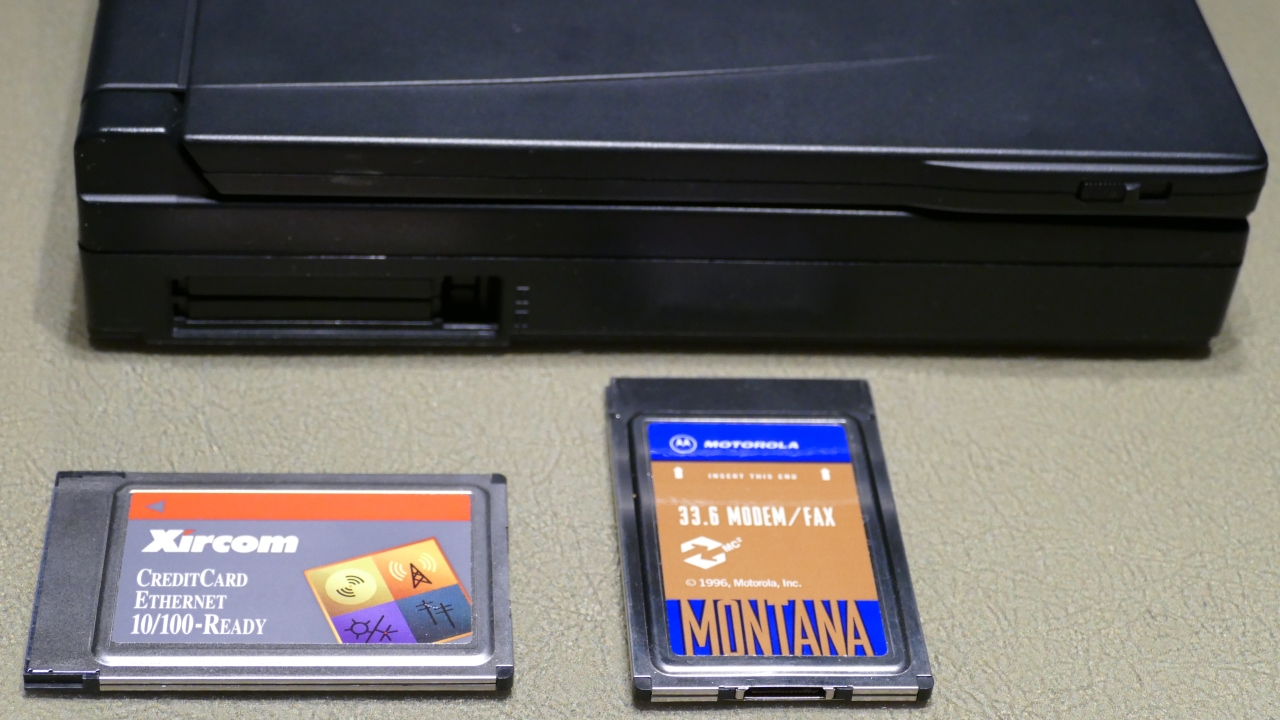
It has a 3½ inch floppy disk drive. The front has an IR port and an 8 speed CD-ROM drive (CD only, no DVD’s or burning). It has a 12.1” active matrix color display which is good for gaming although the 800×600 resolution is a little high for DOS games. The display is driven by a PCI graphics accelerator with 1MB of RAM. The keyboard is fantastic. The keys have a substantial feel and a very satisfying click. It has both a pointing stick and a touch pad. A custom LCD strip provides system feedback. It also has stereo speakers and a 16 bit sound card. There are 2 PCMCIA slots with a 33.6K baud modem fax and a Xircom 10/100 Ethernet card (no Wi-Fi).
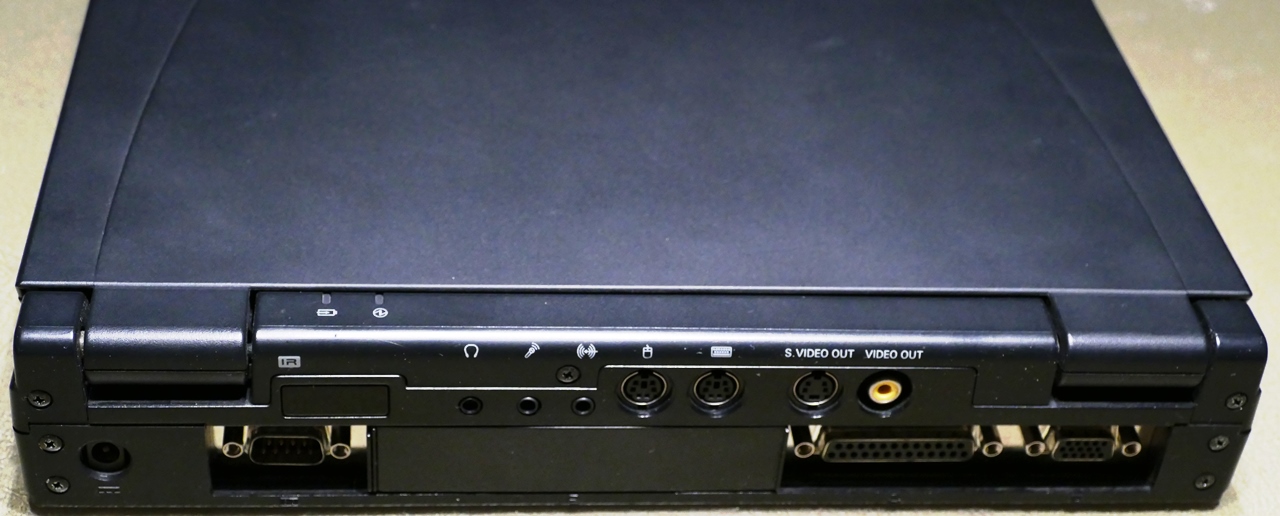
Sliding panels on the back conceal a DB9 serial port, a VGA port and the parallel port required for the EPROM programmer. There’s also a rear facing IR port, headset, microphone and line jacks, PS/2 mouse & keyboard and S-video and composite video.
Back in October of 1996 these Micron laptops were very expensive with a base price of $4399 US. My model has the base 133MHz CPU and the optional 32MB EDO RAM module which was a $749 extra. It also has the bigger 2.1GB EIDE hard drive. Adjusted for inflation, this laptop would have been over $9000 out the door.
Since the laptop was working and I didn’t have any of the original disks or drivers, the first thing I did was clone the hard drive. I used Symantec Ghost to clone the drive over the network. However, there are other ways to clone a hard drive. You could pull the hard drive and use a USB to IDE adapter on a modern computer in conjunction with cloning software such as CloneZilla which I believe also supports network backups. The old mechanical hard drive was very noisy so I replaced it with a solid state SD to IDE adapter drive.
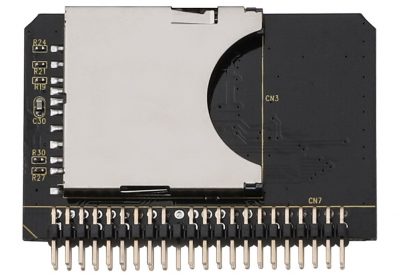
I used a 4GB SD card. I tried a 16GB card but it didn’t work. I don’t think the Micron BIOS can support more than 8GB. I like this adapter because the SD card can be removed without having to unscrew and disassemble the laptop drive caddy. This will facilitate file transfers. Neither SD nor CF cards is a great solution for a Windows OS drive because of the large number of writes to the swap file which will reduce the life of the cards. Still I have a lot of SD cards and this laptop will be getting light use. Also the programming software is DOS based so I could just modify the msdos.sys file to boot the computer to DOS and avoid Windows (change BootGUI=1 to BootGUI=0). Furthermore, with the Ghost software I can spin up a new SD card clone in 10 minutes.
The laptop doesn’t have any USB ports so in order to expedite file transfers I installed an FTP server. After a lot of Googling I found a free FTP server for Windows 95 called War Daemon version 1.71 beta. I had to download it on another computer because of the limited browser support in Windows 95. It’s 3.6 MB which is too big for a 1.4 MB floppy so I burned the program to a CD-ROM. It took a minute but the Micron’s CD player was able to read the writable disc
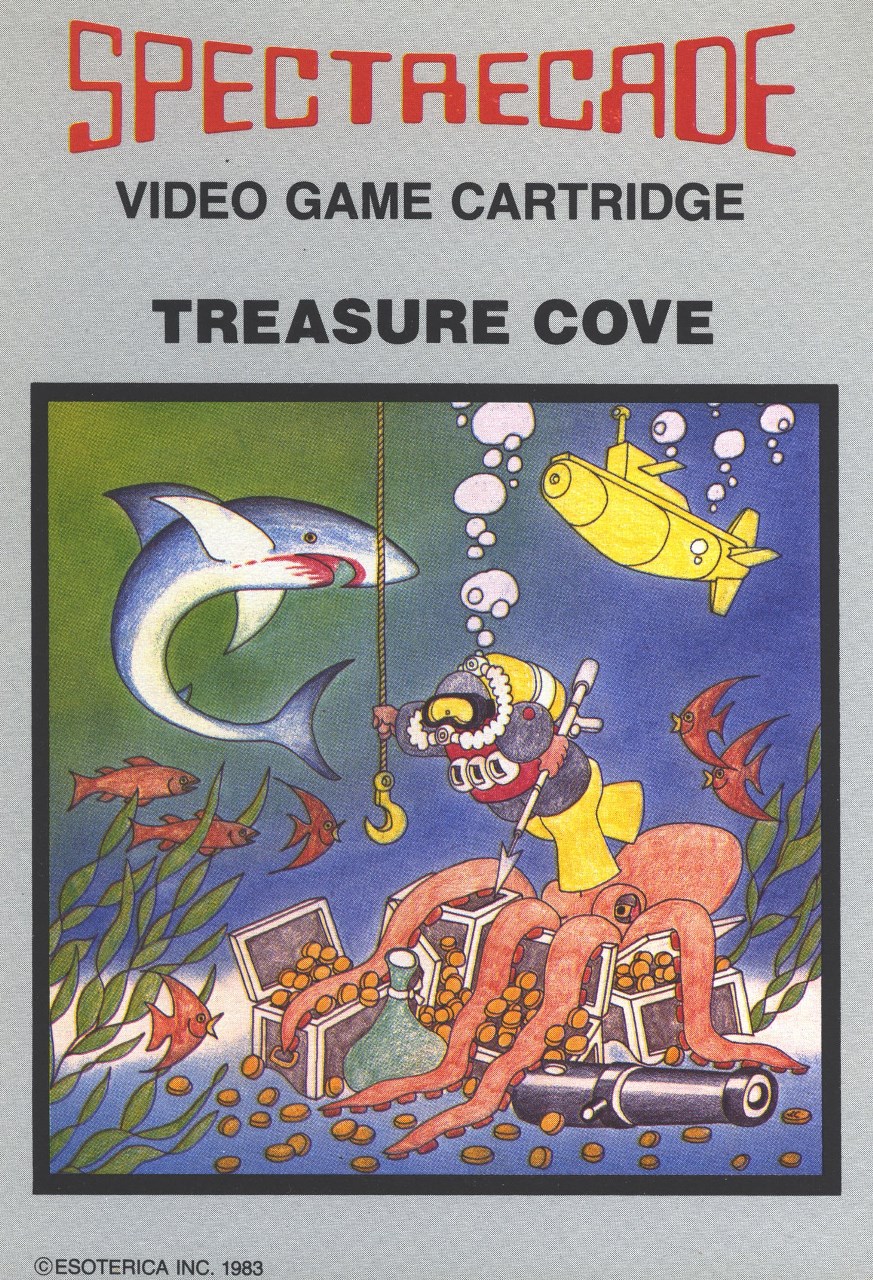
One of the reasons I went with an FTP server on the laptop is because I’ll be writing software in VS code which requires a modern OS but supports tasks to save via FTP. I’m running VS Code on a Raspberry Pi 3 using the HeadMelted build. For this tutorial I will burn an EPROM with the Bally console game Treasure Cove. It was generously released into the Public Domain by Spectre Systems in 2001. Adam Trionfo typed in the Z80 source code from paperwork provided by the author Brett Bibrey. The source code and binaries are available on Adam’s website Bally Alley.
Here’s the JSON file that defines my 3 VS Code tasks. The first task labelled zmac uses the Zmac assembler to assemble the source code from assembly language to the binary format which can be uploaded to an EPROM. I also created a task called mess to open the binary file in the MESS emulator which is now included with MAME. I’m using a version of MESS compiled for Raspbian. The 3rd task labelled ftp, uploads the binary file to the Micron latop’s FTP server. VS Code let’s you group tasks. I created a build task that runs zmac to assemble the code and them mess to preview the code in the emulator. I created a 2nd grouped task called assemble & ftp which assembles the source code and then uploads it via ftp.
{
    // See https://go.microsoft.com/fwlink/?LinkId=733558
    // for the documentation about the tasks.json format
    "version": "2.0.0",
    "tasks": [
        {
            "label": "zmac",
            "type": "shell",
            "options": {
                "cwd": "/home/pi/source"
            },
            "command": "zmac",
            "args": [
                "-l",
                "-o",
                "/home/pi/mess/images/astrocde/${fileBasenameNoExtension}.bin",
                "${file}"
            ],
            "presentation": {
                "reveal": "never"
            }
        },
        {
            "label": "mess",
            "type": "shell",
            "options": {
                "cwd": "/home/pi/mess/bin"
            },
            "command": "./advmess",
            "args": [
                "astrocde",
                "-cart",
                "${fileBasenameNoExtension}.bin"
            ],
            "presentation": {
                "reveal": "never"
            }
        },
        {
            "label": "ftp",
            "type": "shell",
            "options": {
                "cwd": "/home/pi/mess/images/astrocde/"
            },
            "command": "/home/pi/zmac/./ftpup.sh",
            "args": [
                "${fileBasenameNoExtension}.bin"
            ]
        },
        {
            "label": "Assemble & Emulate",
            "dependsOn": [
                "zmac",
                "mess"
            ],
            "group": {
                "kind": "build",
                "isDefault": true
            },
            "problemMatcher": []
        },
        {
            "label": "Assemble & FTP",
            "dependsOn": [
                "zmac",
                "ftp"
            ],
            "problemMatcher": []
        }
    ]
}
Here’s the ftpup.sh bash script called by the ftp task. It accepts a file path argument and then uploads the specified file via ftp.
#!/bin/bash
HOST=     <ip address of ftp server>
USER=     <your username>
PASSWORD= <your password>
ftp -inv $HOST <<EOF
user $USER $PASSWORD
cd /code
mput $1
bye
EOF
Once the binary file is transferred to the Micron laptop, the EMP-20 software is used to burn the EPROM. The program was designed for DOS so it will run best on versions of Windows built on top of DOS such as Windows 3.1, 95 and 98. It might be possible to run the software on 32 bit version of Windows 10 or on a new computer in an emulator such as DOSBox. However, even in Windows 95 I encountered some reliability issues with the parallel port. I found that running Windows 95 in Safe Mode with Command Prompt only worked best. The EMP-20 software is very straight forward.
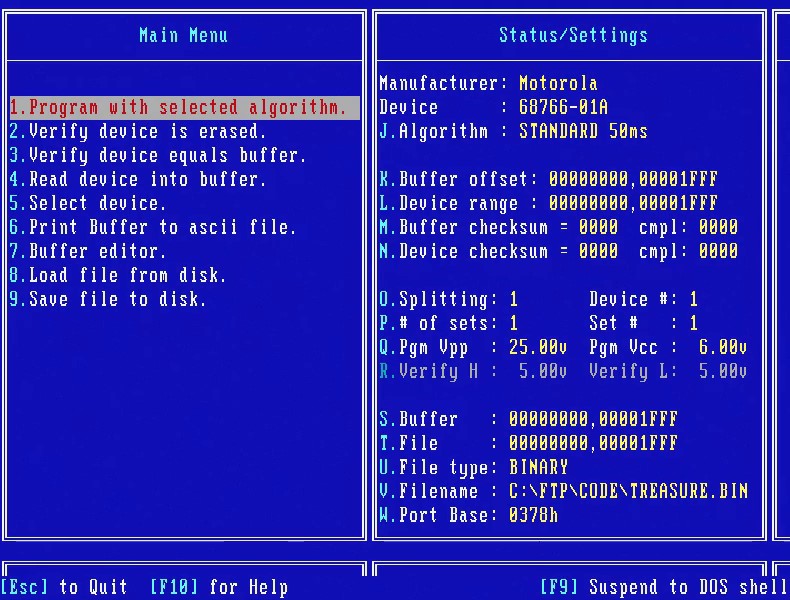
You press 5 to select the EPROM. Press V to select the file to burn. The buffer offset, device range and other settings should get set automatically. Pressing 1 writes the file to the EPROM which should also verify the device is empty (option 2) prior to writing and afterwards verify the device equals the buffer (option 3).
Unlike E-EPROMS which can be erased electronically, regular EPROMS require 253.7nm UV light to erase. You could set the chip out in the sun for a few days but a faster way is to use a UV eraser. Along with the EMP-20, I also picked up a vintage Spectronics PE-140T UV eraser circa 1988. The T model comes with a timer. A tray on the bottom pulls out which can hold up to 9 eprom chips.
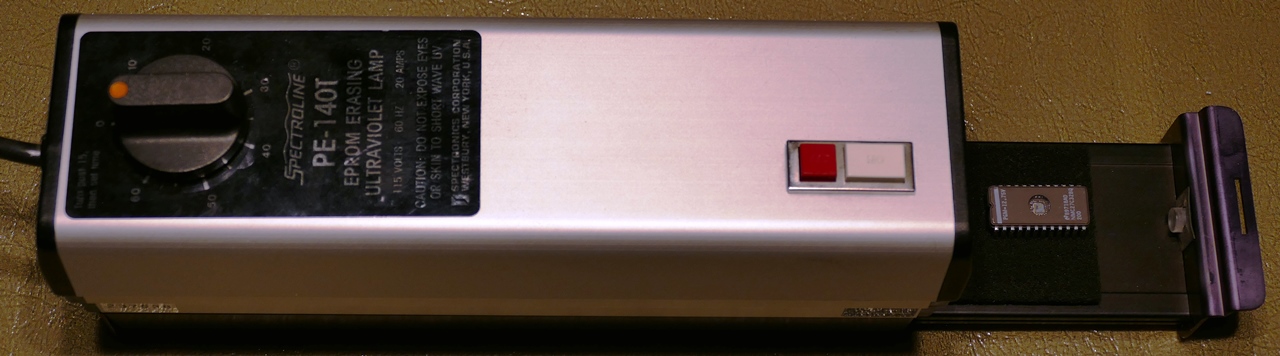
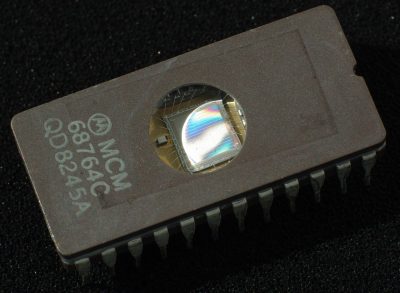
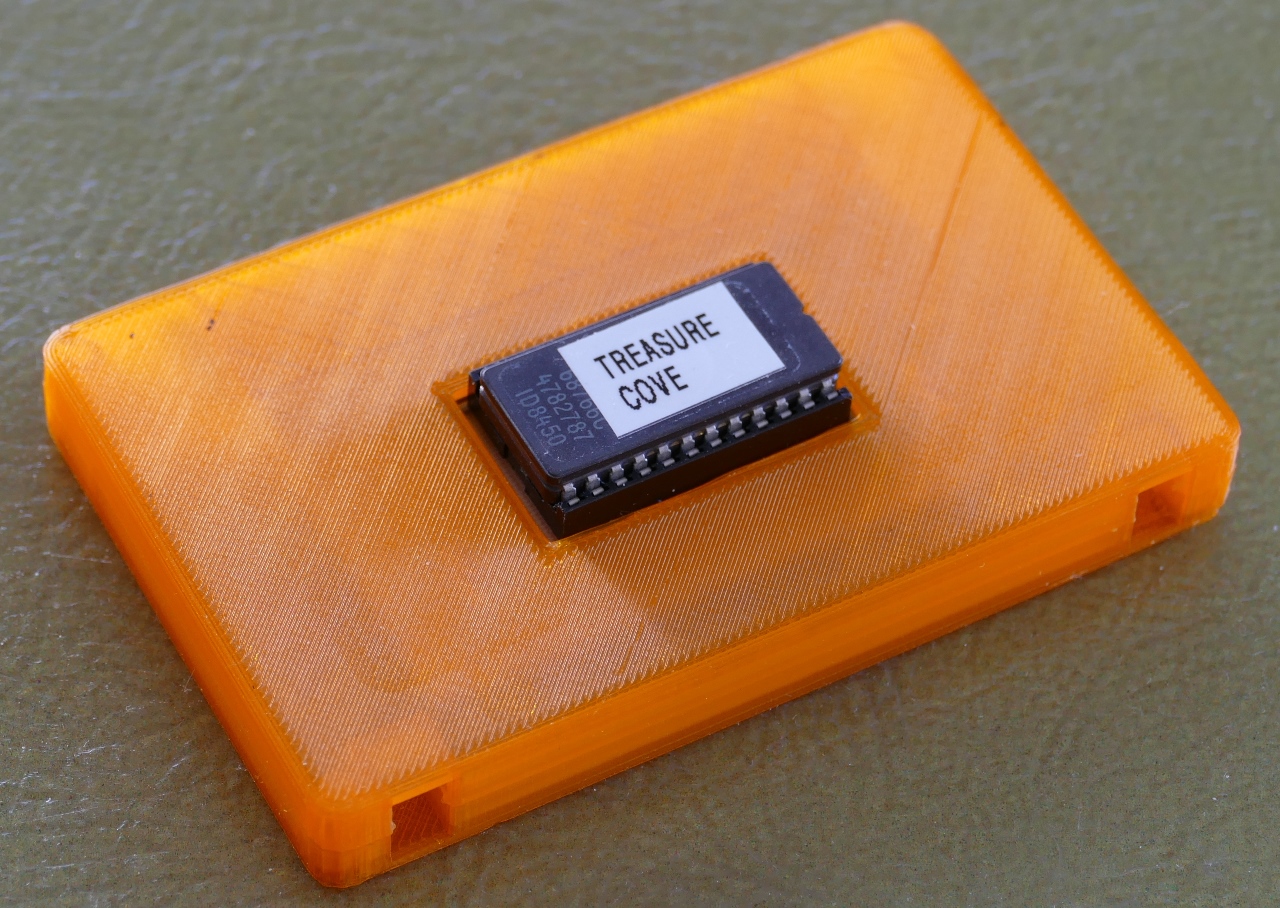
A Motorola MCM68766 8K 24 pin EPROM is used to hold the game code. I picked up 10 of them for $1.50 each from a surplus store. Back in the 1980’s these chips were very expensive.
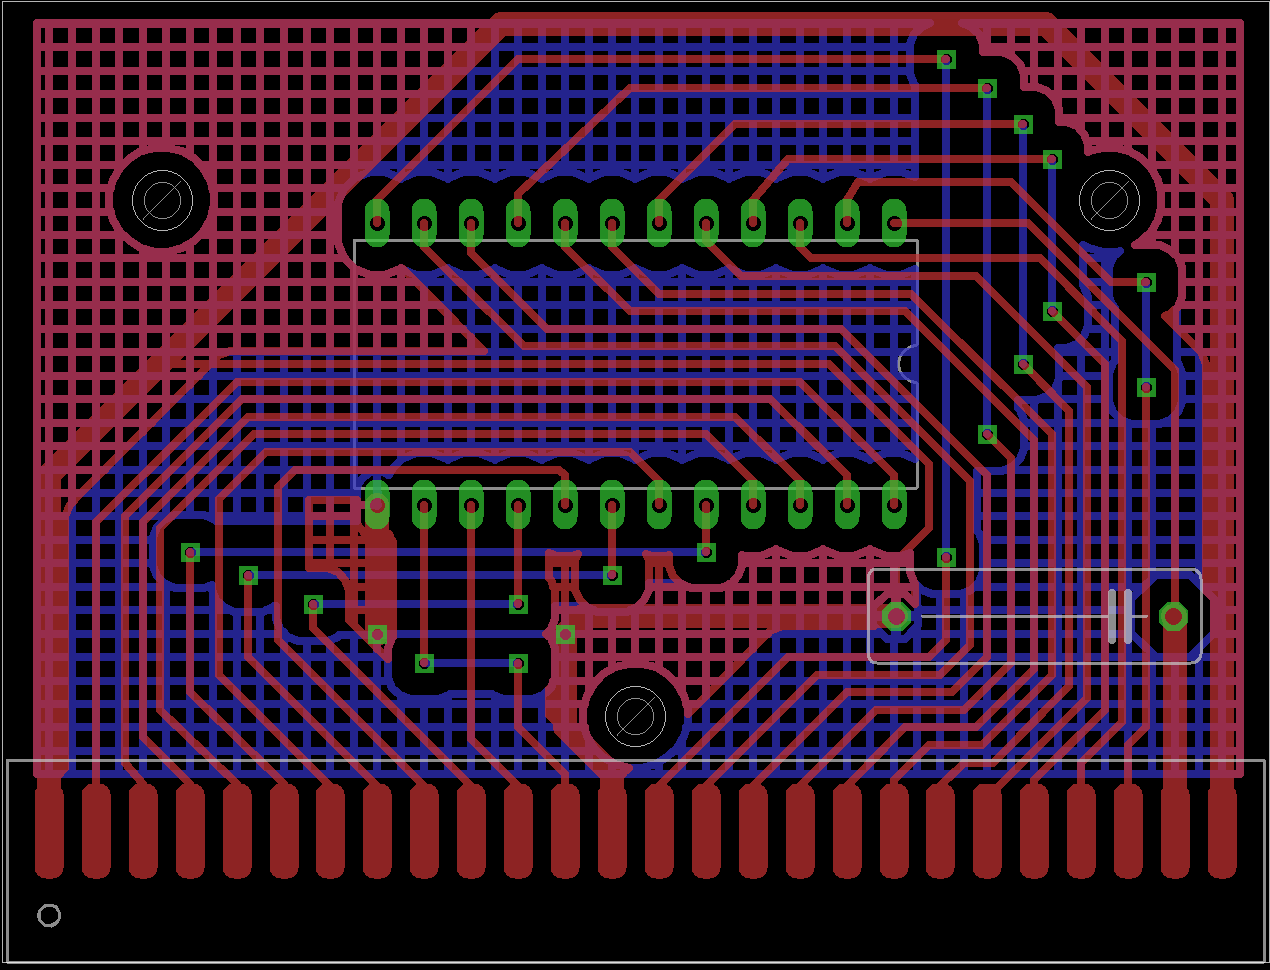
I designed a PCB for a Bally game cart which incorporates a socket for the EPROM using CadSoft Eagle. I etched the PCB at home using a laser printer and acid. Here are my etching notes.
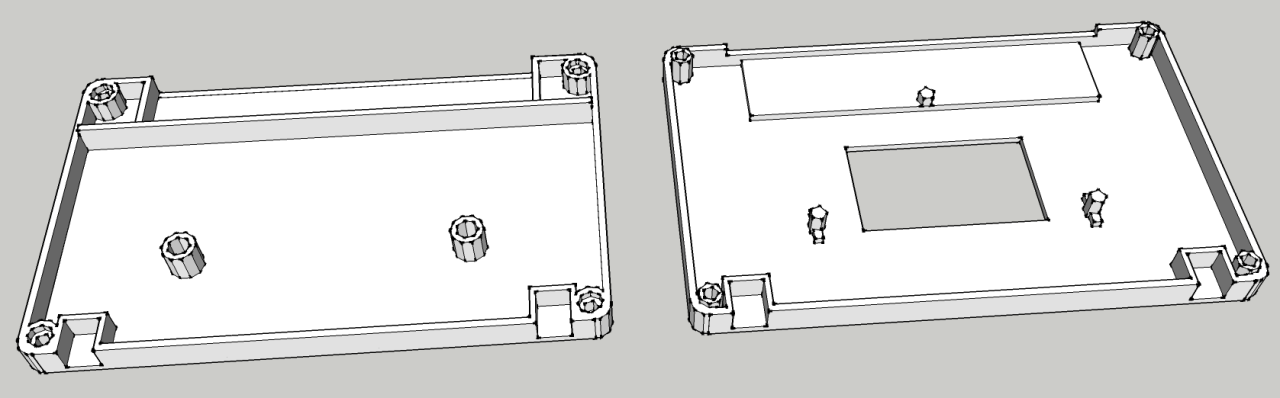
I downloaded a 3D print design for the Bally game cart shell from Thingiverse. I added a hole to the top of the cart to allow room for a socketed EPROM.
Here is the etched PCB with EPROM in the 3D printed cart. Of course, I can pop out the EPROM and replace it with a different game.
Playing Treasure Cove on my partially restored Bally Astrocade.
The graphics for the game cart used at the end of the tutorial video was created using Rachel Weil’s AstroPaint. In addition to creating new game carts, I repaired a couple of old game carts. I also created a BalCheck ROM for a Bally diagnostic utility that I plan on building. Next I’m going to try and upgrade the Bally’s main system ROM and possibly make a few modifications.
Downloads:
Eagle files for modified Bally game cart PCB (updated 10-16-2024).
EMP-20 Driver Update for Windows XP (untested)
Source code for Astrocade closing graphics.
STL and SketchUp files for modified Bally game cart shell (updated 10-16-2024).
Zmac cross assembler v.1.3 (Linux source, Pi build & Windows build)