
In this project I build a system to wirelessly track and prevent the theft of restroom keys using CircuitPython, nRF52840 Feathers and Bluetooth BLE beacons.
My office frequently hosts many guests. Restrooms are shared with other businesses on the floor and require a key to access which guests are given and quite often forget to return. We are not allowed to duplicate the keys and the landlord charges a fee when they go missing. Attaching a bigger key chain like a hubcap was frowned upon by management so I came up with a Bluetooth solution.
This project utilizes an Adafruit Feather nRF52840 Express board which I’ve used in several of my previous tutorials:
- CircuitPython nRF52840 & Pi Tutorial
- CircuitPython nRF52840 LCD Displays Tutorial
- CircuitPython nRF52840 ESP32 WiFi Tutorial
- CircuitPython BLE Client & Server Tutorial
- LiPo Charge Controller Repair Tutorial
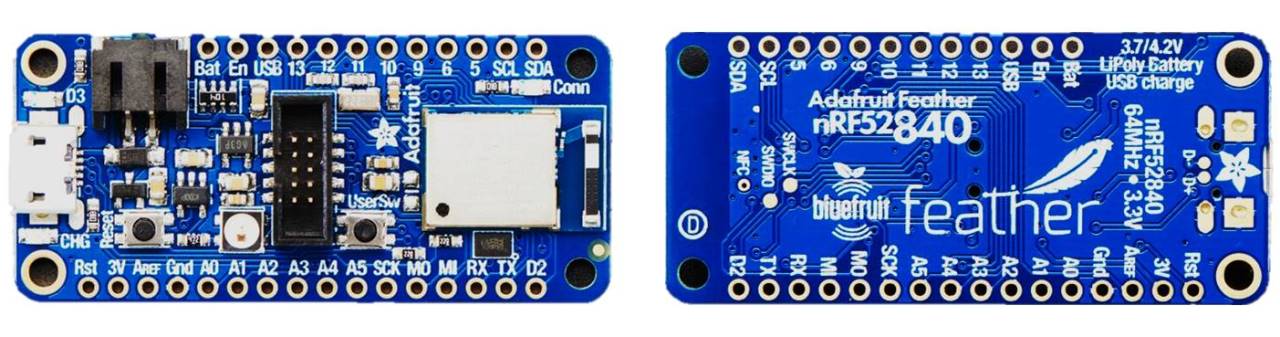
The Feather has many great features that this project will leverage such as:
- Support for Bluetooth Low Energy
- Built-in NeoPixel RGB LED
- I²S digital audio interface
- 21 GPIO pins
- Code can be written in CircuitPython
- Built-in LiPo battery port with charging circuit
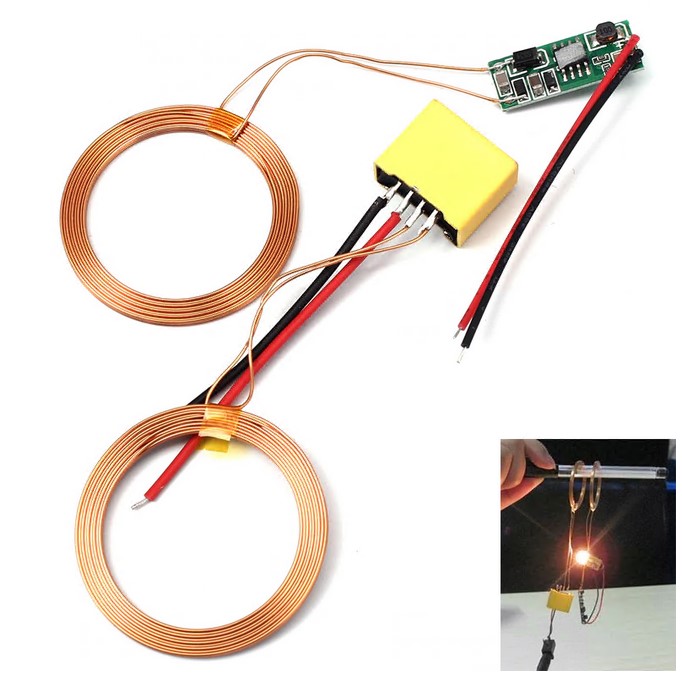
Since the key fob is powered by a rechargeable battery, one design challenge is to make the charging as user-friendly as possible. I didn’t want to have deal with wires or replacing batteries. Therefore, I designed a wireless charging system similar to what’s available for mobile phones and electric toothbrushes. Energy is transferred through inductive coupling. An alternating current is run through a coil in a cradle which creates a fluctuating magnetic field and thanks to Faraday’s law of induction this generates an alternating current in a secondary coil which will be inside the fob. I bought the coils on AliExpress. Adafruit also sells a similar charging set.
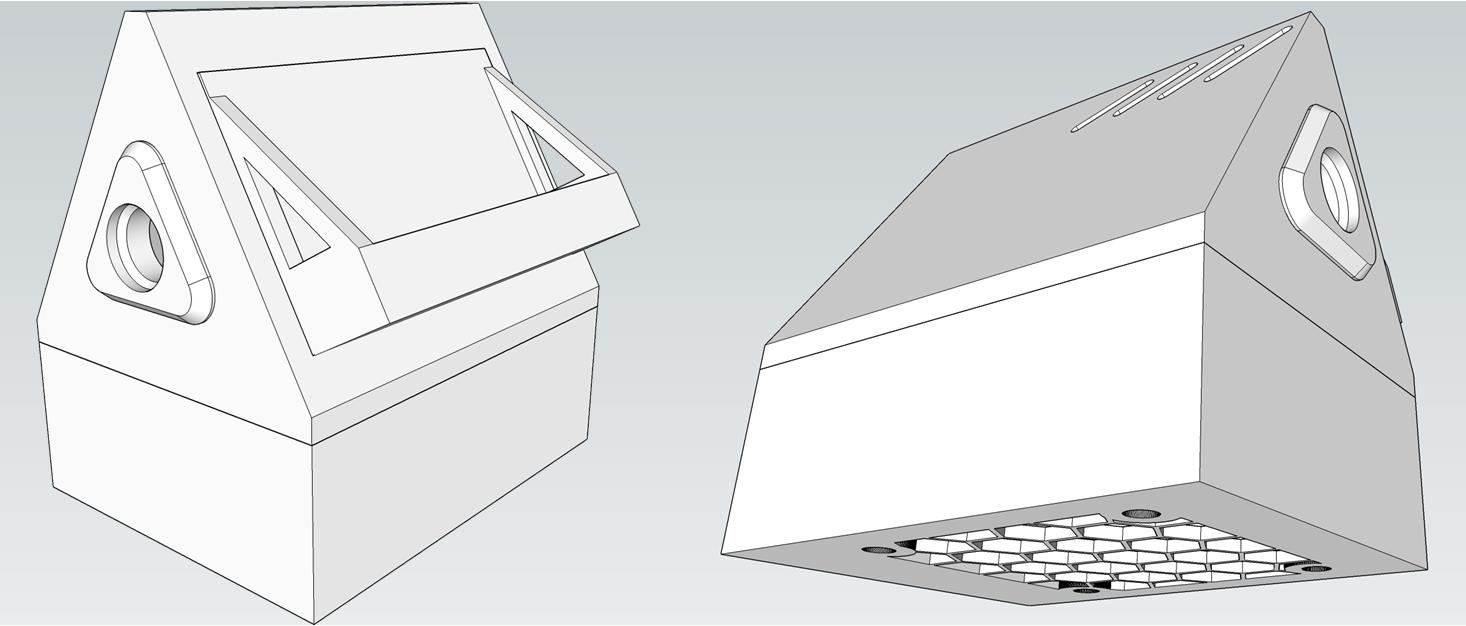
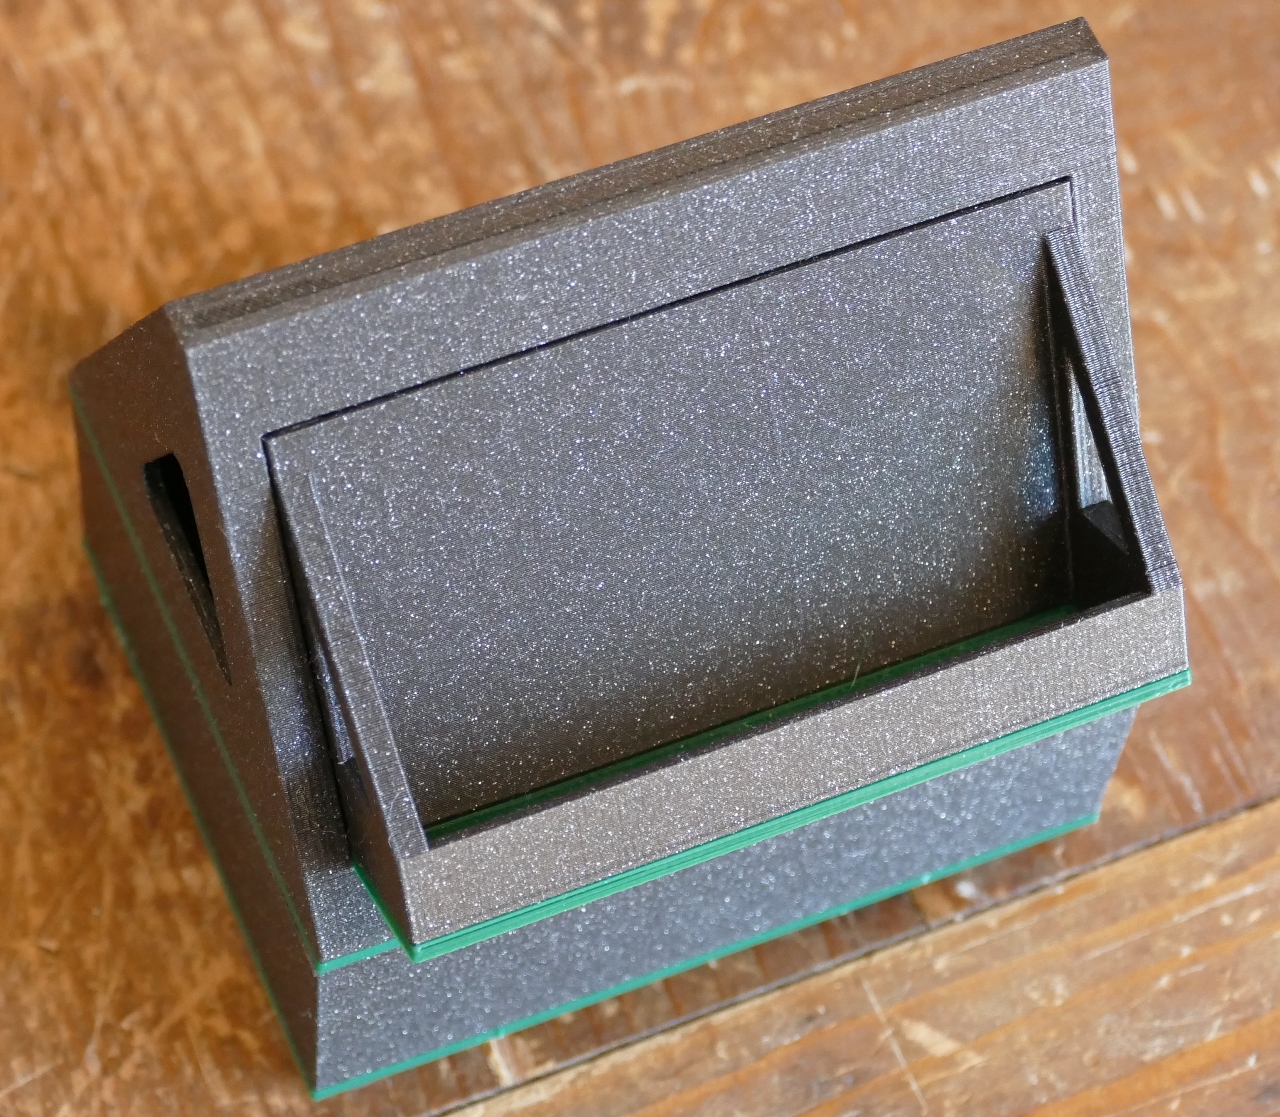
I designed a charging cradle in SketchUp.
I used a 2 color 3D print. The first few layers are green PLA and the rest is a black PLA with a bespeckled finish.
The front panel holds the fob. It covers the main prism shaped piece which holds the transmitting coil and a magnet designed to activate a reed switch.
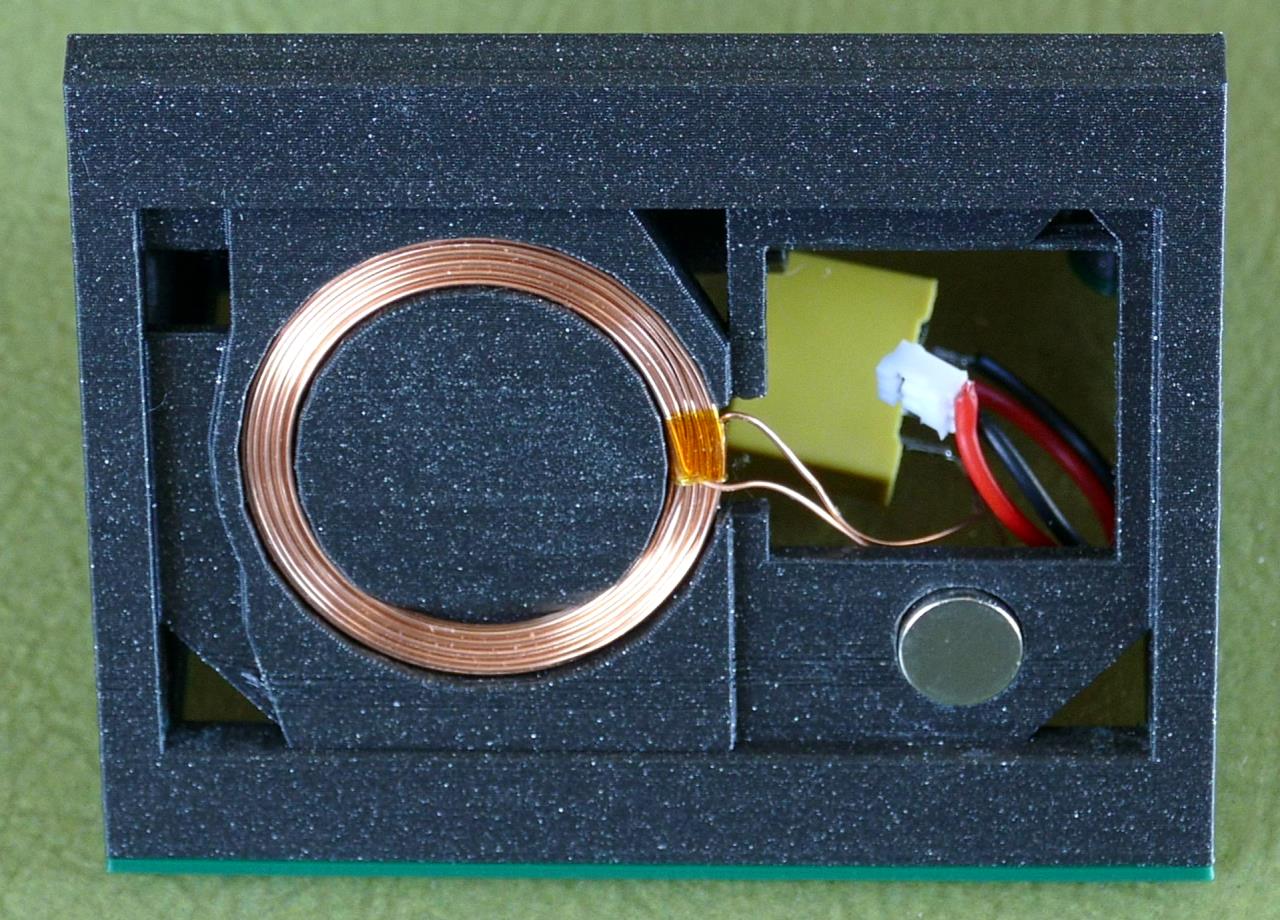
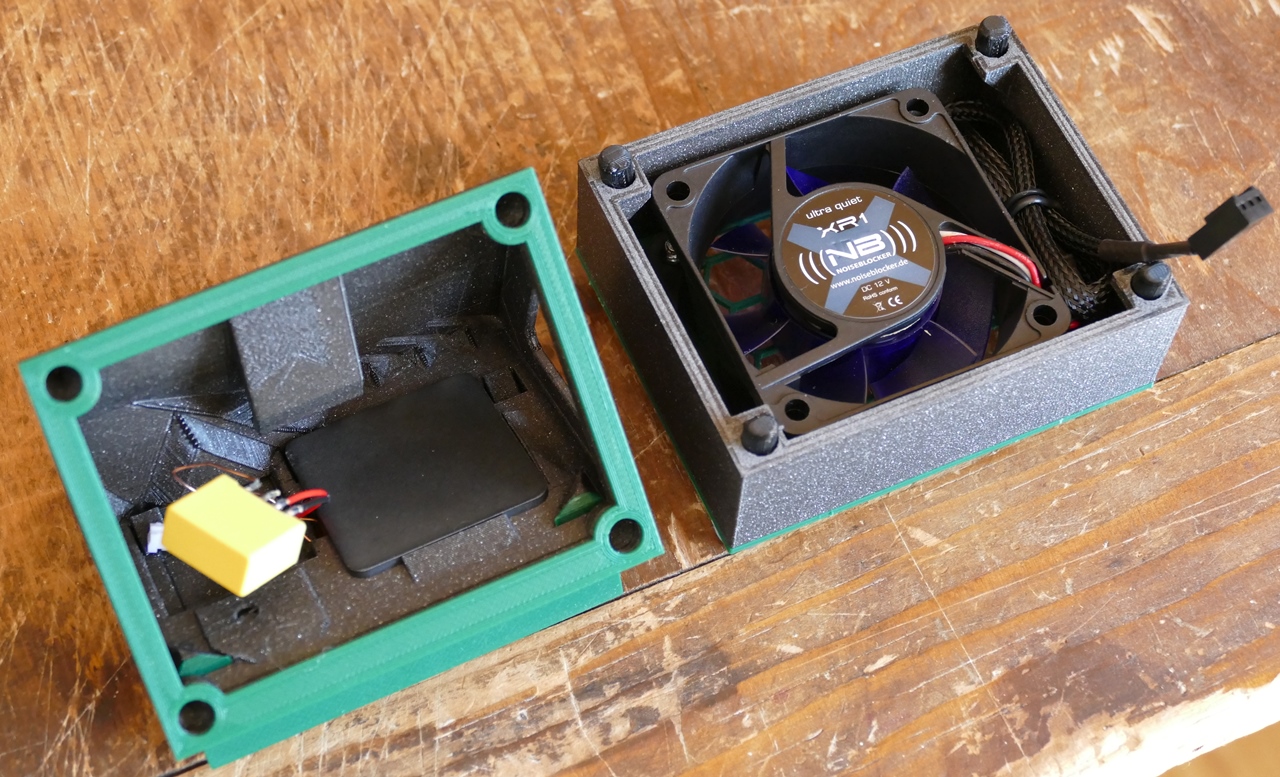
The charging coil generates heat which gets hot enough to deform the PLA. Therefore, the base of the cradle holds a quiet 60 mm fan which sucks air in from the vents on the bottom and blows it over a ferrite plate (38 mm x 38 mm x 2 mm) which is adhered behind the coil. Beside acting as a heatsink, the plate should also improve charging efficiency by concentrating and directing magnetic flux between the transmitter and receiver.
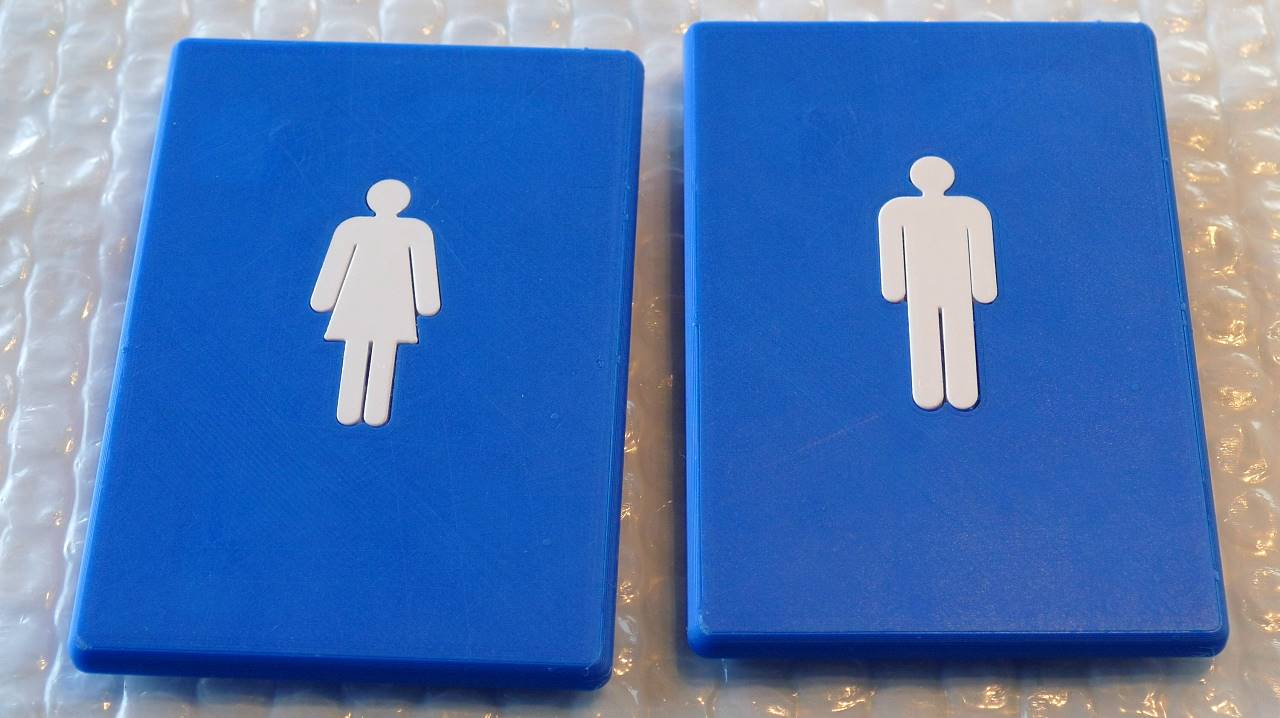
I designed a case in SketchUp for the fob.
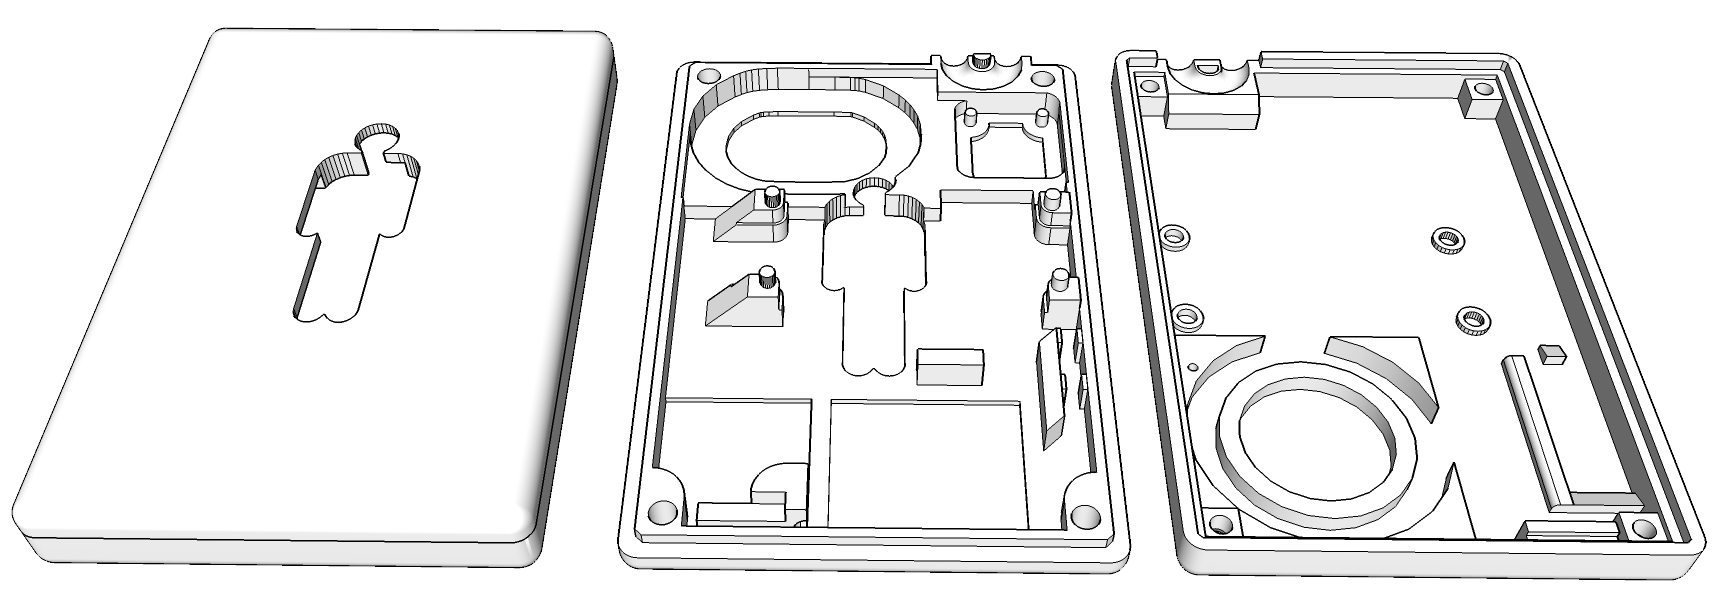
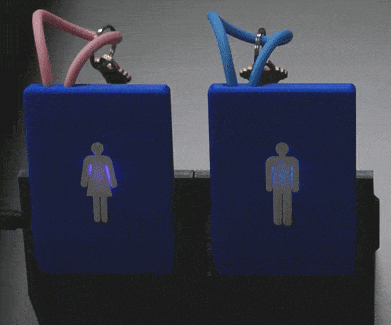
A gender cut out affords space for a translucent insert to be illuminated by the built-in NeoPixel of the nRF52840 board mounted to the underside of the cover. There are sections to hold all the other components. The 2 halves of the case snap together and are secured with 4 M2.5 screws. I 3D printed the top in blue PLA and the gender icons in white. The icons are glued in place with #16 fast setting clear acrylic cement which works great on PLA.
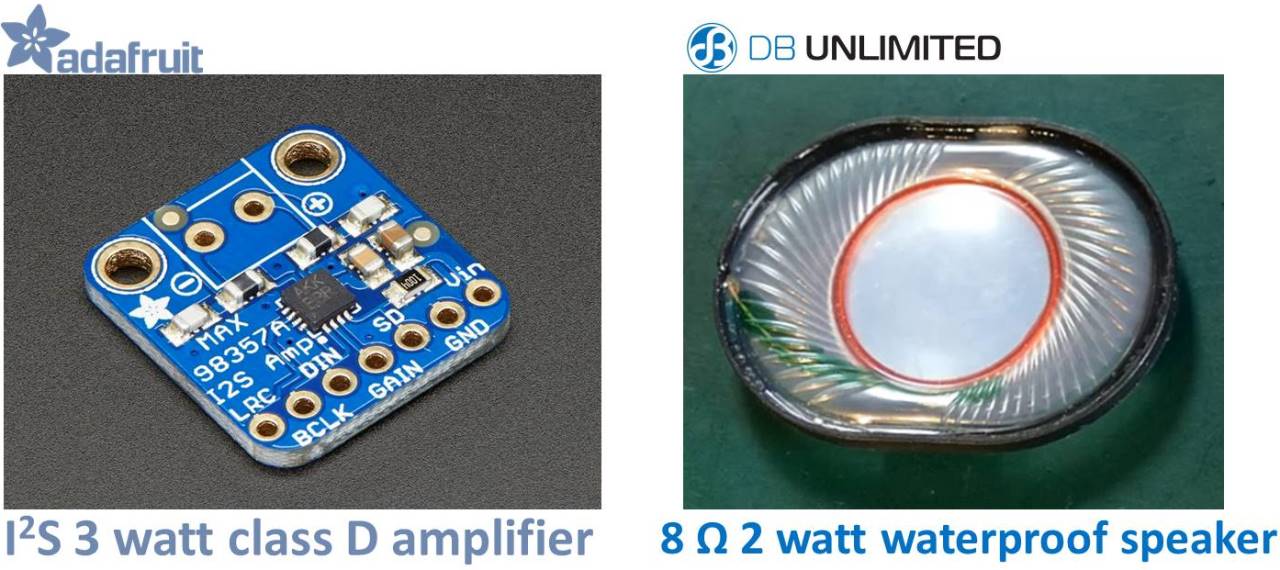
The fob plays a warning if it’s taken outside the vicinity of the office. An 8 Ω waterproof speaker plays the message. The speaker is driven by an Adafruit I²S 3 watt amplifier which uses the Max98357A. This allows the nRF52840 to output a fully digital sound protocol which the amp then translates directly to the speaker.
The positive and negative leads from the speaker are connected to the corresponding terminals on the amp. Connecting the amp to the Feather only requires a few wires. The grounds are connected. The RX receive pin is connected to LRC which is the left/right clock. TX transmit is connected to BCLK which is the bit clock input. GPIO 9 is connected to DIN which is the digital input signal. The gain pin is grounded via a 100K Ω resistor which gives the maximum 15 decibels of gain. GPIO 6 is connected to SD which is the shutdown pin. The battery pin is connected to the VIN pin.
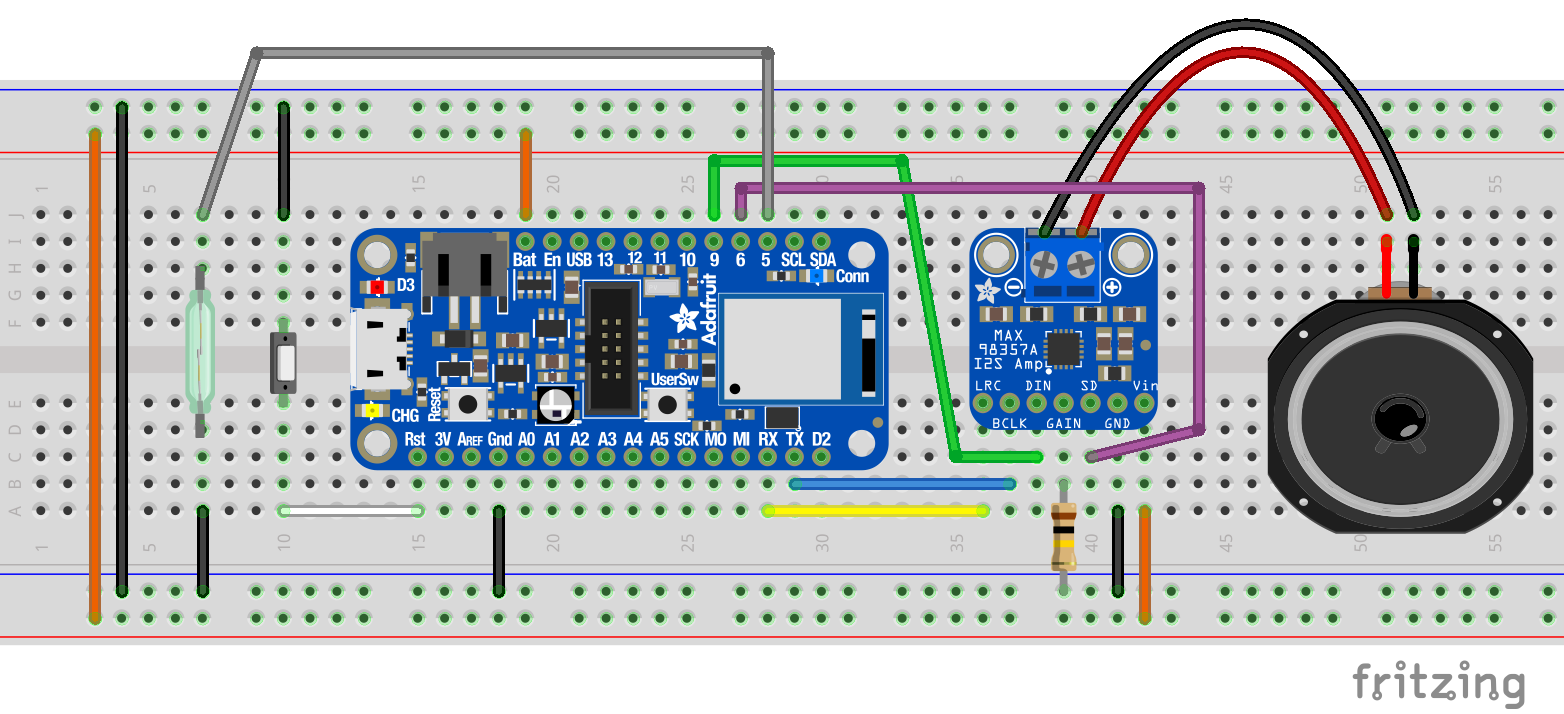
A magnetic reed switch determines if the fob is in the charging cradle. GPIO 5 is connected to one terminal of the reed switch. The other is connected to ground. A mechanical switch extends the built-in nRF52840 reset button. The RST pin is connected to one terminal of the switch and the other to ground. The wiring diagram above was created with Fritzing.
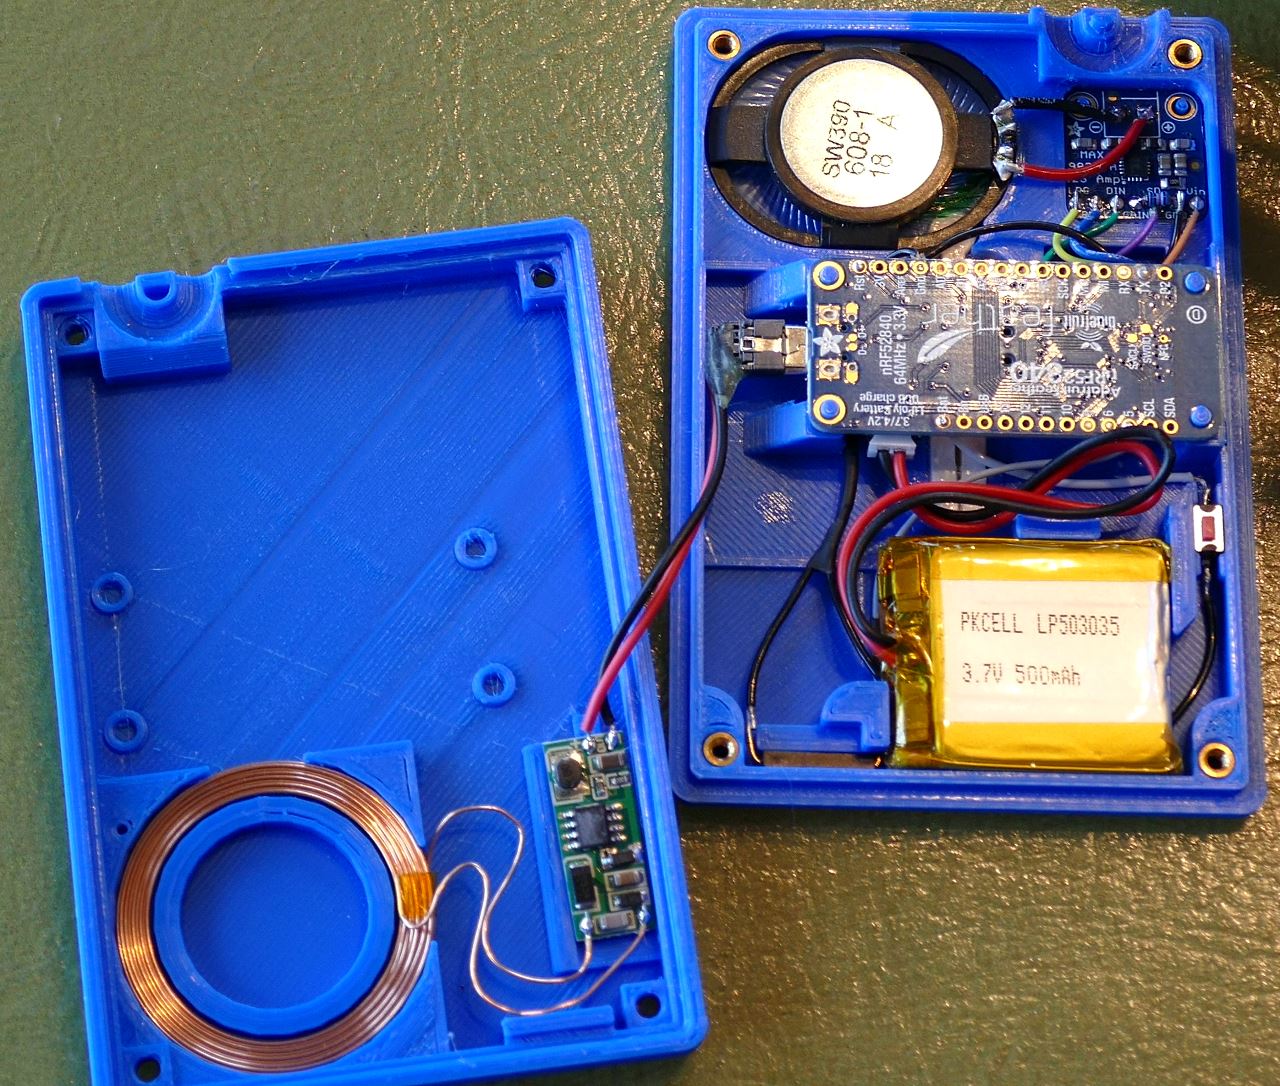
Here are all the components after soldering. I’m using 26 AWG wire with PTFE insulation for the data connections. I prefer the PTFE which is more commonly known as Teflon because the insulation is very resistant to heat so it does shrivel up during soldering. A thicker 20 AWG wire is used between the speaker and the amp. It’s best to keep the data wires between the Feather and the amp as short as possible.
The code for the fob requires several imports. BLE Radio is part of the CircuitPython bundle. It affords control of the nRF52840 BLE radio. The Adafruit LED Animation library is included in the bundle too. This helper library facilitates creating LED animations. AnalogiIn is used to read the Feather’s ADC pins. Array is imported to create arrays with typed elements. I2SOut exposes the I²S interface. RawSample and WaveFile play audio samples and recorded WAV files. DigitalInOut controls the GPIO pins. The NeoPixel library exposes the Feather’s built-in NeoPixel.
from adafruit_ble import BLERadio
from adafruit_led_animation.animation import Pulse, Solid
import adafruit_led_animation.color as color
from analogio import AnalogIn
from array import array
from audiobusio import I2SOut
from audiocore import RawSample, WaveFile
from board import BATTERY, D5, D6, D9, NEOPIXEL, RX, TX
from digitalio import DigitalInOut, Direction, Pull
from math import pi, sin
from neopixel import NeoPixel
from time import sleep
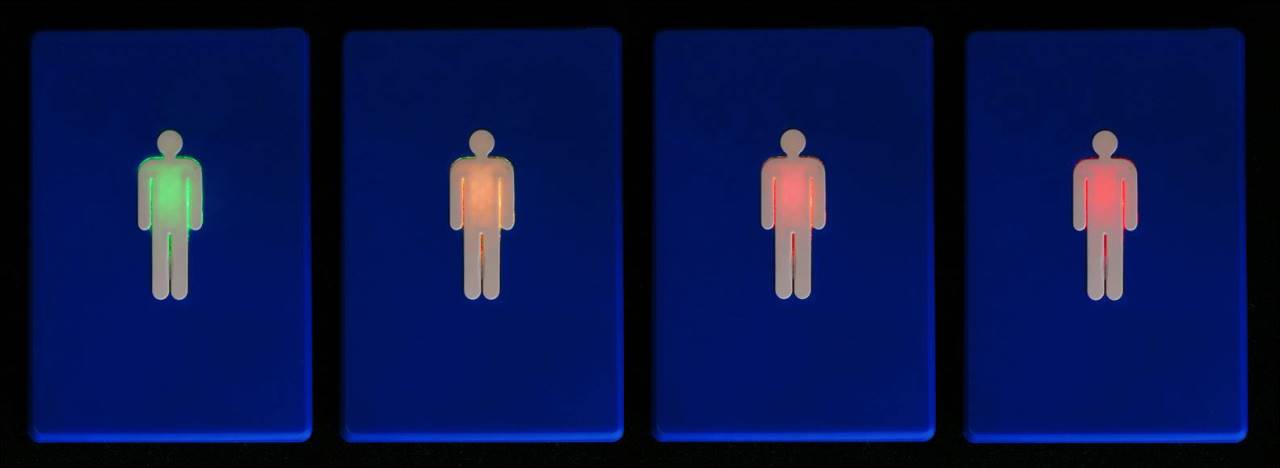
AnalogIn is used to track the current battery voltage. The BLE Radio is instantiated. Hit status is a list of colors which represents the number of beacons hit by the BLE scan. Red indicates no beacons found, orange is 1 beacon, amber is 2 beacons and green is all 3 beacons.
battery = AnalogIn(BATTERY)

ble = BLERadio()
hit_status = [color.RED, color.ORANGE, color.AMBER, color.GREEN]
The Feather’s built-in NeoPixel is instantiated. A pulse LED animation is defined. It will pulse a purplish pink for the female icon and cyan for the male icon. A solid LED animation is defined and the initial state is green. This really isn’t an animation because it just sets the NeoPixel to the specified color.
pixel = NeoPixel(NEOPIXEL, 1)
pulse = Pulse(pixel,
              speed=0.01,
              color=color.PURPLE,  # Use CYAN for Male Key
              period=3,
              min_intensity=0.0,
              max_intensity=0.5)

solid = Solid(pixel, color.GREEN)
The magnetic reed switch is defined and set to GPIO 5. When the switch is exposed to a magnetic field, the pin will be pulled low. The amp enable pin is defined and set to GPIO 6. It is an output and the initial state is set low to disable the amp.
reed_switch = DigitalInOut(D5)
reed_switch.direction = Direction.INPUT
reed_switch.pull = Pull.UP

amp_enable = DigitalInOut(D6)
amp_enable.direction = Direction.OUTPUT
amp_enable.value = Fals
A method called PlayTone is defined. It generates a loud warning tone. The length of the array is the sample rate divided by the frequency in Hertz. A sample is created using the RawSample method and passed the sine wave array. An I²S interface is implemented using the I2SOut method. The play method plays the sample. Loop equals true causes the sample to repeat indefinitely. A 1 second sleep, plays the sample for 1 second. Then stop cancels playback. Deinit is used to dispose of the sample and the interface.
def play_tone():
    """Generate tone and transmit to I2S amp."""
    length = 4000 // 440
    sine_wave = array("H", [0] * length)
    for i in range(length):
        sine_wave[i] = int(sin(pi * 2 * i / 18) * (2 ** 15) + 2 ** 15)

    sample = RawSample(sine_wave, sample_rate=8000)
    i2s = I2SOut(TX, RX, D9)
    i2s.play(sample, loop=True)
    sleep(1)
    i2s.stop()
    sample.deinit()
    i2s.deinit()
A method called PlayMessage is defined. It will play a recorded WAV audio file. A WAV file called D1 is loaded. The WaveFile method instantiates the loaded WAV file. An I²S interface is implemented. The play method plays the WAV file. A while loop suspends the program until the playback completes. Again deinit cleans up.
def play_message():
    """Play recorded WAV message and transmit to I2S amp."""
    with open("d1.wav", "rb") as file:
        wave = WaveFile(file)
        i2s = I2SOut(TX, RX, D9)
        i2s.play(wave)
        while i2s.playing:
            pass
        wave.deinit()
        i2s.deinit()
Boundary_violations tracks the amount of time that a fob resides outside the range of the BLE beacons. The main program loop is an infinite while. A high reed switch indicates the fob is not docked in the charging cradle. Hits tracks how many BLE beacons are within range.
boundary_violations = 0

while True:
    if reed_switch.value:  # Not Docked
        hits = 0
Each BLE beacon broadcasts a unique name assigned by the manufacturer. A free BLE app called nRF connect (Android & iPhone) can be used to find the beacons and their associated names. The unique name is referred to as the Complete Local Name.
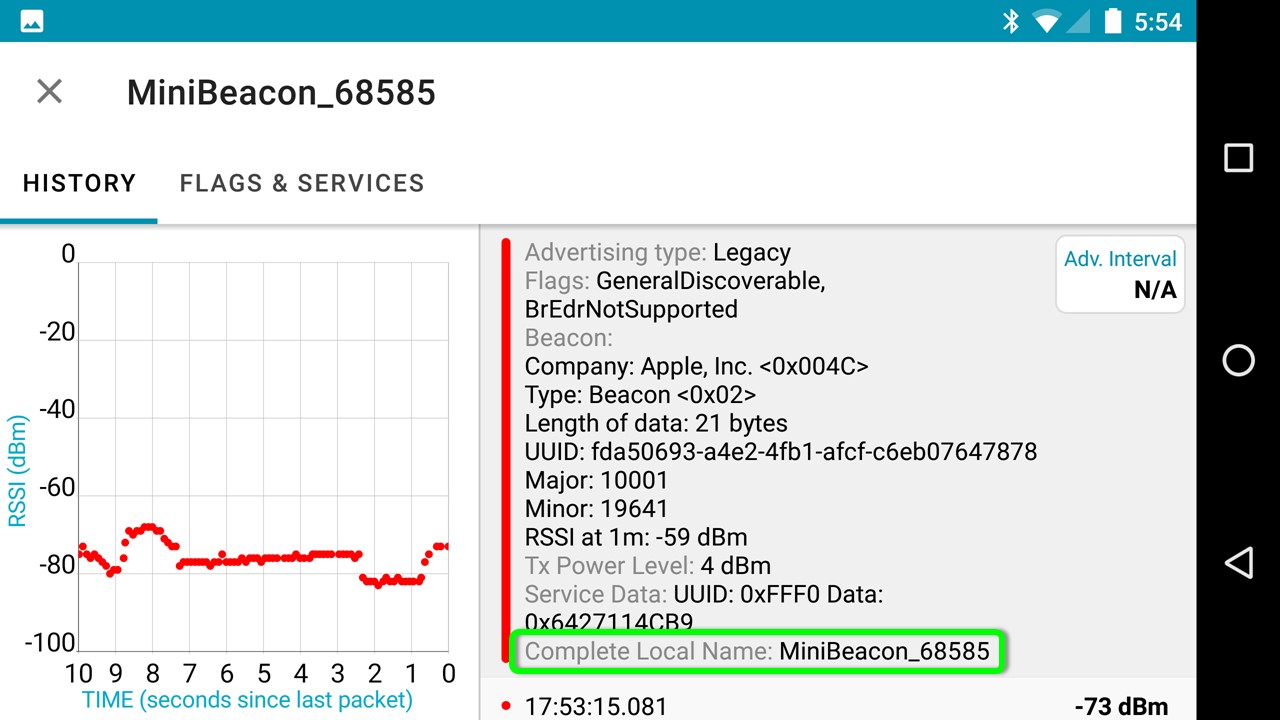
The BLE commands are wrapped in a try statement to catch errors. Advertisements stores the results of a BLE scan. Timeout limits the scan to 3 seconds. BLE devices transmit advertisements so they can be identified by other BLE devices. A for loop processes all detected Bluetooth BLE advertisements. Addr holds the advertisement address details. The BLE beacons will show up as a scan response with a type of random static. All other advertisements can be ignored. If the name matches the Complete Local Name of the first beacon then the hits variable is or’d by 1. Bitwise operations are used instead of incrementing a counter because the BLE scan often returns duplicate advertisements which would result in an incorrect beacon count. If the 2nd or 3rd beacon is detected then the corresponding digit of the hits variable is or’d. Any errors are printed to the console.
try:
    advertisements = ble.start_scan(timeout=3)
    for advertisement in advertisements:
        addr = advertisement.address
        if (advertisement.scan_response and
            addr.type == addr.RANDOM_STATIC):
            if advertisement.complete_name == 'MiniBeacon_58568':
                hits |= 0b001
            elif advertisement.complete_name == 'MiniBeacon_58569':
                hits |= 0b010
            elif advertisement.complete_name == 'MiniBeacon_58570':
                hits |= 0b100
except Exception as e:
    print(repr(e))
The actual beacon hit count is determined by using list comprehension to add up the flipped bits of the hits byte. The corresponding color is then set using the hit status list indexed color. Solid animate displays the color on the NeoPixel. The LED color warns the user as the FOB strays from proximity to the office.
hit_count = len([ones for ones in bin(hits) if ones == '1'])
solid.color = hit_status[hit_count]
solid.animate()
sleep(1)
If the hit count is zero then the fob has been taken out of range of all the beacons. The remainder of boundary violations divided by 60 will issue the audible alarm every 60 cycles. Each BLE scan takes more than a second. So, the alarm fires every few minutes. The I²S amp is enabled. The programs sleeps for a second. The warning tone is played. Another 1 second sleep then the WAV file message is played. After 1 second pause and the amp is disabled. Boundary violations is incremented. If at least 1 beacon is hit then the boundary violations is reset to zero.
if hit_count == 0:
    if boundary_violations % 60 == 0:  # Play message every 60 cycles
        amp_enable.value = True
        sleep(1)
        play_tone()
        sleep(1)
        play_message()
        sleep(1)
        amp_enable.value = False
    boundary_violations += 1
else:
    boundary_violations = 0
If the fob is docked in the cradle then none of the BLE code above needs to run. Instead the boundary violations is reset. The battery voltage is retrieved using the battery.value to poll the board’s ADC pin. The ADC value is multiplied by the reference voltage of 3.3 volts and divided by the ADC resolution. This converts the ADC value to the actual voltage which still needs to multiplied by 2 because there is a voltage divider on the battery ADC pin. The fully charged voltage of the LiPo battery can exceed 4 volts which is greater than the ADC’s maximum rating. A voltage divider scales the voltage to an acceptable range. If the voltage is less than the nominal LiPo battery voltage of 3.7 volts than the NeoPixel pulse period is reduced to 1 second to speed up the flashing.
else:  # Docked
    boundary_violations = 0
    voltage = battery.value * 3.3 / 65535 * 2
    if voltage < 3.7:
        pulse.period = 1  # Speed up pulse for low battery
    else:
        pulse.period = 3
    pulse.animate()
When in the cradle, a fast pulsing LED indicates a possible battery failure. Otherwise a slower 3 second pulse indicates a healthy battery. Key rings on silicone bangles are attached through the 2 top holes on the cases.
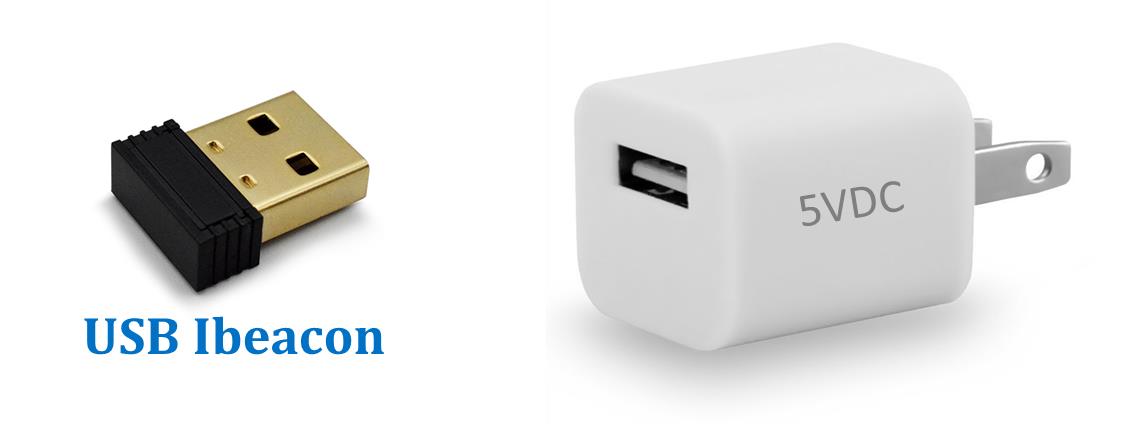
Ibeacons are used to determine if the fob’s have been removed from the office suite. I chose USB Ibeacons to obviate battery replacement. The beacons can be plugged into a common 5V USB phone charger.
The office suite encompasses 3 of the public restrooms’ walls. I placed a beacon inside our suite on each of the shared walls.
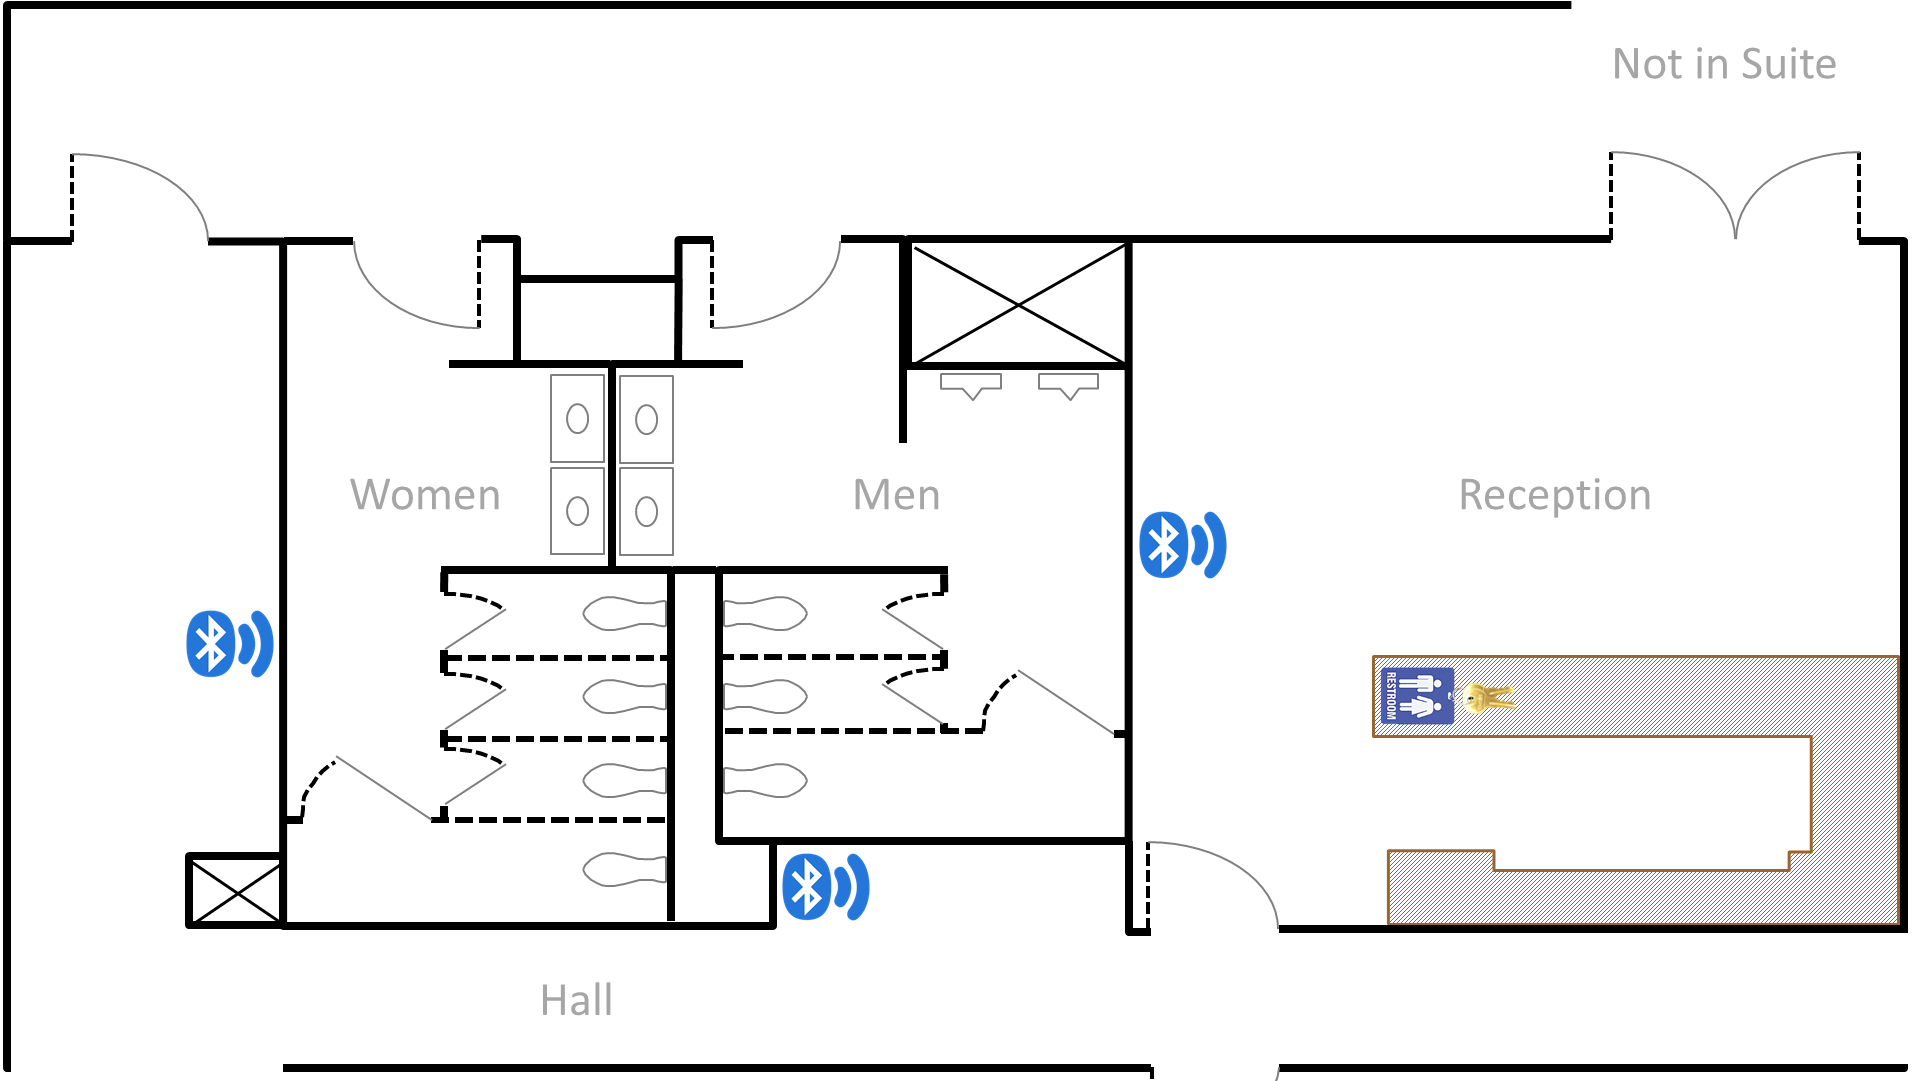
One of the walls is in our reception lobby where we keep the keys. Therefore, the fobs stay in range of the beacons while carried to the restrooms but if a guest wanders off the fob icon will change colors. Green indicates 3 beacons in range, yellow equals 2 beacons, orange equals 1 beacon. Red indicates out of range of all beacons.
Once out of range, the fob will play a warning tone and the following message.
 UPDATE: the 4 key fobs have been running in my office for 2.5 years. They have been working perfectly and I’ve never had to reset one. I did end up replacing the DB 67 waterproof speakers with DB Unlimited SW380408-1 speakers which fit without any modifications. The original speaker solder points all broke from people dropping the fobs on the hard marble floors of the bathroom. I also added some hot glue within to reinforce the PLA.
Downloads:
- Restroom Key Tracking Code (07-11-2020)
- SketchUp & STL Files for Fob & Cradle (07-11-2020)
- 3D Printing Notes (07-11-2020)
Parts List
| Description | Part # | Vendor |
|---|---|---|
| Adafruit Feather nRF52840 Express | 4062 | Adafruit |
| Adafruit I2S 3W Class D Amplifier Breakout - MAX98357A | 3006 | Adafruit |
| Lithium Ion Polymer Battery - 3.7 V 500 mAh | 1578 | Adafruit |
| Inductive Charging Set - 5 V @ 500 mA max | 1407 | Adafruit |
| DB 67 Series Waterproof Speaker 8 Ohms 1.5 W | SW390608-1 | Digikey |
| 60 mm 1600 RPM 11 dba Fan | B00WVTEEWS | Amazon |
| USB Ibeacon BLE 4.0 Module | 32818225158 | Ali Express |
| M2.5-0.4 Threaded Heat Set Inserts for 3D Printing (50 pack) | B077CH3GCM | Amazon |
| M2.5 x 10 mm Stainless Steel Hex Head Screws (100 pack) | B00NQ8GHUU | Amazon |
| Reed Switch 14mm Plastic Anti-Interference Normally Open (15 pack) | B07WQVLRQC | Amazon |
| 10 X 4 mm N35 Magnets (40 pack) | B07VXCNNVL | Amazon |
| Mix Color Silicone Bangle Key Ring Wrist Keychains (20 pack) | B07M99S7MF | Amazon |
| Micro USB Male Type B, 5 Pin Solder Plug (10 pack) | B00OK8ELNA | Amazon |
| DC Power Jack 5.5 mm x 2.1 mm (15 pack) | B07KY7DTQ6 | Amazon |
| Adhesive Rubber Bumpers 12 mm x 7.5 mm (40 pack) | B017WFQQLC | Amazon |
| 9 V 2 A UL Certified DC Power Supply | B07ZPJBT6W | Amazon |
| Description | Part # | Vendor |
|---|---|---|
| Epoxy Mid-cure 4.5 oz | B0166FFFJ8 | Amazon |
| SCIGRIP 16 10315 Acrylic Cement | B003HNFLMY | Amazon |
| eSun Cool White PLA Filament 1.75 mm | B01EKEMFQS | Amazon |
| eSun Pine Green PLA Filament 1.75 mm | B01EKEMGUS | Amazon |
| 3D Solutech Real Blue PLA Filament 1.75 mm | B00ME7A1II | Amazon |
| AIO Robotics Solid Black PETG Filament 1.75 mm | B0794Q8Q51 | Amazon |
| Prusament Galaxy Black PLA Filament 1.75 mm | B0794Q8Q51 | Amazon |
| Teflon Wire 20 and 24 AWG | M22759/16-(20 & 24) | Pro Wire USA |